
This is a guide to setup and use the quick cook editor scripting widget.
The widget automates repetitive cooking, copying, paking and starting the game to load a specific level. Also supports separate profiles for maps or mods. 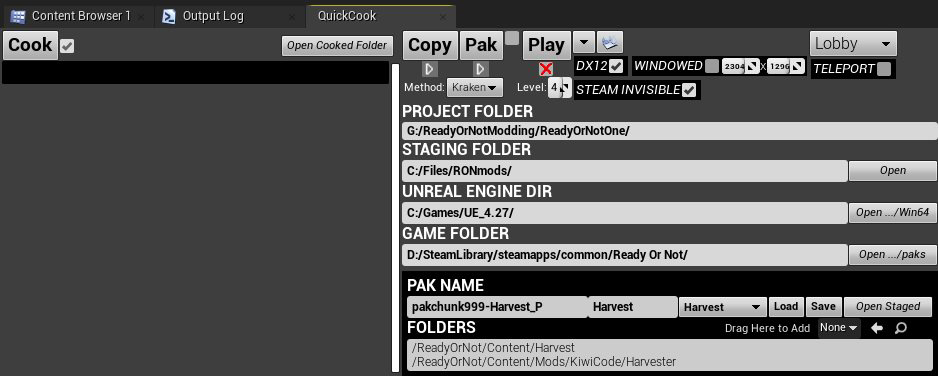
Quick Cook Setup:
- Download the .zip containing the widget and python dependencies.
- Extract the .zip contents into your UE4 Project’s content folder so that you have two sub folders as shown;
.../Content/QuickCook.../Content/Python
- Restart UE4 if it was open to ensure the new python modules are available.
In UE4; Navigate to
/Content/QuickCook/in the content browser. Then right-click"QuickCook"and select"Run Editor Utility Widget"
![]()
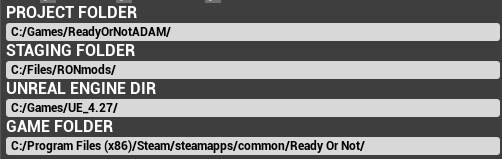
- Fill out the configuration to match your setup for:
- Project Folder: Should be your covered bones folder etc containing the
.uproject - Staging Folder: Should be the parent of the after-cooking copy folder which you use with UnrealPak.exe to create .paks.
This should be the parent folder of your pakchunk99-YOURMOD folder etc.
- Unreal Engine Dir: Should be where your engine files for UE 4.27 are located.
- Game Folder: Should be the top directory of your Ready Or Not game installation.
- Project Folder: Should be your covered bones folder etc containing the

 {: .left }
This configuration will be saved and loaded automatically to your UE4 Project’s directory at;
...\Saved\QuickCook\QuickCook.cfg
You should add
/Content/QuickCook/to your “Directories to never cook” in your project settings.
Quick Cook Usage:
This widget doesn’t modify or bypass your project’s “Directories to never cook” or “List of maps to include in a packaged build”
Therefore, please ensure you have manually cooked, named your staged mod folder and paked it successfully before using this tool.
Profiles:
- Open your map.
- Opening a map will try to load a profile with matching name.
- To create your own, under “PAK NAME” enter your staging folder name (i.e. your pak name without .pak)
- In the right field enter your map name exactly as seen in the top-left tab or content browser.
- Press the
Savebutton.Profiles are saved as .ini files in the project’s
...\Saved\QuickCook\
![]()
- Add the folders you wish to be synced when pressing the
Copybutton from...\Saved\Cooked\to the profile’s folder within “Staging Folder”
Although you can’t drag folders from the content browser, you CAN drag an asset within on to theNonenext to “Drag Here to Add” to quickly add their parent folder.![]()
- Press
Save


Folders are copied relative to
.../Saved/Cooked/WindowsNoEditor/to allow copying Engine content if needed.
The popular pak.bat includes/ReadyOrNot/which these tools wont work with.
To modify an existing staged folder simply make sure your cooked copy of/Content/is inside a/ReadyOrNot/folder.
Eg;.../pakchunk99-YOURMOD/ReadyOrNot/Content/
To modify yourpak.batsimply replace"../../../ReadyOrNot/"with"../../../"
The Copy Button uses the dirsync python command
sync
This syncs folders one way and only if files have changed data rather than by date to increase speed.
Usage Notes:
- For
Playto work correctly ensure QuickMap is installed and configured. - Check box state and game mode selection state is saved to config, not profile.
![]()
![]() Check boxes below Copy, Pak and Play allow the tool to continue after the button to the left has finished it’s action.
Check boxes below Copy, Pak and Play allow the tool to continue after the button to the left has finished it’s action.
This let’s you in one click, press cook, then (after some time) automatically spawn in your level in game with a chosen gamemode.- Freemode skips the 10 second game countdown and disables AI. No loadouts are loaded.
- Teleport requires a
/QuickCook/QuickTeleportblueprint placed in your level. If ticked, it will move your player in Freemode to your UE4 viewport camera’s location - Windowed requires a
/QuickCook/QuickTeleportblueprint placed in your level. If ticked, it will runr.SetReswith the selected options

 Check boxes below Copy, Pak and Play allow the tool to continue after the button to the left has finished it’s action.
QuickMap Setup
Quickmap is an empty level that can be loaded before the game’s MainMenu level to enable extra game launch parameter options such as level loading.
- Download the
pakchunk99-QuickLoad.pakfrom here or Nexus Mods or mod.io - If in a .zip, extract it, then copy it your game’s pak folder like any other mod.
/Ready Or Not/ReadyOrNot/Content/Paks/ - Open
%localappdata%\ReadyOrNot\Saved\Config\Windows\Engine.ini[UE5] This is now \Windows\ instead of 4.27 \WindowsNoEditor\
- Add an empty line then add this override;
1
2
[/Script/EngineSettings.GameMapsSettings]
GameDefaultMap=/Game/QuickCook/QuickMap.QuickMap
- Save the
Engine.ini
Be sure to remove this line, or update QuickLoad after a major update if the MainMenu level name changes.