
Map Modding
This version of the mapping guide is outdated since the release of 1.0. For an updated guide and download please check out Getting Started with Ready or Not Mapping
Special thanks to:
ACowBoyBishop#7664 and Vegriv#8646 for testing and help! Thanks to matthew9324#3567 for C++ help and RoN Dev Zack Bower#0466 for FMOD integration.
Guide written by The Real Sourc3#7480.
If you need help don’t hesitate to visit the RoN Custom Maps Discord and tag me :) I heavily advise to watch the videos related to the newest Covered Bones template on Nexus.
Folder Structure
Folder structure in UE4 4.27.2 needs to be as shown under to work. Content is the base folder your UE4 projects starts from.
YourProjectName is only a placeholder for what you name your project when you make it in the New Project menu in Epic’s UE4 Launcher. The project name for the Meth house map for example is listed as RoN_Meth.
To make a map you should start by downloading the newly updated Covered Bones Mapping template from Nexus
It includes all the C++ files and Folder Structs like listed below and should provide you with a strong basis to start map modding.
The Folder struct below is only the nessescary files required for the map to work (using all features) but the Covered Bones includes more files for conveniency. To distinguish the old Bare Bones from the new updated template, it’s now called Covered Bones.
1
2
3
4
5
6
7
8
9
10
11
12
13
14
15
16
17
18
19
20
21
22
23
24
25
26
27
28
29
30
31
32
33
34
35
36
37
38
39
40
41
42
43
44
45
46
47
48
49
50
51
52
53
54
55
56
57
58
59
60
61
62
63
64
65
66
67
68
69
70
71
72
73
74
75
76
77
78
Content
    BlueprintSpawners
      BP_Door.uasset
      bp_door_reap.uasset
      CustomGameModeOverride.uasset
      BP_GameModeOverride.uasset
      BombSpawner.uasset
      BP_SpawnEvidence.uasset
      BP_SpawnActor.uasset
      BP_SpawnSelectedActor.uasset
    Blueprints
      DataTables
        DoorDataTable.uasset
        DoorType.uasset
        TrapDataTable.uasset
        AI_DataTable.uasset
        AI_DataTable_V3.uasset
        AI
          AI_DataTable_Club.uasset
          AI_DataTable_DataCenter.uasset
          AI_DataTable_Dealer.uasset
          AI_DataTable_Farm.uasset
          AI_DataTable_Gas.uasset
          AI_DataTable_Hospital.uasset
          AI_DataTable_Hotel.uasset
          AI_DataTable_Importer.uasset
          AI_DataTable_Meth.uasset
          AI_DataTable_Penthouse.uasset
          AI_DataTable_Port.uasset
          AI_DataTable_Ridgeline.uasset
          AI_DataTable_Valley.uasset
      Environment
        BP_Door_New.uasset
        IncapacitatedHuman.uasset
      Gameplay
        COOP
          BP_BombActor.uasset
          COOPModes
            GM_COOP_ActiveShooter
            GM_COOP_BarricadedSuspects
            GM_COOP_BombThreat
            GM_COOP_HostageRescue
            GM_COOP_Raid
      Games
        GM_COOP.uasset
      Logic
        MethLogic
          BP_Evidence_Meth_Contraband.uasset
          BP_Evidence_Meth_Contraband_2.uasset
        PortLogic
          BP_Evidence_Port_Dossier.uasset
        RidgelineLogic
          BP_Evidence_Ridgeline_Ricin.uasset
        ValleyLogic
          BP_Evidence_Valley_HardDrive.uasset
          BP_Evidence_Valley_HardDrive_02.uasset
          BP_Evidence_Valley_Laptop.uasset
      Sound
        Unused
          ModMusic_BP.uasset
          ModSound_BP.uasset
      E_WorldGenType.uasset

    FMOD
     // Sound banks and events located here
    Mods
        YourProjectName (CoveredBones)
          Levels
            // To make your level appear mod main menu place it here:
            YourMapName.umap
            YourMapName_BuildData.uasset
            MoreDoor.umap
            MoreDoor_BuildData.uasset
        // Custom models, materials and textures are placed here in sorted folders.
    ReadyOrNot
      Data
       // Misc useful data items are located here
Project Settings
Project settings are important when making maps. They tell the engine how to interact with the assets and how they are cooked. When making maps you will need to change some of these to fit what content you want to include in your map. Some of the stuff are not optional. They will break certain elements of your game if they’re cooked. Don’t worry though - it’s nothing permanent.
Go to the top to Settings drop down button and pick Project Settings (2nd from the top).
Navigate to Packaging and scroll down to Ini Section Blacklist - there will be a tiny bar with an arrow on it to expand the menu further. Click on it and scroll down to Directories To Never Cook and add 2 array elements. Edit them with the 3 dots to this:

The Folders in the Bare Bones Template that need this treatment are:
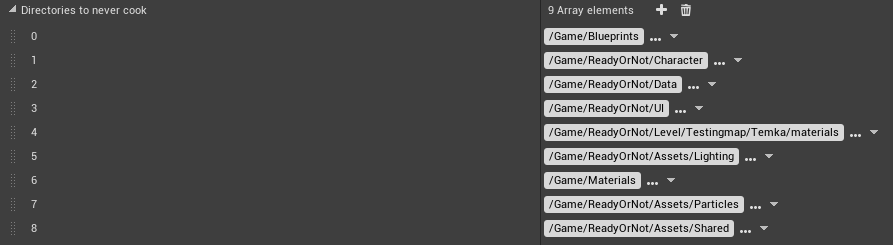
(!! Ignore the /Game/Materials and /Game/ReadyOrNot/Assets/Shared if they’re not there !!)
For custom materials to work we need to edit some Packaging settings that can be found in Project Settings.
Look for the tick box called Share Material Shader Code and make sure it is NOT ticked. It should be ticked off in the BB template by default.
You’re then free to use all kinds of materials with both translucency and emissive properties without the need of instancing game master materials, making Quixel and Megascans importing a lot more user friendly.
GameModes
Blueprints must be constructed manually as no blueprints can be imported from the base game.
With the Bare Bones project the gamemode blueprint will be called GM_COOP.
If you don’t have one, create an empty GameMode from the GameMode base class and rename it, then place it in the corresponding folder structure listed above.
GameMode Override:
At the top of your editor screen you will find the Blueprints tab, where you can edit Asset Blueprints and World Blueprints.
In order for your game to work you must override the default gamemode and pick World Override: and pick the GM_COOP gamemode blueprint class.
I have added a new way to set the gamemode as by default the game comes with Barricaded Suspects and Raid as the only available game modes. This tool is found in BlueprintSpawners and is called GameModeOverride. It does what it says - override the gamemode - and thus that gamemode will be the only gamemode for the level, despite what it says on the map in the lobby. This asset is dragged out somewhere in your level (doesn’t matter where) and you select your intended game mode and provide the literal map name as it appears top left on the tab in the editor. If you want the game to be Bomb Threat you should also add up to 2 BombSpawner.uassets in your level that spawns vanilla game defusable bombs in the level.
World Geometry:
If you make a new level instead of using the template’s included test map, just note that the standard level of UE4 includes a floor which is a static mesh. This will usually not show up in-game and you’ll fall through the world upon launch.
If you want static / physics meshes in your world you must either reference base game meshes under the ReadyOrNot folder or provide your own in the correct folders.
For prototyping or if you don’t have access to a lot of high poly assets it can be desirable to use BSP brushes. These are usually just convex hull geometry that you can piece together. You can actually make most of your map with this, then add models to enhance the level afterwards. I included some basic materials too to get you going.
To make a walkable floor you have to use the Place Actor menu’s Geometry tab and choose the Box primitive.
Use the right side menu to adjust the size of the floor or use the Brush Editing Mode (Shift + 4) to adjust the shape and size of your primitive. You only really need a floor, but it can be favorable to include walls and ceilings to get a sense of scale as well as for AI generation.
A trick would be to use the included SM_Farm_Door_A door model to align doorways and ceilings for the scale.
Lighting
Include at least one light if not using the “sun” light standard to the scene. This helps bake the correct lightdata on your geometry. Without any light you can sometimes recieve weird shadow artifacts or weird colors. This also helps those weird people who don’t put any attachments on their guns.
I added the GoodSky asset pack from UE4 Marketplace into the template, because it’s really handy to configure day/night using it; even adding a thunderstorm in a few clicks. In addition to that you’d need to place a Directional Light into the level for the actual light.
You can add multiple lights in your scene, but adjust the Attenuation Radius so that too many don’t overlap. UE4 is very limited when it comes to light overlapping, so you’ll need to tinker with this to get a good feel for it. If a red X is displayed on the light it will not render in the final product or be glitched.
World Generation and AI Navigation
World Gen:
This is probably one of the more complex steps as it involves messing a bit with the World Blueprint so I made the title a bit bigger.
In the new update the devs added world generation to custom maps so I will need to test a bit with that, but the previous way to go was to include RosterScenarioSpawner and WorldDataGenerator C++ Actors in the map so that they would generate these points. The Bare Bones template should already have this included but if it doesn’t or you create a new map from scratch you’ll need to add these manually by going to the bottom of the Content section and look for C++ Classes and dragging these out into your world.
(Still need to add more info to this chapter - unfinished)
Navigation:
To make the AI know which part of your map is intended to walk on you’ll need to set up a volume that touches the floor that you want them to be able to navigate.
This volume is called Nav Mesh Bounds Volume and can be found in the Volumes Tab in Place Actors. This volume should ideally intersect the walkable floor. Navigation area only generates inside of this volume so make sure that all your walkable floor is encompassed in this volume. It also doesn’t matter if the volume is sticking out underneath of the floor or is not the same size, the engine pulls navigation info from the Project Settings when it generates paths.
After building the paths from the Build button you can display the walkable paths generated by pressing P.
Adding Props / Models
- Locate the prop[s] that you want to use on your map. These will have the .uasset format as any other file. However, make sure the .uasset you are looking at is the static mesh, not texture file or anything else. You can verify this by opening that file in UModel. If the class says
StaticMesh, you’re good to go.
An easier route is to download the Mapping Reference Project made by RareKiwi and delete the assets from folder after cooking. - Make the folder struct the same as the asset file path.
- Go to
Place Actors > Basicand drag the Cube to the Content Browser and clickCopy Here. You can use this in your level wherever and upon loading into your map, this will turn into the appropriate asset. Only go beyond this step if you want to see the asset within the editor. - Export the static mesh you want to use as a .psk using UModel.
- Using Blender and the .psk plugin for it, export the model as a .fbx.
- Import the .fbx into UE4 with the same name as the asset you are attempting to use within your map. Make sure the file is in the same directory as the sibling file in the game files.
Adding Doors
To get a door into the game you place all the provided files into the folder structure as shown above.
Set up the BP_Door in the Blueprint Editor under BeginPlay like this:
This will make a BP_Door_New entity be spawned at the location of this blueprint with all the provided variables from BP_Door.
The BP_Door gets these variables from the DoorDataTable and the TrapDataTable - so if you can’t see these variables be sure to look on the right side and see that the Data Table is linked to the blueprint.
The red arrow in the BP shows which way the trap will be placed and marks the back side of the door.
- Place an instance of BP_Door onto the map and change the desired values:
- Door Type: Use the DoorDataTable in the data table block and select the wanted door.
- Trap Type: Doors can have pre-attached traps. The types to choose from comes from the TrapDataTable and are Explosive, Flashbang, Alarm, NoTrap. Note that the NoTrap doesn’t disable the trap, it makes it random.
- Lockchance, can be 0.0 - 1.0 We’re unsure if this value does anything, but we would expect higher probability of locking the closer to 1.
- Lockable: If the door can be locked or not. If you want a door to always be open you tick this box to False.
- NoSpawnTrap: If ticked it will disable any traps from pre-attaching to this door. Leave unticked if you want the TrapType to propigate.
- UseBrokenDoorMesh: We’re unsure if this does anything other than spawning the ruined door from the training course in the lobby map.
- MinOpenClose / MaxOpenClose: Probably has something to do with the max angle the door can swing, but I have yet to notice any difference after changing these values..
Evidence Actors
If you’ve played the game for more than 5 minutes you may have come across the different kinds of evidence that you can pick up in the world. These are the smaller kinds of objects that are linked to drugs, videos/photos, lists and more. In the new Covered Bones there is a provided blueprint to spawn these kinds of actors.
Simply drag out one BP_SpawnEvidence.uasset per evidence actor into your desired location in your map, and select your preferred evidence (oh and due to my negligence the white and red meth bags were swapped on the list - whoops) The evidence types should have intuitive icons when you select between them :)
Multiplayer
Multiplayer works by default if you place enough spawn points in your map. This spawn point is called PlayerStart and you’ll need at least 5 for normal multiplayer function.
Building and Cooking
At this point the map should be ready for rendering and packaging (you don’t really need doors but maps are very lacklusting without).
You firstly need to Build the data into the map by pressing the Build button at the top of the screen. It will take some time to finish.
Once it is done you can cook the files.
You cook the map so that the game can recognise the level as a playable map.
Before cooking be sure to select the Content folder as the cooker will cook everything down from that folder.
Go to top left at File and choose under Project -> Cook Content For Windows.
The cooked project will be located in your projects folder under <yourprojectname>/Saved/Cooked/WindowsNoEditor/
To make the map appear in game you must pak the project folder with the pak bat file mentioned in The Basics. Only pak the Project folder with the Content folder inside, not the MetaData or AssetRegistry and it should work from the mat :)
Name the pak to pakchunk99-Mods-<yourprojectname>_P - Replace the brackets and what’s in them with your project’s name.
For now, delete the FMOD folder from your cooked folder unless you are testing FMOD stuff. And if you do, delete everything except your custom banks and events.
If you don’t delete game-default assets everything from the game will be overwritten with empty data since the banks in this folder are only for reference.
That will result in your game having no sound other than VO.
Materials
To “paint” your walls/models/etc. you’ll need it to display a material. A material in UE4 is a set of textures layered on top of eachother to display color, depth and light interaction. Inside the asset it uses a block with nodes attached to it to get the information. This information is set up in a visual Blueprint form to make the process easier.
You drag connections between the material attributes nodes to link them together. I have added a TV simulated material woth a bunch of cool layering to convey a realistic look that you’re free to use, mix n’ match.
To paint an object you can drag the material from the content browser out onto the surface directly or use the side menus and select multiple surfaces to paint at the same time.
Chapter not finished.
Post Processing and visual tech
Post processing in UE4 is the method to give your maps the extra umph and sell the immersion visually. It’s how you get areas to feel different and lift the ambience for the player. The goal of post processing is to enhance what’s already there to reflect your intended visuals. I might be a little cryptic here, but that’s for the better. Let’s examplify this: If your lore is set in the Middle East it would not make sense that the light has the same color as it does further north like UK, it might be a little orange-shifted to give the “desert-feel”. Maybe you want some fog and haze to emulate distant sandstorms.
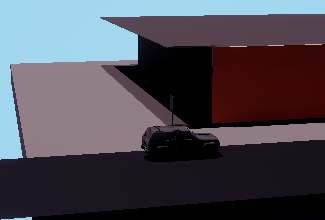
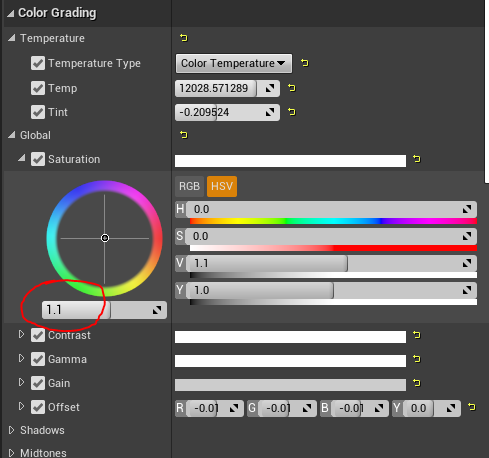
Or enhanced clarity. Maybe the lighting is dialed in right for realism, but has the wrong color, saturation and contrast. Take a look at this basic example:
I can’t tell you what exactly you should do for your map to look real. It is very contextual, so it varies from map to map. But I can tell you how certain elements work to achieve some effects. The first element that you should have to enable custom post processing is most obviously a Post Process Volume actor. It allows you to change a lot of values regarding filmic and rendering. It contains a long set of variables that you can change to get the desired effects:

For the most part we will use what’s in the Color Grading section, because it has the most effect. Scrolling down to Color Grading Changing Temperature, Tint and Saturation, Contrast, Gain, Gamma will be our main focus point. Most scene “moods” can be achieved here..
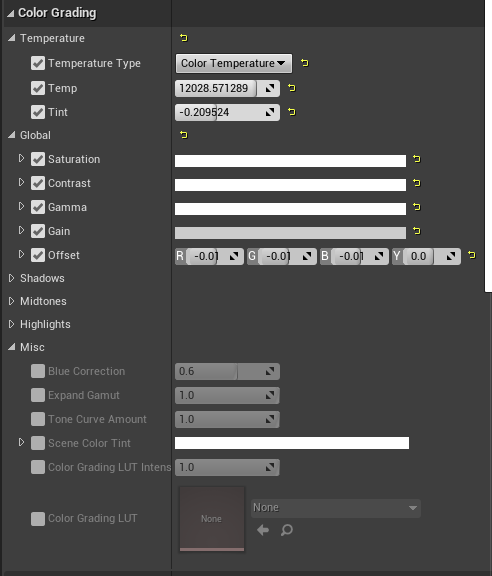
Note that the effects in Global has a drop down to change overall values more specifically, and for the most part we should only care about the slider under the color-cirle to change the value of that parameter. If you need to do some color balancing in that area you’d mostly want to do it in Saturation and Gain.
FMOD Sound Integation
(WIP)
For this you’ll need FMOD for UE4 If you don’t know how to install FMOD visit the RoN Custom Maps Discord and check out the Guides Links or watch THIS VIDEO
When you have installed FMOD correctly, you can make sound come into your map by placing a FMOD Audio Player from the Place Actors menu. You’ll also need to reference a sound that’s already in game* for it to play. If you want this sound to always play regardless of your location (like theme music) you don’t really need to do anything but to check that the “Start Activated” checkbox is ticked.
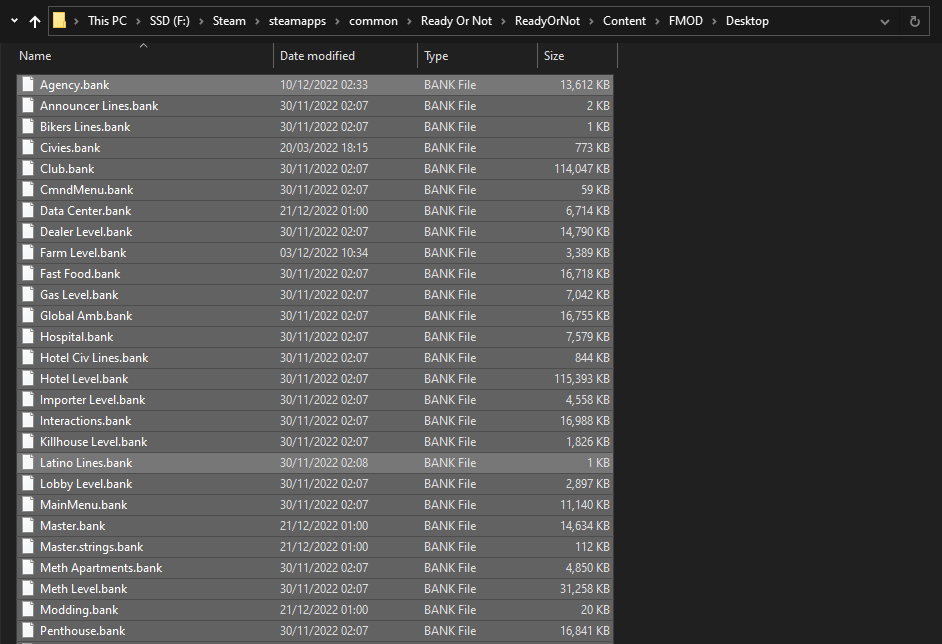
To get the sounds from Ready Or Not into unreal editor for referencing and preview (yes you can preview the audio!) you need to copy over some banks from the game’s directory into your project. Navigate to your Steam/Steamapps/Common/Ready Or Not/ReadyOrNot/Content/FMOD/Desktop folder and select all the bank files in the folder and copy them.
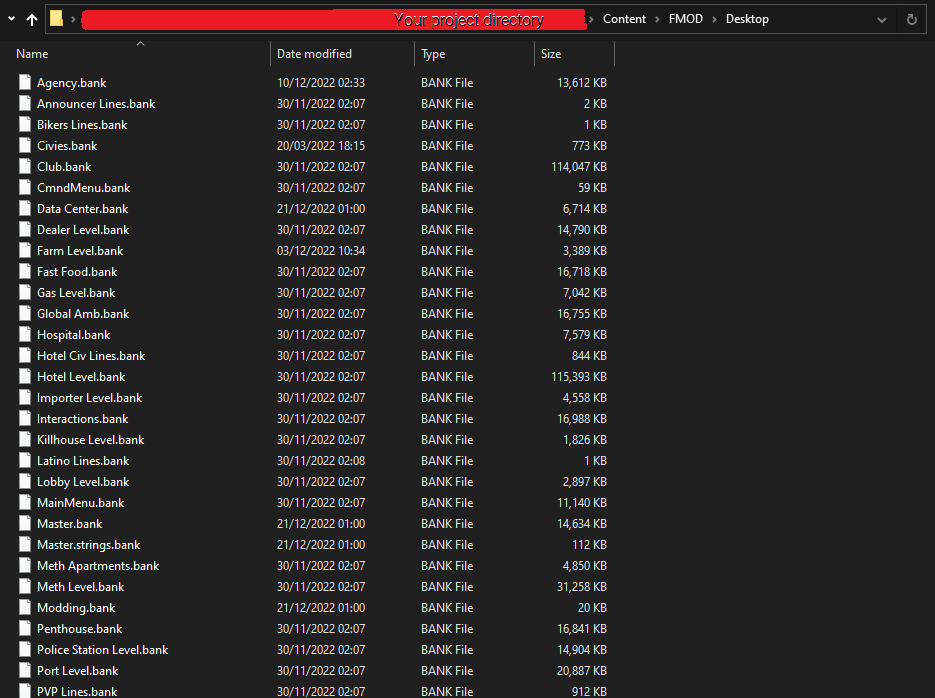
Then go to your project and go to the Content/FMOD/Desktop folder and paste in the banks…
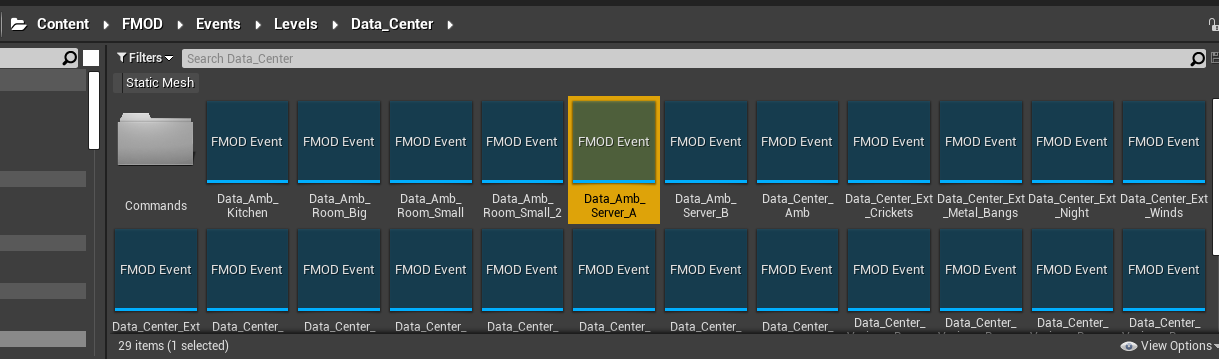
Navigate to the Events folder to verify that it works, you should be able to double-click an asset and preview the sound in the editor.
If you want to make a dynamically changing ambience based on the area you enter you will need to use a simple blueprint actor for this. I covered that briefly in the video above, but the idea is to blend or stop all other ambiences when you step into a new one. Using a box collision that only overlaps the Pawn channel will make the triggering happen. To fade in a sound you can use a timeline to manipulate the volume but ideally you want to fade in based on the distance to the other ambience actor but for normal cues 2 seconds of fade time will do.
For sound transitioning there is a transitioning volume located in Mods/Audio/Atmos that you can use to simplify this process - with that actor you can select what sound you transition to and from and you can walk back and forth through it. Place down the default ambience actor too for the sound to be played when u spawn into the level.
### Custom Sounds! So there is a way to get custom sounds and music playing in game right now and will be standard with the next release version of the Covered Bones Template. For now I will link the assets you need to make this work. You still need the FMOD plugin for this. Thanks to RareKiwi#5360 and crazy4videogames#3909 for figuring out the last steps of this puzzle!
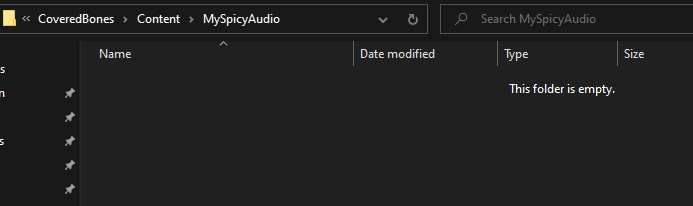
#### Audio Files Setup: Make a new folder in your main (Content) folder and name it something like MySpicyAudio or something you can remember. Go to the Explorer window in Windows where you can see the files and browse to your covered bones project and go into the MySpicyAudio folder. Drag out your preferred sound (.wav, .mp3 or .ogg formats) and put it into the folder like shown below:
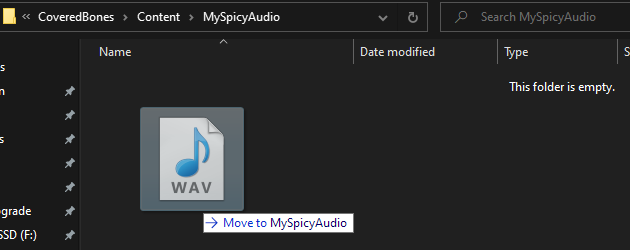
The default wave sound file that will be included in the upcoming version of bare bones will be a 1 second long clip of a fire alarm, just to show it working:

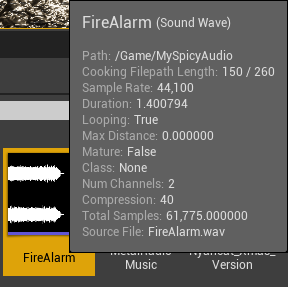
Unreal Editor will prompt you about importing the asset, so just click Import and it should appear in the Content menu. 
If you have set the sound up correctly you should see that the source file says FireAlarm.wav and that the path says /Game/MySpicyAudio and not the path to the location you imported it from or else it won’t play.
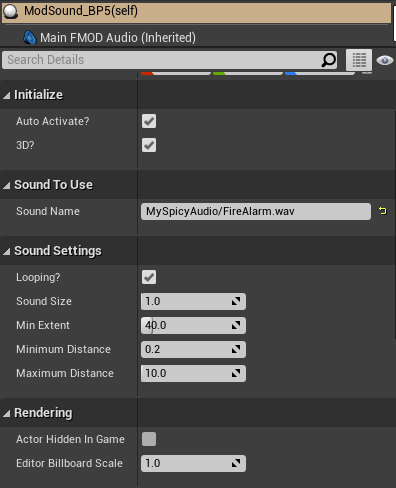
Sound Blueprints Setup:
Once you have obtained a file to play you will need to create a folder path (if it doesn’t already exist!) that will look like: Mods/Blueprints/Sound/Unused !Note that it should be in the Mods folder. Other locations might not work or cause the blueprints to misbehave… Game music needs to be fixed before I upload the ModMusic_BP, but you can download the ModSound_BP and the FireAlarm.wav here (extract in Content folder): ZIP file archive
Using The Blueprint:
Drag the blueprint out in the world where you want it to play from - a fire alarm usually plays best from above head height. In the details panel on the side you can edit some of the parameters; if it should loop, if it’s 3D (not playing everywhere) and more settings related to the max audible distance. Amongst these settings you need to set the Sound To Use as a Sound Name - The way to set up the sound name is to reference its location, name and file extension. So for the included fire alarm file you should change the name to MySpicyAudio/FireAlarm.wav - any other file you add to your custom audio folder would need to be set up the same way.
If it works in the editor it will most likely work in game too. Re-cook the build and verify that the sound files and bp’s were copied over. Look in the discord and ask if you’re getting stuck :)