
Getting Started with Ready or Not Mapping in UE5 [POST DLC4 Boiling Point]
If you already have a map made in UE4 for Ready or Not we have a Migration Guide into UE5 for you.
Introduction
Ready or Not is currently Unofficially supported by dedicated modders. Due to the hard work of them we are currently very close to getting 100% of the experience that Official Maps have. But with all things modding there is expected to be a little bit of jank when creating maps.
This guide will step you through the basic set of requirements needed to build custom levels for Ready or Not and complete your first iteration by getting your map into the game.
Ready or Not mapping REQUIRES that you download and use Unreal Engine 5.3.2. Do not download or use any other version.
If this is your first time creating a map, be aware that the level of experience to create something functioning is considered Intemediate. It is recommended that you spend some time watching and learning some beginner videos for Unreal Engine on youtube before you start asking too many newbie questions.
If you need help or have any questions, don’t hesitate to join the RoN Custom Maps Discord!
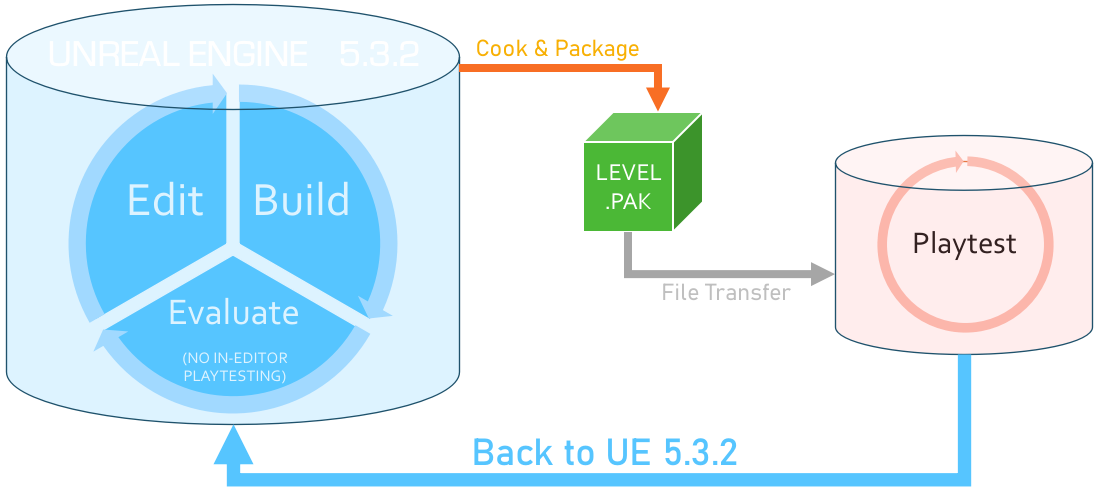
The Level Design Cycle for RoN
We currently provide a template project that contains all the gameplay features/blueprints needed to make RoN maps here: Installation.
For the Level Design process, you pretty much do it all within Unreal Engine, and can use whatever (reasonable) method you want to create your level.
It is important to note that currently we cannot test gameplay within Unreal Engine and can only do it within the Game. To actually play the level you need to pack your level into a deployable .PAK file. More info here: Cooking & Packaging & Installing
Development Example
If you would like to see what it’s like to make a map for Ready or Not, I recorded my entire development for Hell Comes to the Hills.
YouTube Playlist: Ready or Not: Custom Map Development by Delta
Installation
Unreal Engine
- Download and install the Epic Launcher.
- Open the Launcher, go
Unreal Engineon the left side bar, thenLibraryalong the top toolbar - Under
Engine Versionspress the+icon and next to the Version Number, click the drop down and select5.3.2and Install- If you only see
5.3, download that instead, it should download the last version which should be 5.3.2.
- If you only see
The Template Project
- Download the Template from Nexus and extract it to your preferred location: Ready Or Not Community Mapping Framework
- Open the extracted ReadyOrNot folder and run
ReadyOrNot.uproject
If you open the Content Browser (Ctrl+Spacebar) and navigate to Content > Mods > Template > Levels, there are 5 levels here:
- RoN_ExampleMap
- This is as the name suggests an Example Map which shows how the different mechanics of the game need to be implemented: Including Spawning, Doors, AI, Lighting, QSM and Ambient Sounds. It’s meant as a learning and reference level if you need to check how things should be implemented.
- RoN_ExampleMap_MissionSelect
- A very basic level that is only used when you are selecting a level in the Station.
- RoN_Template
- This is a barebones level that will cook and play in the game. You can use this as a template if you are making a new map, but we will make one from scratch in a little bit below to explain the requirements.
- RoN_WorldGen
- This is an advanced example map made showcasing what can be done with the Manual World Data Guide
- RoN_DifficultyExampleMap
- This is an intermediate example map made showcasing what can be done with Custom Map Difficulties
Your First Map
If you have seen previous YouTube tutorials it may have said you need to set up the Render Settings, or modify the Packaging settings. With the latest version of the Template, you do not need to change or extract any settings. You should be good to go from the first time you launch.
The Folder Structure
Before we continue, it is very important to understand the folder structure of an Unreal Project.
Unreal uses this concept of a Content folder, this is where all the game content and maps for the game reside (located at: ...\ReadyOrNot\Content).
When you install a .PAK file you are essentially adding or overriding assets in Content. Any change you make here will likely affect other mods that people use. This a more common occurance when a lot of us are using the same Marketplace or Quixel/Megascans assets.
More importantly, it can also cause conflicts with the core Blueprints required for gameplay!
To prevent us from stepping on each other’s work and causing game crashing conflicts:
- Create a directory for yourself within the
Modsfolder using your username and place ALL your assets (including 3rd Party/Marketplace/Quixel/Megascans) there.- Megascans will install in an existing Megascans Folder, you CANNOT use this and your assets will likely not render properly - make sure install to your folder instead.
- Drag the Mods >
Templatefolder into your newly created folder from Step 1.- If you get a prompt asking to “Continuing with a Rename?” - click “Okay”.
DO NOT move the
Toolsfolder.
- If you get a prompt asking to “Continuing with a Rename?” - click “Okay”.
- Within the Content Browser, right-click on the
Modsfolder and select “Fix Up Redirectors”- If the old “Template” folder remains, it is likely empty and you can delete it.
The Mods folder should now look like the following:
1
2
3
4
5
Content
    Mods
        Tools
        YourUsername
            Template
The reason we move the
Templatesfolder into our own is because as development continues newer version of the Blueprints may come out that fix bugs. If we didn’t move this folder, it WILL cause issues for everyone as older versions would conflict with newer ones.
Since you will be visiting your folder frequently I would consider changing the the folder color and adding it your favourites within the Content Browser. You can do this by simply right-clicking the folder here.
Bare Essentials for Gameplay
- Before proceeding: It is CRITICAL that you have read the previous section on Folder Structure. Do not proceed until you have completed the steps above.
- Following the previous steps in Folder Structure, go to your
Content > Mods > YourUsernamedirectory in the Content Browser and create a new Level then open it- Whatever you name it will be what it shows up as in-game
- But do not name it “House” - it is a restricted namespace and will not load in game
- Whatever you name it will be what it shows up as in-game
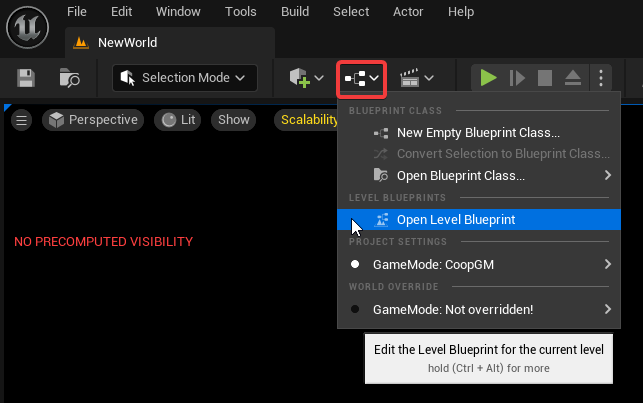
- Once opened, on the toolbar click Blueprints button and click
Open Level Blueprint
- Under
Class Settings, check the details panel and change theParent ClasstoReadyOrNotLevelScript - Click
Compile, and you can save and exit the window - On the toolbar select Window > Place Actors
- Within the new Place Actors window select the Geometry Tab
![Geometry Tab]() and chuck down a couple of boxes to make a floor and a couple of walls to act as a space to play in.
and chuck down a couple of boxes to make a floor and a couple of walls to act as a space to play in.- If everything is black, press
Alt+3to switch toUnlit Mode
- If everything is black, press
- Back in the Place Actors window, search for, and place down the following:
- 1x Player Start Actor
- This is where your Player and Team Spawn
- Nav Mesh Bounds Volume
- Required for your AI to function, whatever this covers will be where your AI can walk
- Roster Scenario Spawner Actor
- This creates your gameplay objectives and spawns
- 1x Player Start Actor
- In the Content Browser, navigate to
Content > Mods > YourUserName > Template > Blueprintsand place down the following:- 2x BP_AISpawn_Managed
- Spawn points for AI - we will come back to this in a little bit
- Also move them up from the ground about 50uu - Sometimes AI will not spawn if flush with the ground
AI are technically not needed, but without it the map will automatically complete when you play it and you wont be able to test it.
Alternatively you can use the native AISpawn actor from the Place Actors window, these are interchangable, however the BP allows you to preview the mesh of the AI so it is a little more usable.
- BP_SpawnManager_V3
- Required to spawn AI
- 2x BP_AISpawn_Managed
 and chuck down a couple of boxes to make a floor and a couple of walls to act as a space to play in.
After you place down these Blueprints in your map you can search it in the
Place Actorstab.
Additional Things
Lighting
Currently your level doesn’t have any light, so we should set up the basic stuff so we can actually see when we playtest it. Add the following:
- On the toolbar select Window > Env. Lighting Mixer and in the new window click on:
- Create Sky Light
- In the Outliner select it and set the Mobility to
Static
- In the Outliner select it and set the Mobility to
- Create Atmosphereic Light (our Directional Light)
- In the Outliner select the
DirectionalLightit and set the Mobility toStationary - With it still selected, Go to Cascaded Shadow Maps and set the
Dynamic Shadow Distance StationaryLightto 4000 and set theNum Dynamic Shadow Cascadesto 1.- These values will be what you will see in game
- In the Outliner select the
- Create Sky Atmosphere
- Create Height Fog
- Create Sky Light
- In the Place Actors window search for and place down:
- Lightmass Importance Volume and adjust it to cover the playable area
- 1 Sphere Reflection Probe that encompasses the map
- Without reflections the models/guns in game can look flat and not properly lit.
If you set your Directional Light to be the
Atmosphere Sun Light(done by default if you did the above), you can useCtrl+Lto change the direction of your sun now
AI Spawns
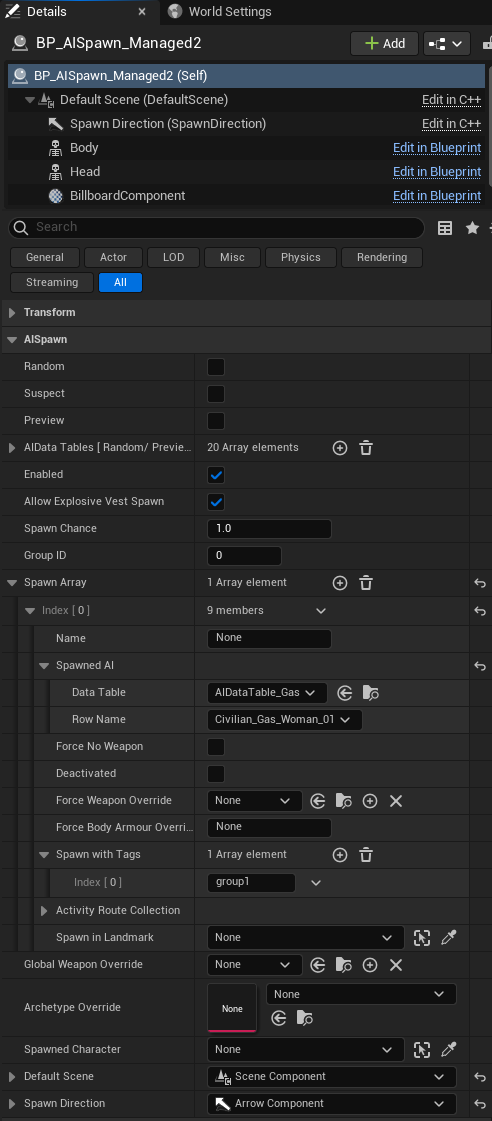
The 2 BP_AISpawns_Managed blueprints that we placed down are not configured yet, so lets do that by adding a Civilian and Suspect:
- Select an AISpawn and under AISpawn > Spawn Array press the
+symbol - Expand the new array element and also expand
Spawned AI- This is where you choose what AI to Spawn
- To begin with change the
Data TabletoAIDataTable_Gas& theRow NametoCivilian_Gas_Woman_01 - Select the other AISpawn and follow the same steps but change the
Row NametoSuspect_01_Shotgun - Check for both of these AISpawns that the
Spawn with Tagsin theSpawn AIarray element is set to “group1”- The
Spawn with Tagsallows us to use theBP_SpawnManager_V3to control what spawns with specific tags - It should be set to “group1” by default.
- The
- Additionally check that for each AISpawn that under Actor > Tags there is an entry of “Managed”
- Without this the Spawn Manager cannot find the AISpawn and will not spawn them.
- It should be set to “Managed” by default.
You can select any Data Table and Row Name for your map and you are not restricted to 1 Data Table.
Your AISpawn details should look something similar to this:
Spawn Manager
The BP_SpawnManager_V3 is required to spawn AI. By default it is set up work with any AISpawn that uses “group1”. This can be found under Default > AISpawn Configs in the manager.
You are free to add and change the tags on the Spawns and Manager how you see fit for you level. There are a couple of notes:
- You can have AISpawns with different AIDataTable and/or Row Values spawn on the same tag without any issues. (it’s how we set it up above).
- eg: Notice that the 2 AISpawns have
Civilian_Gas_Woman_01&Suspect_01_Shotgunbut share the same tag of “group1” - You can use this to create a variety of scenarios for your map!
- eg: Notice that the 2 AISpawns have
- If you want a set number of a specific AI tag group to spawn, set the
MinimumAmount&MaximumAmountto be the same number. - If you want to spawn a random range of enemies of a tag, set a min and max value but also Enable
RandomizeWithinRange. - For now we can just leave everything as default.
Doors
Doors are pretty simple to place down and edit into your map.
- In the Place Actors window, search for
Doorand place down aDooractor.- This may sometimes show as “BP_Door_Framework”, ONLY use the one named “Door”
- You can change which door you want by going to Door > Type of Door and selecting the desired door from the
Row Namedropdown.
Doors have a lot of impact on World Generation, for more info and how to create Double Doors read the following: Setting up Auto World Data Generation - Doors. However, I would only recommend looking into this after you have completed this guide.
The basic Template includes the Static Meshes so you can preview the door but not the materials. To get them you will need to follow the steps in Using Ready or Not Game Assets and Content
Building / Baking
DO NOT SELECT “BUILD ALL LEVELS”! Doing so will lock the editor in Texture Streaming and you will need to force close the editor through Task Manager. You have been warned!
If you’ve been following along so far, then you probably have not built your map. Building parts of your map fixes up changes in Geometry & Volumes, Lighting & Reflections and Pathing. You should do it whenever you want to update/preview changes in your map.
To build your map, on the Toolbar, drop down Build and select what is appropriate:
- Map Check
- Check for errors in your map - this will usually run if you do any build settings regardless but useful if you dont want to modify anything.
- Build Geometry
- This will rebuild your brushes and volumes after editing
- Usually best to do this first before any other builds
- Build Pathing
- Will update the NavMesh of any changes, best to do it after building geometry.
- If the NavMesh does not update afterwards, look for the the
RecastNavMeshactor in the outliner and delete it and build pathing again.
- Build Lighting Only
- As the name suggests, will build lighting on your map. This is what you’ll be building 90% of the time.
- Build Reflection Captures
- Self-explanatory, if you build lighting it will also usually build reflections, but if you want to save time and just update reflections use this.
- Build Landscapes
- Self-explanatory.
- Precompute Static Visibility
- NOTE: In UE5.3.2 Precomputed Visibility (PCV) is sorta broken - you cannot visualize cells in the Editor and you can never really get rid of the Error Message.
- You can disable the Error Message in Project Settings > Engine Settings > Rendering > Culling and disable
Warn about no precomputed visibiilty. - You can STILL build PCV and the data will remain, but you will not be able to verify it. You will need to enable
Precompute Visibilityin World Settings to get it to build. - PCV will usually built after lighting, and selecting this will usually force rebuild the lighting anyway.
My usual build process currently is: Build Geometery > Pathing > Lighting. Once the builds complete, you should File > Save All
Building times can vary, but the largest determining factor is usually Lighting. As map size increases and the quality of Lighting is changed, builds can take anywhere from 2mins all the way up to 6hrs and longer. At the moment the map should probably only take a couple of seconds.
Cooking
Cooking is the process of turning the project into content that can be deployed on other machines. We also only want cook content that is only important for the map to keep file size small. We need to configure this first:
- Go to Edit > Project Settings and on the side tab select Project > Packaging
Under Packaging Disable
Share material Shader CodeWe Disable it to stop us from sharing shadercode. If we cook a map with shared shadercode, the game will crash on Start-up. If it doesn’t somehow, it is very likely it will break other people’s map and even cause their games to crash.
If you have Cooked Content installed in your project this option allows you to see materials in the Editor if enabled. However If you have it disabled when you close the Editor, the materials will be black next time you open it. You can fix it by enabling it again and restarting the Editor.
- Under Packaging > List of maps to include in a packaged build, you should see an element that shows the directory for the RoN_ExampleMap and RoN_Template.
- If you do not see
List of maps to include in a packaged buildyou may need to expand theAdvancedcategory.
- If you do not see
- Delete these 2 entries for now.
- Press the
+and create an entry and enter your map’s directory within the project folder. - You do not need to change any other settings and it should look something like this:

- Make sure you Save All before proceeding
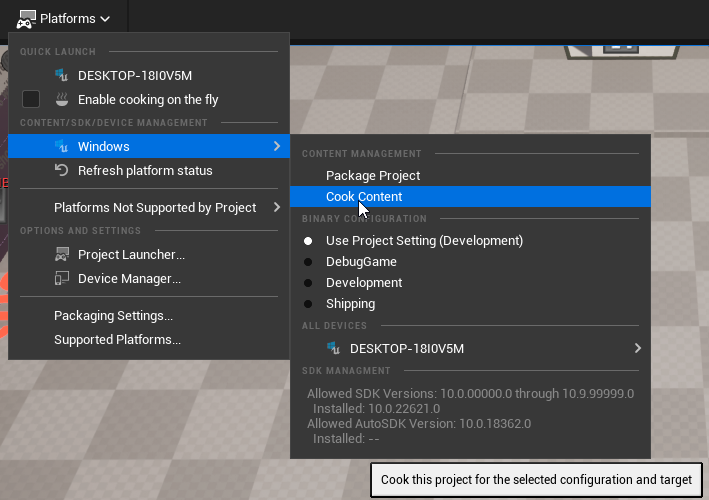
- On the Toolbar click Platforms > Windows > Cook Content

- This could take some time for your first cook as it compiles all the shaders. Just be patient.
- Once cooking has completed re-Enable Project Settings > Packaging
Share Material Shader Code

You should hear it succeed, but a message will not remain on screen when it completes. If it failed the notification will stay on the screen. You will need to look at the Output log in the Editor to find out what the Errors are (you can ignore warnings - there will be a lot of them).
Packaging & Installing your Map
Packaging will turn our cooked content into a single compressed file that we can actually use to play in game and distribute to other people.
There are a bunch of Unreal packers out in the wild, but only use the following method for maps.
- Create a folder somewhere to act as your staging location for packing, name doesn’t matter but I use
Paking.- I wouldn’t create it in your project folder however.
- Within this folder create a new folder using the following naming convention:
pakchunk99-Mod_YOURMAPNAME- the 99 after
pakchunkindicates the load order of paks. We keep maps at 99. - We use
Mod_to help organize your mods for the ease of users. Replace
YOURMAPNAMEwith whatever your map’s name is. This will not show up in game, but will help identify your map/mod to people downloading your mod.A lot of mods have _P appended to the end of their .paks. For maps we do not need it and should not use this namespace. Using _P in your package actually patches over files and we do not want to to this! There could be a bunch of Blueprints or shadercaches that are generated when we cook our map and it will conflict with other mods if you include them. AGAIN. DO NOT ADD _P TO YOUR PAK NAME.
- the 99 after
- Go to
C:\Program Files\Epic Games\UE_5.3\Engine\Binaries\Win64and create a.batfile here with the following arguments:
1
2
3
4
5
6
7
8
9
10
11
@setlocal ENABLEDELAYEDEXPANSION
@if "%~1"=="" goto skip
@setlocal enableextensions
@pushd %~1
(for /R %%f in (*) do @set "filePath=%%f" & set "relativePath=!filePath:%~1=!" & @echo "%%f" "../../../ReadyOrNot!relativePath!")>"%~dp0/filelist.txt"
@pushd %~dp0
::-compresslevel=4 for Normal, -compresslevel=-4 for uncompressed hyperfast paking
.\UnrealPak.exe "%~1.pak" -create=filelist.txt -compress -compressionformats=Oodle -compressmethod=Kraken -compresslevel=4
@popd
@pause
:skip
Create a Shortcut to the .bat file you created and move it to your staging folder from step 1.
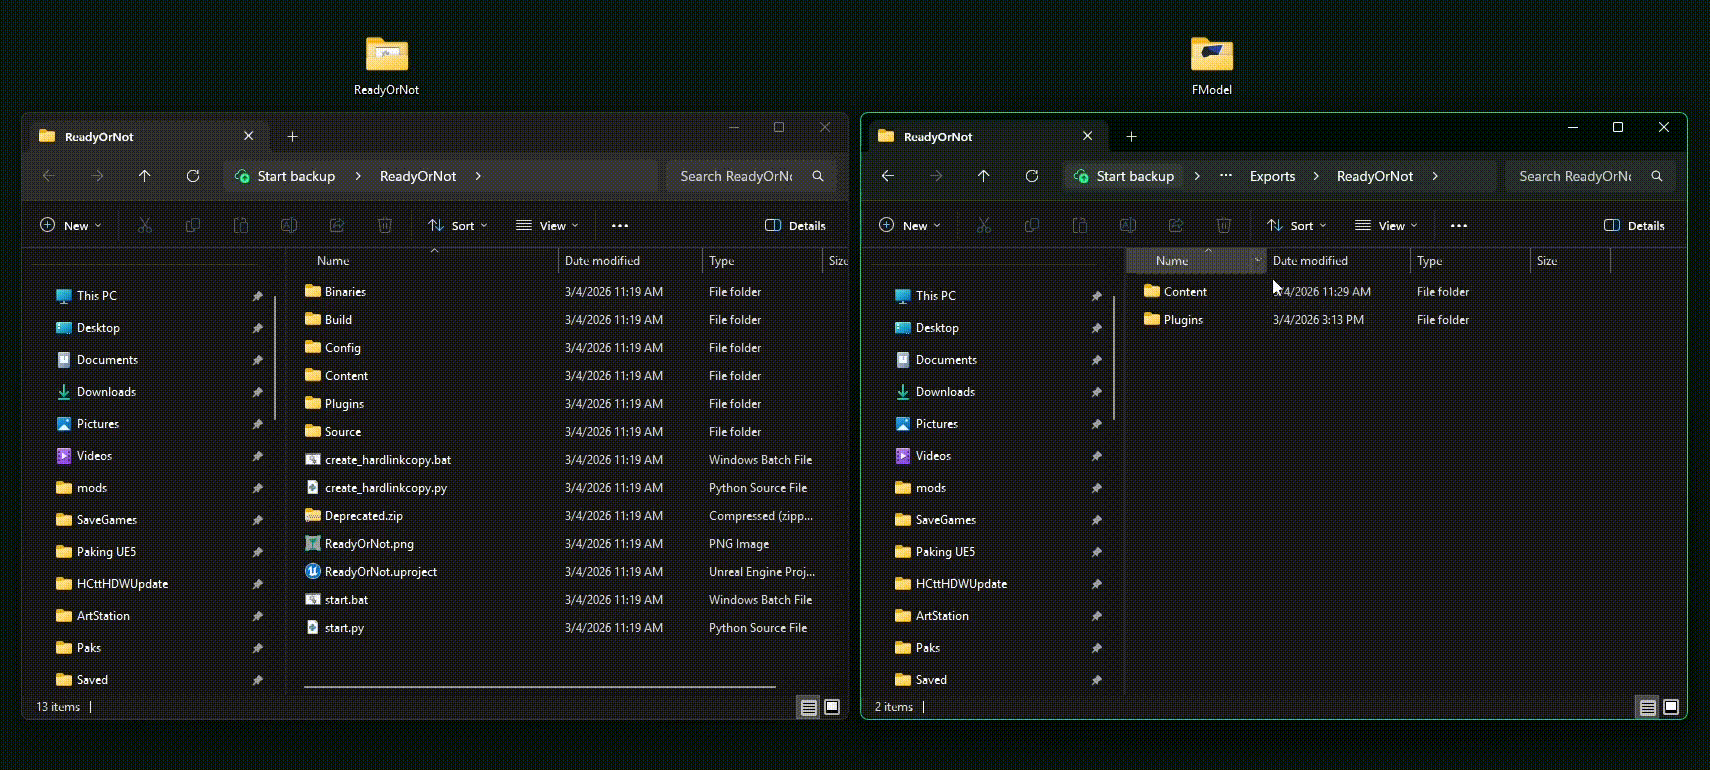
Navigate to your Template/Project folder and go to:
...\Saved\Cooked\Windows\ReadyOrNotand copy ONLY theContentfolderPaste your
Contentfolder into yourpakchunk99-YOURMAPNAMEfolderDrag your
pakchunk99-YOURMAPNAMEfolder onto your .bat shortcut. A command window will pop up and tell you when it is complete. If successful you should have a new file in your staging directory namedpakchunk99-YOURMAPNAME.pakCopy your
pakchunk99-YOURMAPNAME.paktoC:\SteamLibrary\steamapps\common\Ready Or Not\ReadyOrNot\Content\PaksYour map should now be available in the game
This is an example of what a Staging folder can look like:

You will be jumping between these folders a lot, I really recommend putting your Staging folder, Project Cooked folder Ready or Not Pak directory to your Quick Access bar.
Testing your Map
The easiest way to test your map is to simply load up the game and select it from the Mission Select screen. If all works well then it should take a couple of seconds to build WorldGen and plops you into the map.
Common Issues with a Map not Loading
Make sure you did the following:
- Are you using the up-to-date version of the template linked above in this guide?
- Are you are using the packing method described above in this guide?
- Did you only include the
Contentfolder from...\Saved\Cooked\Windows\ReadyOrNot? - Did you Disable
Share Material Shader Codewhen you cooked the map? - Do you have all the actors mentioned in Bare Essentials for Gameplay?
If your map is still not not launching, then you may want to reach out for help on the Mapping Discord linked above.
Updating your Map after Playtesting
And Voilà! You’ve just gone through your first iteration of RoN Mapping!
There are just some final important steps needed to know when you re-cook and package your map to test updates:
- After you recook your map, it is recommended that you delete the
Contentfolder within your stagedpakchunk99-YOURMAPNAMEfolder instead of overwriting it.- Overwriting your folders may leave residual files and settings that may mess with your playtest
- BEFORE you launch the game. Navigate to
C:\Users\USERNAME\AppData\Local\ReadyOrNot\Saved\SaveGamesand delete the WorldGen.sav file that has the same map name as your map (e.g. Hell Comes to the Hills filename looks likeHCttH_WorldGen_40173.savas “HCttH” is the .umap name chosen).- This step is critical! Each time the game launches your map for the first time, it generates World Data and stores it so the map launches faster the next time you play it. However the game does not know when your map has been changed. So you will likely be playing on a map with outdated build information resulting in quite a few bugs.
- The WorldGen contains information such as how doors are positions and connected, room layouts, stacking points, navigation, cover and more. So it is important to make sure you generate new World Data with each iteration!
- There is full guide on World Data here: Setting up Auto World Data Generation
Just like with the other folders, it is recommended you add the SaveGames directory to your quick access, as you will be visiting it quite a fair bit!
Automatic Mod Packing (AMP)
The current version of the Framework has Quick Cooking buttons. This allows you to cook your map, copy the cooked contents to the staging folder (including difficulty settings), pak your map, place the pak in the game’s directory and launch the game - All with a press of a single button!

First, configure the plugin:
- On the Framework dropdown button, click on
Open Framework Plugin Config... - In the
Mods Staging Folderput the location of your staging folder - In the
Ready or Not Paks Folderput the location of the installed game’s paks folder
Second, Install Quick Load
- Within the Framework’s root directory, copy
pakchunk99-Mod_QuickLoad.pakover to your game’s pak folder. - Or you can download and install it from Nexus: Quick Load
Installing Quick Load is Optional - but it is required if you want the game to automatically launch your map at the end of the AMP process, otherwise the game will just simply launch to the Main Menu.
OPTIONAL: Delete or rename startup movies in C:\SteamLibrary\steamapps\common\Ready Or Not\ReadyOrNot\Content\Movies\ for faster start ups.
To use the Automatic Mod Paker (AMP):
- Open your map and on the Framework dropdown click on
Create Profile
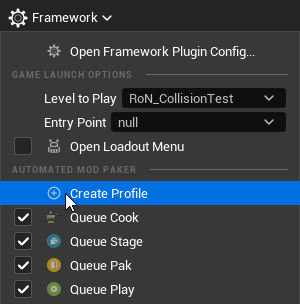
- This will create a profile under the
Mod Pakaging Profilesusing your map’s filename.- The
Auto Add Maps to Cookwill automatically add your opened map theList of maps to include in a packaged buildso you do no need to worry about it. - The pak’s name will be auto-generated based on your map’s .umap name - you may wish to change the name of the pak here under
Pak File NameBut please remember to follow the pak naming conventions mentioned above.
- The
- Close the plugin window and make sure your newly selected profile is in the drop-down in the toolbar
The profile will automatically be selected to match the map’s name if they are the same.
- Click the
![Staging Folder Example]()
Start an Automated Mod Paker Queuebutton.- This will do all the neccessary steps needed to play your map in the game.
- You can toggle what actions are done when you press the AMP button by changing the check-boxes in the Framework dropdown.
- Example: If you do not wish to launch the game then you would simple uncheck
Queue Playin the Framework dropdown.
- Example: If you do not wish to launch the game then you would simple uncheck
- Pressing
Cancelon the pop-up should stop the next stage from progressing.- If you wish to cancel cooking prematurely than you can close the command window it creates for it.

Additional Features
- You can do each step manually by pressing the appropriate button instead. You can find out what each button does by hovering over them and reading their tooltip.
- Clicking the Framework dropdown also allows you to quickly open folder shortcuts to your Cooked Content folder, Staging folder and the Game’s Paks folder.
- The Frameworks dropdown also has quick access to commonly used tools such as the World Data Helper, World Data Loader and the Material Instance Editor
- If you have a Mod Level Data table configured for your map, you can also choose the Entry Point/Spawn when you launch the game.
- Within each map profile, you can also automatically pack custom Difficulties - if you manually type the
.../Content/Difficultiesdirectory intoDirectories to Copy.- Further reading: Custom Difficulties
- AMP also automatically copies custom Audio files (.ogg, .wav, .mp4, etc..) if you use them in your map. This will automatically search the
.../Content/Mods/directory for any folders/files.
Using Ready or Not Game Assets and Content
FModel Setup
You will at least around 100GB free for the next part, we will be extracting the game’s cooked assets so they will show up in your map, and unfortunately require a lot of space.
Download FModel: https://fmodel.app/
Download Mappings file: Mapping File
BEFORE PROCEEDING: Remove ALL mods from your game. FModel will load them and cause issues and materials may not load properly.
If first time using, click the arrows for
ADD UNDETECTED GAMEand selectC:\SteamLibrary\steamapps\common\Ready Or Not\ReadyOrNotas your directory AND press the+button.Select the UE Version to be
GAME_UE5_3and press OK- Go to Settings and under General > Advanced, Enable
Local Mapping Fileand set theMapping File Pathto the downloaded Mappings file. (This will allow you to view the cooked content in FModel)- OPTIONAL: In Settings > Models > Mesh Format, change it to
glTF 2.0 (binary)so you can export static meshes - Take note of your Export Directory
- OPTIONAL: In Settings > Models > Mesh Format, change it to
On the Archives Tab, select all the .paks from the game and click Load.
On the Folders Tab, navigate to ReadyOrNot > Content and right-click the
Contentfolder and selectExport Folder's Packages Raw Data (.uasset). This will save all the cooked content from the game and might take some time.- You will also need to get the DLC content. On the Folders Tab, navigate to ReadyOrNot > Plugins > GameFeatures and right-click the
GameFeaturesfolder and selectExport Folder's Packages Raw Data (.uasset)- You will have these files even if you do not own the DLC.
Copy Cooked Content to your Project
Close the Editor/Template before continuing.
- Navigate to where FModel exported the cooked assets and move/copy/cut the
Content&Pluginsfolder to the Template’s root folder.Make sure you copy the extracted folders to your Template’s root.
DO NOT copy into the Content folder.
DO NOT end up with.../ReadyOrNot/Content/Content/(<– BAD) - DO NOT overwrite any files if prompted! Just skip these files.
- If you overwrite them, you will need to start again from scratch with a new Project.
 This is how you correctly move cooked content from FModel’s export folder into your project.
All the game’s assets should be available in the project now, including working Materials, Decals and Particle Effects!
Viewing DLC folders and C++ classes
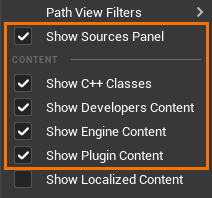
By default your Unreal Engine’s content browser might not be setup to show these folders.
- In the top right of your content browser, click the
Settingsbutton.
- Ensure the following options are enabled;

- Show Sources panel
- Show Developers Content
- Show Engine Content
- Show Plugin Content
- In the far left of the Content Browser, you should now be able to expand the ReadyOrNot drop down and find the DLC content:
- Home Invasion content is found in the regular
/Content/folder. - Dark Waters content is found in
/Plugins/ReadyOrNotDLC2/ - Los Suenos Stories content is found in
/Plugins/ReadyOrNotDLC3/ - Boiling Point content is found in
/Plugins/ReadyOrNotDLC4/
- Home Invasion content is found in the regular
Optional: Importing FMOD Events
If you wish to hear FMOD Events/ambient sounds in the Editor, follow these steps:
- Navigate to
C:\SteamLibrary\steamapps\common\Ready Or Not\ReadyOrNot\Content\FMOD\and copy theDesktopfolder. - Navigate to your projects
...\Content\FMOD\folder and paste theDesktopfolder here.
Where to Next?
We have other guides that cover some more in-depth aspects of mapping that you can check out below: