
Introduction
Ready or Not uses a combination of FMOD and an in-house built audio solver called the Quantum Sound Manager (QSM). QSM is a method to help with reverb and audio occlusion from around the map and takes into consideration room sizes, door states and even whether or not glass is broken and adjust volumes accordingly.
This guide will explain the requirements to get QSM working within your map and how to integrate it with FMOD ambiance and events.
The Example Map provided in the Template has QSM set up for a generic house, so check it out if you’re curious.
The second part of this guide is Setting up Music Events for Maps
Importing FMOD Content
You do not actually need to complete the steps below to implement QSM. However it is likely you will want to mess with some events if you want to tweak Ambient events. The steps below will tell you how to get it working.
Currently the Template has placeholders for the FMOD events - you cannot actually listen to them. If you wish to hear them you will need to:
- Navigate to
C:\SteamLibrary\steamapps\common\Ready Or Not\ReadyOrNot\Content\FMODand copy theDesktopfolder - Within your project folder, paste the
Desktopfolder to...\RonTemplate\Content\FMOD
This should be all you need to do to start hearing FMOD events if you press Play.
Actor Overview
Any property not listed in the tables below are meant to be private and we shouldn’t modify them
Ready Or Not Audio Volume
- A Volume that controls FMOD Events when players are in them, it essentially acts as a trigger volume for child/nested events.
- Maps require at least one for Reverb and Ambient Sounds that cover the entire playable space
- ALL FMOD Events should be nested to a Ready Or Not Audio Volume
| Property | Description |
|---|---|
| Reverb Events | Unknown use |
Room Volume
- These are volumes that are placed within the interior sections of your map. They aim to represent the different shapes and sizes of the rooms they occupy.
- QSM will use these volumes to determine how the audio will bounce around the room according to the shape of the volumes.
- They can be comprised of 1 or many different volumes
| Property | Description |
|---|---|
| Room Group ID | Used to group multiple Room Volumes covering the same room |
| Reflection Probe | Reference to the Reflection Probe object to be assigned for this specific Room Volume (see below) |
DO NOT Edit the scale of these. If you require to edit the shape, modify the Volume in Brush Edit mode (Shift+4).
Reflection Probe 
- A probe placed in the middle of the Room Volume to communicate the center and size of the room to QSM
- There is a Tool available called EUW_Tool_RoomVolumeHelper which will automate the process for you
- This is not a requirement but Zack HIGHLY RECOMMENDS IT.
| Property | Description |
|---|---|
| Room Size | Approximate volumetric size of the room - can be auto generated with the Blueprint mentioned above |
Portal Volume
- These volumes act as portals for QSM to pass through into other rooms. These are specifically placed in doorways, open windows, arches & holes and even managing when glass is broken.
| Property | Description |
|---|---|
| Is Outside | Enable if the Portal connects to the outside |
| Portal Type | Used to determine the direction in which sound will pass through the portal: HORIZONTAL for regular use through doors and windows. VERTICAL for upward sound direction through a well or hole in the ground. |
| Attached Objects | Add your doors that are within the Volume to this array. DO NOT ADD TO “Doors”! |
| Breakable Glass Soft Pointer | Pointer to the Breakable Glass BP the Portal Volume covers. The Breakable Glass BP is located: Content > ReadyOrNot > Level > Destructibles > Glass > BP_BreakableGlass_v01_C. 1 BP per Portal. |
DO NOT Edit the scale of these. If you require to edit the shape, modify the Volume in Brush Edit mode (Shift+4).
Sound_ParameterTransition_V2_BP_C Blueprint
- This Blueprint is used to help transition between different FMOD and Reverb states. Specifically used when passing through doors and thresholds into other rooms.
- They can also be used to activate parameters for the music in the game to make it more dynamic.
| Property | Description |
|---|---|
| FMOD Ambient / Music Events | Contains the FMOD Events that control the Transitions. For Ambient sound Outdoor-to-Indoor Transitions - choose which map Ambient sounds to go here (will contain *_Amb in the file name, eg: Gas_Amb_V2 |
| INParameter | FMOD Parameter taken from the Amb FMOD Event you added above. You can find these values here: Reference - FMOD Parameters |
| OUTParameter | Exactly the same as above, but usually suffix with OUT (eg: GasAmbOUT) |
| Reverb IN | Select the drop down that best represents the Room Reverb you are moving into |
| Reverb IN Material | Select the drop down that best represents the physical material of the room you are moving into |
| Reverb OUT | Select the drop down that best represents the Reverb in the room you are entering from |
| Reverb OUT Material | Select the drop down that best represents the physical material of the room you are entering from |
| Global Parameter IN | The FMOD modifier for Indoor Audio. Set to 1 as a good default |
| Global Parameter OUT | The FMOD modifier for Outdoor Audio. Set to 0 as a good default |
| Use Door Check Feature | Enable if the transition between Rooms uses doors. Helps with determining reverb on different door open states. |
| Gobal Parameter Door Check? | Leave Disabled. Unsure what it does. |
| Doors Open | Unable to modify, but within the official editor, is auto populated via the Construction script. |
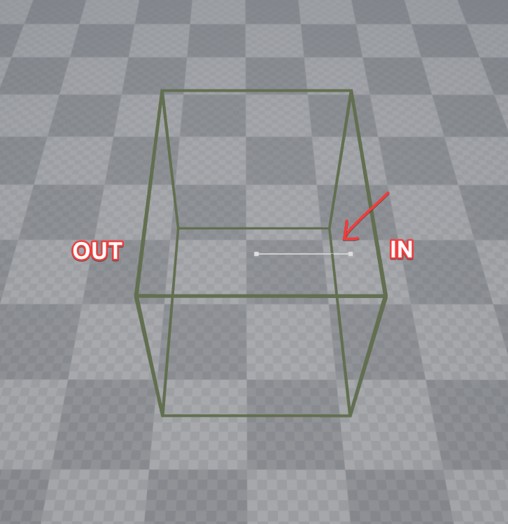
The ‘IN’ part of the BP can be identified by the white spline line inside the box when the BP is UNSELECTED.
Distance Along Spline Threshold, Min/Max Range OUTSIDE/INSIDE can be edited but should be left default values. These are spline editing values used for more artistic control on fringe case audio transitions. An example of this is the long corridor in the club that heads towards the dance floor.
DO NOT Edit the scale of these. If you require to edit the shape, modify the
Boxcomponent’sBox Extent. Editing the object scales will mess with the FMOD transitions.
QSM_Weapon_Reflection_Probe
- Located
Content > FMOD > Events > Levels > Reverbs - The best way to describe it is that it’s akin to a sound version of a Map’s Facade. Its a fake Reverb/Echo probe placed outside the map to mimic where sound would Reverb off of back to the player.
- eg: Bouncing off distance large buildings or a neighbors house, Echos/Reverbs from an underpass or cave outside the map, or just a simulated reverb from a large valley or open field
- These are more artistically placed around the map to give that je ne sais quoi to the echoes
DO NOT Exceed more than 6 of these probes per map. You may usually need less.
Sound_StarterAmbience_V2_BP_C Blueprint
- Works very similar to the Transition Blueprint above, however is meant to set the starting values for Ambiance through “AmbSwitch”* when a player loads into a map. It covers the player spawns.
| Property | Description |
|---|---|
| FMOD Ambient / Music Events | Contains the FMOD Events that control the Transitions. Mainly for Ambiance but OST Timelines can be used as well |
| STARTINGParameter | FMOD Parameter taken from the Amb FMOD Event you added above. You can find these values here: Reference - FMOD Parameters |
| Starting Global Parameter | Just set this to “AmbSwitch” |
| Starting Global Parameter Value | The value of AmbSwitch to be set when a player loads in |
| Starting Reverb | Select the drop down that best represents the Reverb of the starting area |
| Starting Reverb Material | Select the drop down that best represents the make of the materials of the starting area |
Character Reaction Volume
Usually used with ai SWAT to trigger [CALL]Env voice lines when you and SWAT are standing within the volume.
- There is a timer looping trying to run the voice lines, provided that combat isn’t active and another line hasn’t played too recently.
- There is an example setup in the RoN_ExampleMap
- More voice lines are available in
/Ready Or Not/ReadyOrNot/Content/VO_PC/in the game Paks - You can use your own audio if you include the .wav or .ogg in your Paks
- Interest Point actors can be placed and linked to provide somewhere for the talker to look at when triggered.
Footstep Foley Volume
Changes the characters footsteps when they are overlapping it.
- Can be used for puddles, glass, tall grass or bushes etc.
- Many usable FMOD events are located in
/Content/FMOD/Events/Surfaces/Foliage/
Setting up Audio
Before beginning, it is highly recommended that each one of these steps are done within a folder (or sub-level) within the World Outliner to keep things ordered. In this particular case you should be renaming assets (F2) as you create them to keep things managable.
Part 1 - Important Notes about FMOD Events
All FMOD events must follow these 2 guidelines so they work flawlessly in the map:
- Always Disable
Auto Activatefor all Events - Always nest/make events a child of a Ready Or Not Audio Volume
The reasoning is that there are “way too many instances where FMOD for whatever reason stops the audio for certain events since they load before the game initializes” - Zack c. 2024
Part 2 - Ready or Not Audio Volume and Level Ambience & Reverb
- Drag a
Ready or Not Audio Volumefrom the actor’s tab into the scene. - Edit the brush to cover the playable area.
- It is recommended to scale it just a bit over to encapsulate the some of the outside area as a safety net against players
- Go to
Content > FMOD > Levels > Reverbsin the Content Browser and select theReverbMasterFMOD Event and drag it into your scene. - IMPORTANT: Within the World Outliner, find this Event and drag it ONTOP of the
Ready or Not Audio Volumeto make it an attached actor of it. - Decide which Level’s ambiance is appropriate for your map and navigate to
Content > FMOD > Levelsand enter the appropriate level folder. - Find the correct Ambient FMOD Event for your specific level listed here: Reference - FMOD Parameters and drag it into your scene.
- IMPORTANT: Within the World Outliner, find this Event and drag it ONTOP of the
Ready or Not Audio Volumeto make it an attached actor of it, just like before.
 The Main RoN Audio Volume with it’s attached ReverbMaster and Level Ambiance events
The Ready or Not Audio Volumes can also be used to control FMOD events that should play persistently around the map but shouldn’t be heard all the time. e.g. The hum of a fridge that was in a room, but you didn’t want to hear it if you were outside. Another example would be hearing the splash of a water feature outside, but only if you were close to it.
You can think of them as trigger volumes to control scenarios by setting them up in the same manner as above, by making any relevant FMOD Events an attached actor of the Volume.
Remember to always disable Auto Activate.
![]() An attached ambient sound event
An attached ambient sound event
Part 3 - Setting up Room Volumes
Room Volumes (RV) have a couple of requirements and quirks that you MUST follow:
- You DO NOT need a RV for the Exterior/Outside portions of your map. Only Interior sections.
- A room’s RV can consist of 1 or multiple RVs. If you are using multiple RVs for a single room, make sure they share the same
Room Group ID.- It is best to just keep RV as simple Boxes if you are using many.
- RVs cannot be concave.
- RVs of the same ID can overlap, and it is recommended to slightly overlap volumes to be safe.
- HOWEVER RVs of different IDs CANNOT overlap AND their faces must be touching/meeting (see Figure below). Failure to meet these requirements will mean that QSM will not work correctly.
- It is HIGHLY recommended that for this process you keep World grid snapping enabled for your entire process to make ‘meeting’ the walls an easier task.
- Snapping to 5uu is an excellent increment to work fast and accurately.
- It is recommended that the RVs conform to the shape of the room they are in as closely as possible.
- It is also recommended that the volumes also slightly extend into the floors, walls & ceilings rather than undershoot them as so the Audio bounces retain their accuracy.
- Having the RV not extend outside the walls a little bit might cause issues such as footsteps not being heard on the floor or gunshots not being registered inside the room if they hit the ceiling or walls.
- I have used a spacing of 5uu as a good buffer for my extra extending.
Part 4 - Setting Up Reflection Probes
- Go to Content > Mods > Template > Tools and right-click and Run the EUW_Tool_Room_VolumeHelper
- Click on
Make/Assign Probes, it will go through and make and assign probes and place them in their appropriate location to the Volumes they get assigned to. - Select all the newly generated Reflection Probes, click on the new Reflection Probes and press
Guess Room Sizes (Selected Probe/s)in the tool. - That’s it! Though I would double check all the assignments just to be safe.
Part 5 - Setting up Portal Volumes
Portal Volumes (PV) are relatively easier to set up in comparison to Room Volumes and don’t require as many special rules
- Drag a
Portal Volumefrom the actor’s tab into the scene. - Drag the PV so that it covers the threshold between 2 different Rooms. e.g. Between a doorway or going from an outdoor area to an interior one.
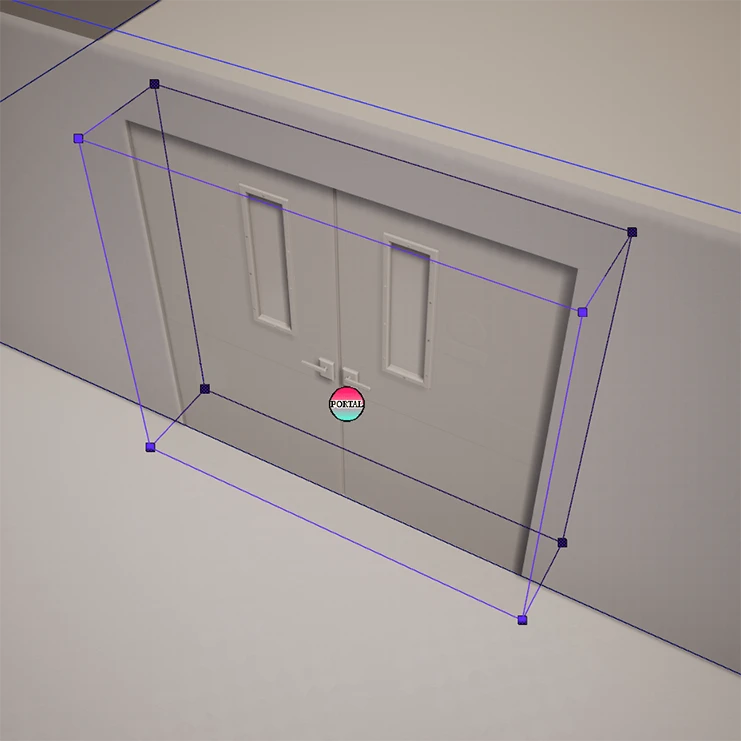
- Edit the PV in Brush Edit Mode (Shift+4) so that it completely covers the door-frame/window/hole and extends out a little bit. See the picture below for an example:
- DO NOT Scale the PV, they should only be edited via Brush Edit Mode
- PVs do not need to be exactly the same size as the hole, and it is fine if it is larger or extends wider/higher than the hole that it covers
- The PV’s box needs to be present in both rooms it is creating a Portal for.
 A portal volume (purple) placed intersecting a room volume (blue)
 - If the PV goes from an exterior/outdoor area into an interior area with Room Volumes, Enable the
Is Outsideproperty - In most cases, leave
Portal TypetoHORIZONTAL. - If you are using Breakable Glass, set the
Breakable Glass Soft Pointerto the correspondingBP_BreakableGlass_CBlueprint. - If your portal is overlapping a Door actor, add an entry (
+) to theAttached Objectsarray and add your door. If you have double doors, add another entry and the 2nd door.Not doing so will cause the door’s audio to be muffled on one side of the door when interacting with it,
and sounds will not be occluded when the door is closed.If you are using the old Door Spawner system, you need to instead, in the door spawner, add the portal to
Add to Audio Room Portal
 A portal volume (purple) placed intersecting a room volume (blue)
Zack recommends to approach doing Portal Volumes by completing the Outdoor-to-Indoor thresholds first for testing. You will need to make sure that all of these thresholds are covered for QSM to correctly identify the Interior and Exterior areas.
Part 6 - Setting up Sound_ParameterTransition_V2_BP_C Blueprints
Part 6.1 Placing the Transition BP
- Drag a
Sound_ParameterTransition_V2_BP_Cinto the scene, located within the Content Browser atContent > Blueprints > Sound. - Identify which side of the BP is the
INside by UNSELECTING the BP and noting down what side the white spline line inside the box is on. The side the line is on is yourINdirection.- When you select the BP there will be splines on either side.

- Rotate the Transition BP appropriately so you know which part of the BP is
IN&OUT - You will likely need to resize the BP, but it is important that you DO NOT SCALE it. To change the size select the
Box Componentof the BP and adjust theBox Extentvalues instead.- The size of the box is an artistic choice but note that as soon as a player steps into it, the transitions will begin. So take careful consideration to not place them in areas that do not make sense logically.
- The spline values determines the ratio in which the volume of the ambiance changes when moving through the BP. You should make sure that if you edit the
Box Component, you also edit theSpline Componentpoints on either end to be WITHIN theBox Component- You should only need to change the
Xvalue for the spline point’sLocation
- You should only need to change the
Transition BP’s require different property settings for Outdoor-to-Indoor and Indoor-to-Indoor thresholds. Please read the requirements properly.
Part 6.2 Properties for OUTDOOR-to-INDOOR Transitions
- Add (
+) an element toFMOD Ambient / Music Eventsand add your Ambient Event you selected from step 1. - For the same element, type the corresponding
INParameter&OUTParameterthat is defined within the same FMOD Event- These do not have a consistent naming convention, however the OUT parameter is usually named
OUTorEXT- Eg:
Gas_Amb_V2isGasAmbIN&GasAmbOUT, whileValley_Amb_V2usesValleyAmbINT&ValleyAmbEXT
- Eg:
- You will need to locate these identifiers defined here Reference - FMOD Parameters
- These do not have a consistent naming convention, however the OUT parameter is usually named
- Select the appropriate reverbs for your rooms for
ReverbIN&ReverbOUT - For
FMOD Global Parametertype in exactly:AmbSwitch - Enable
Use Door Check Featureif your Transition BP contains doors - You cannot add elements to
Doors Open, this is supposed to self-populate via the BP’s construction script. - Se the
Global Parameter INto be set to1&Global Parameter OUTto be set to0
Part 6.3 Properties for INDOOR-to-INDOOR Transitions
- Select the appropriate reverbs for your rooms for
ReverbIN&ReverbOUT - That’s it! You don’t need to modify any of the other properties like above. It is actually recommended not to modify anything else as the BP has checks that will mess up audio for smooth Interior transitions.
Part 7 - Breakable Glass
Breakable glass is extremely easy to implement but they need to use Portals to allow sound to allow sound pass through when they’re broken.
- Create a Portal Volume that tightly fits the area where the breakable glass will go
- Drop a
BP_BreakableGlass_v01_C(located:Content > ReadyOrNot > Level > Destructibles > Glass) into your scene- You can select the Material and Mesh for the Blueprint to use
Before the Los Suenos Stories DLC3, this was in Content > ThirdParty > BreakableGlass > Blueprints`
- You can select the Material and Mesh for the Blueprint to use
- Select the Portal Volume you wish to match with the glass and under
Breakable Glass Soft Pointuse the eye-dropper to select the Breakable Glass Blueprint in the scene. - If your Breakable Glass crosses the threshold of Indoor-Outdoor (like most windows do), Enable
Is Outside
Part 8 - Placing down QSM_Weapon_Reflection_Probes
As mentioned in the Actor Overview, these are akin to a sound version of a Map’s Facade. It’s a fake Reverb/Echo probe placed outside the map to mimic where sound (specifically gunshots) would echo/reverb off of back towards the player.
Examples: Bouncing off distance large buildings or a neighbors house, echos/reverbs from an underpass or cave outside the map, or just a simulated reverb from a large valley or open field. These are more artistically placed around the map to give it that je ne sais quoi. There really isn’t a science to it, just where you think some reverb and echoes should come from.
To set them up:
- Place a
QSM_Weapon_Reflection_Probein your map from Content > FMOD > Events > Levels > Reverbs. - As with all FMOD Events, nest it in a Ready Or Not Audio Volume and Disable
Auto Activate. - That’s it!
Some additional notes, Zack mentions you can place up to around 6 probes in your map, but you shouldn’t exceed 6. Additionally only 2 probes are active at a time based on proximity to the player. They can be nested in a RoNAudioVolume, but do not need to be physically inside it.
Part 9 - Using the Sound_StarterAmbience_V2_BP_C Blueprint
These work very similar to the Transition Blueprints, however is meant to set the starting values for Ambiance through “AmbSwitch”* when a player loads into a map.
- Place a
Sound_StarterAmbience_V2_BP_Cinto your scene and make sure it covers the PlayerStart- You do not need one BP per PlayerStart (as one can cover many), but it really should be 1 BP per location
- Do not just encompass the map in one BP, it should be as localized as possible.
- You do not need one BP per PlayerStart (as one can cover many), but it really should be 1 BP per location
- The rest of it works the same as a Transition Blueprint, just select the Event to edits and the starting AmbSwitch parameters and values that you wish.
Tools & Testing
RareKiwi has created a bunch of useful tools to help test and debug QSM and OST Values. All these tools are provided in the Blueprint and Tools folders.
BP_AudioPropagationQSMTester
Content > Mods > Template > Blueprints
This is a BP that you place anywhere in your level. When you play your level in the game it will constantly fire a gun shot so you can debug and see if QSM is working correctly.
| Control | Action |
|---|---|
| P | Move Here |
| [ (Left Bracket) | Trace there |
| ] (Right Bracket) | Occlusion Type |
| Del (Delete) | Toggle Active |
Pressing \ (Backslash) during the mission countdown will crash RoN
BP_AudioSampler
Content > Mods > Template > Blueprints
When placed in your level, it allows you to test the effect different FMOD Parameters have on FMOD Events. This is meant to be used within the Editor. You can changed what Event to preview by selecting the FMODAudio component in the Details panel. You can use any FMOD Event in here; Timelines, Ambients and regular sound effects!
When you are playing in the editor, the Blueprint will auto-populate the sliders to show what you can edit. However the sliders will not update the audio automatically and you will need press the Play button for each change you make.
Example Use: The FMOD event Ridgeline_Cicadas can be controlled by AmbSwitch to lower the volume for entering interior sections. It would be hard to figure out the correct values to use without many iterative builds, but using the AudioSampler allows us to quickly identify the values needed without leaving the editor.
EUW_Tool_RoomVolumeHelper
Content > Mods > Tools
Used to help keep track and change the Room IDs of Room Volumes. It creates a list of all Room IDs you have and select specific IDs.
EUW_Tool_ListRoomIDs
Content > Mods > Tools
Used to help keep track and change the Room IDs of Room Volumes. It creates a list of all Room IDs you have and select specific IDs.
What Next? Music!
If you got QSM all set up, you should look at the next part of the guide: Setting up Music Events for Maps to allow you add music to your map and let it react dynamically to combat and other parameters.