
Introduction
With the release of Boiling Point, the Community Mapping Framework can now import and author the Auto-Gen World Data that is created each time a Custom Map is first played. This is a pretty substantial leap for us, we no longer have to manually set up the entire World Data and players not longer need to wait for it either!
Originally the Auto-Gen was not that reliable, but VOID have done some bugfixing so that the World Generation created by the game is working identical to their set-up.
If you are already familiar with the World Data Actors, and just want to get into importing WorldGen, click here: Recommended Workflow
World Data Overview
RareKiwi has already created an extremely in-depth guide on how to create World Data here: World Data Authoring Guide
The guide is very comprehensive, but a little bit daunting so this will give you the cliff-notes summary on the important aspects to make this as digestable as possible.
Tools
World Gen Loader (EUW_Tool_WorldGenLoader)
- Content > Mods > Tools > EUW_Tool_WorldGenLoader
- Also found in the Framework toolbar dropdown for quick access
The main tool required to import and generate World Data from the game’s WorldGen.sav files. It also contains some QoL features to help clean-up & fix some errors that can result from importing.
World Data Helper (EUW_Tool_WorldDataHelper_Framework)
- Content > Mods > Tools > EUW_Tool_WorldDataHelper_Framework
- Also found in the Framework toolbar dropdown for quick access
This is the core tool to edit and modify World Data, and critical if you want to create the World Data from scratch. We will likely not need to use it much, but we will need it running in the background (Right Click > Run Editor Utility Widget).
It is mostly used in this guide to visually identify Rooms, Stack-Up Point & Clear Points.
Actors
World Data Generator ![WorldDataGenerator]()

This is the core of the World Data. It contains an array of Rooms which contains a reference to their Door and Threat Awareness Actors, their unique names, location and other linked rooms.
One will be automatically created after you import WorldGen.sav data.
Placing one in your level will disable automatic world data generation in game due to
Has World Ever Been Generatedbeing automatically set to TRUE.You will need to delete this if you need to regenerate and reimport World Data from the game.
Door Actors ![Door]()

Native versions of the old Door Blueprint. They work the same as the BP version, but have some important changes that are critical for successful World Gen.
Read here for information on updating doors: Doors
Editor Only Room Proxy ![Room]()

This is a Framework only class which is used to contain a single room’s Room Data in a visual form to help debug the world data. They are usually generated in front of a Door and contain visuals to show assigned doors and linked rooms.
Threat Awareness Actors (TAA) ![Threats]()

These are scattered throughout a level/room - we won’t be editing these. They have 3 main functions:
- When clearing a room, SWAT needs to clear each by getting line-of-sight to it’s position.
- They are used by SWAT to determine where to stand in a room based on the
Threat Level. - The nearest Threat will have an array of
Swat Look At Pointsso they have an appropriate angle to cover when not in combat.
TAAs are generated in a 20x20 grid from each Door actor, approximately spaced 250uu from each other, or closer if the NavMesh is tighter (like in corridors or angled areas). Essentially a 5000 x 5000uu square from the center of the door.
- Threat Level Low and Medium
![1]()
![2]()
- Usually where there are no direct line of sights to doors or where the NavMesh is marked for “No Suspects”
- Threat Level High
![3]()
- 90% of the map will be these.
- Threat Level Extreme
![4]()
- These are usually reserved for TAAs that are connected to Doors
- Threat Level Stairs
![Stairs]()
- Just a special use-case when generation detects stairs.
- Preferred Exit
![PreferredExit]()
- These are editor only icons to help debug/assign door
Exits, they have no impact on gameplay


Stack-Up Points ![StackUpPoints]()

Where the SWAT will stack up on a door when commanded to do so. These can be edited after import to provide more realistic stacking scenarios.
- Arrow Rotation DOES NOT affect the direction SWAT will look, and is a visual indicator to show what door they are assigned to.
- If doors do not have Stack-Up Points, then SWAT commands cannot be given on that side of the door.
- This is a feature, not a bug. Usually only occurs on very tiny rooms.
Clear Points ![ClearPoints]()

The path SWAT will follow when ordered to clear a room. When a door is selected these will appear. The sprites will only show if the World Data Helper tool is running.
Editing these also require the use of the World Data Helper to add/remove points and to clean them up to update Look-At traces.
Cover Points ![CoverPoints]()

Where AI will use cover on the map. We are not editing these.
Editing them can be extremely finnicky and out of scope of this guide, please refer here to learn more about it: Adjusting Cover Points
Recommended Workflow
Before we dive too deep, we should establish something important:
The whole point of using Auto World Gen is to do as little as possible to get maximum results.
We are not trying to edit every single actor, in fact it is recommended to not edit the majority of data. The only actors recommended to change are the more “tactical” themed mechanics such as Stack-Up Points and Room Clearing.
This means we are NOT manually modifying Room set-up, Threat Awareness Actors placement and Cover placement. All these actors should remain unedited; solely generated by the state of your NavMesh and Door placement using the recommended steps below: Preparing Your Map for Auto World Gen.
If there are errors in your World Data simply adjust the NavMesh and Doors - rebuild, play and re-import the WorldGen.sav again.
Custom Stack-up and Clear Point Workflow
If you edit these elements you need to alter your workflow slightly as not to reimport what the game auto-generates. The World Gen Loader has checkboxes for some buttons that you need to disable to specifically ignore importing and overriding these values so you can keep your existing changes.
You can decide to create Stack-Up or Clear Points either before or after Auto-Gen, it is a matter of preference. Though it might be good to see how the game thinks the points should be created first - to save some time/work. 😉
Preparing Your Map for Auto World Gen
To our understanding, VOID do not author/edit any of their World Data, it is all procedural. Currently, the World Generation created by the game is working identical to their set-up.
To match their generation we need to prep the map like they do:
- If you are not already using them, you need to update all Doors to use the native Door actors (not Blueprints).
- Adjusting a Door’s
Doorwaycomponent correctly. - Cleaning/Removing the NavMesh of unplayable areas.
Doors
It is HIGHLY recommended naming your doors. World Gen doesn’t create names for rooms, and due to how iterative it can be, it isn’t wise to waste time naming rooms. The Doors are the best thing to help identify if World Gen gets set up correctly.
Updating Doors
If you are updating your map from older versions, you NEED to switch over to the native versions of the Door; these are not Blueprints but official game actors.
You will need to drag in new Door actors from the Place Actors window (simply named “Door”). These need to be completely fresh actors. DO NOT Replace them using the editor.
If updating your Blueprint doors: DO NOT use Right-Click > Replace Selected Actors with
DoorActors.If you simply replace them it introduces a pretty tedious bug with Doors. It does not clean up the BP_Door actor correctly and results in issues with World Gen and SWAT commands. In worst cases, will require you to completely redo any edits made to custom Clear Points you make.
The Doorway Component
For Rooms to be correctly identified and created during Auto-Gen, the Room’s NavMesh needs to be isolated into its own “island”. Doors are used to cut into the NavMesh to create these islands and help separate one room from another.
 How a room’s NavMesh should look now; Notice that any location where a door would be, it divides the NavMesh. Each room has its own distinct NavMesh ‘island’. This is done automatically by placing down a Door actor (you do not need to do any additional set-up).
The component that controls this on the Door is the Doorway Component.
The Doorway’s Box Component represents the actual size of the door and what needs to cover the “door” area/space.
You should NOT scale Door actor or the Doorway component to cover the space! Scaling the door will *not actually scale the
Box Extentof the Doorway component. This will lead to World Gen Issues. This is especially important for the “Doorway”Type of Doorwhere you usually need to extend the length of the door.
To correctly adjust the Door’s Doorway component:
- Within the “Details” panel, click on the
Doorway (Doorway)component of the actor. - Within Shape adjust the
Box Extentand TransformLocation(do not mess with rotation or scale!) to fill out the size of the door.
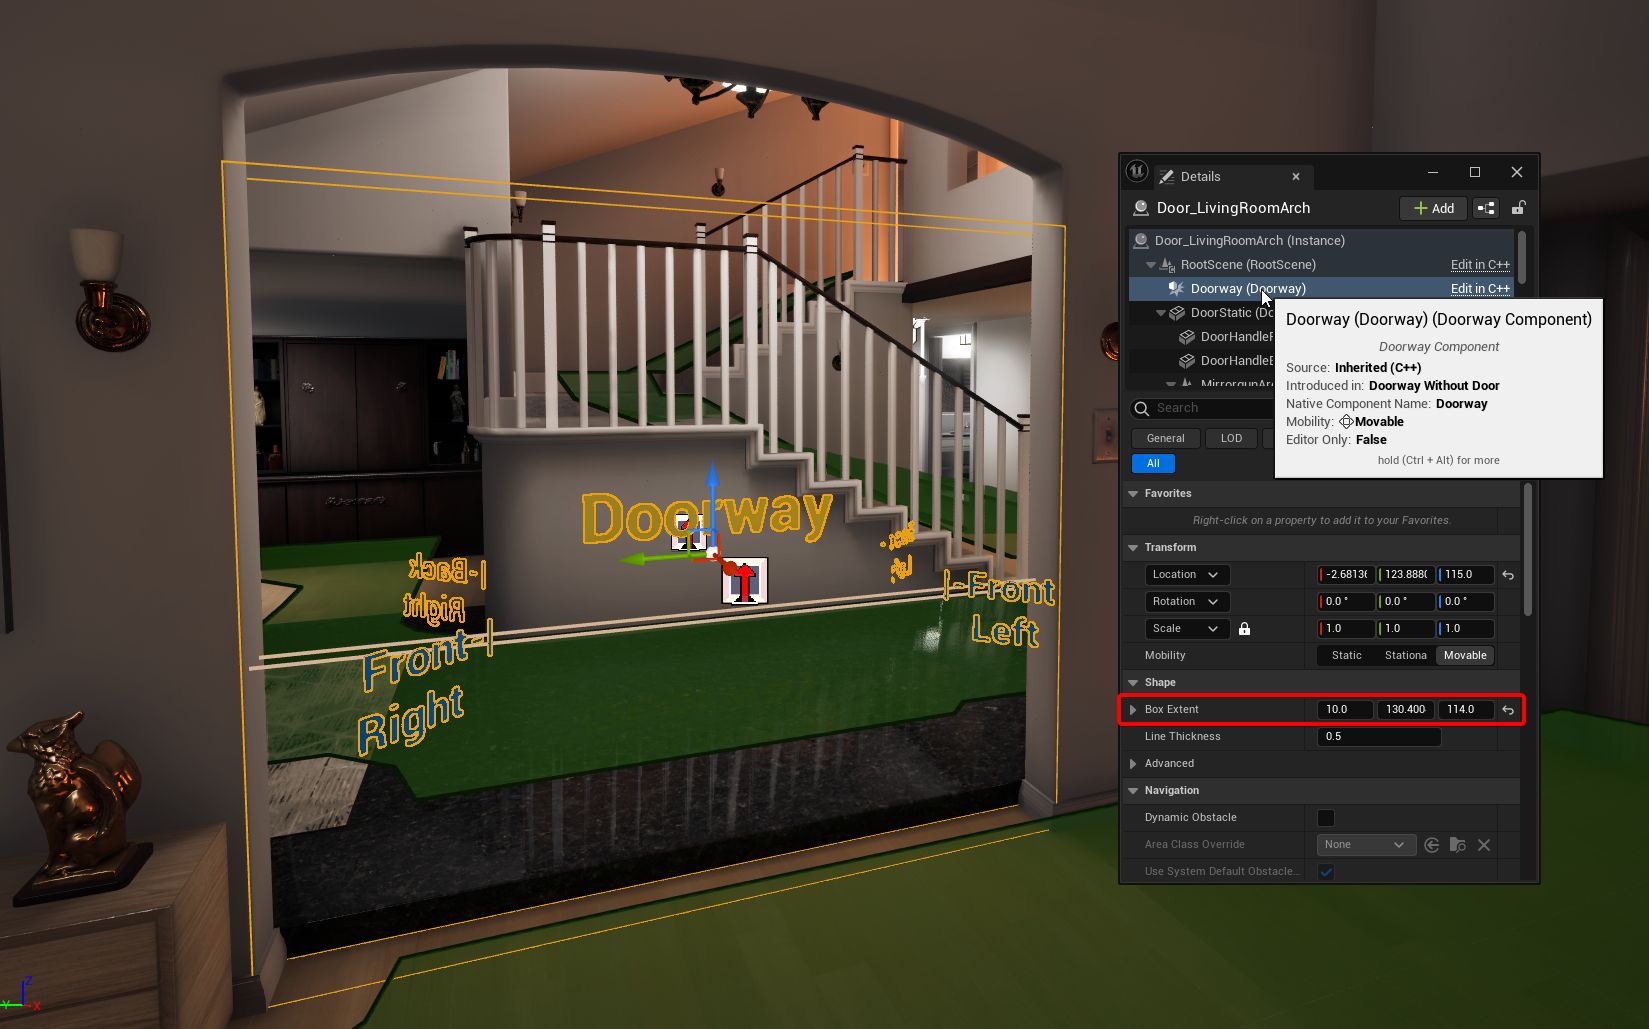 The Doorway Box Extent Y value was increased to 130 and moved to the center of the doorway to cover the empty space completely. Also not the NavMesh is cut up where the Doorway is, helping creating those NavMesh islands needed to help identify Rooms.
Although you definitely should not scale the Door actor drastically, scaling it very minutely will likely not cause massive issues.
Example: Scaling the X/Y/Z by 1.01-1.05 will likely not cause major issues (We have not encountered any), but just be mindful of what you are doing. Always playtest!
Double Doors
- Place down 2 matching doors next to each other and rotate one 180° (it doesn’t matter which one)
- Some doors have dedicated Left and Right versions
- If the door meshes are offset, you can move the whole Door actor to align them to be flush.
- Select one Door to be “main” door and under Door > Sub Door, Enable
Main Sub Door& then use the selector to assign the other door toDrive Sub Door - Select the other door and assign the previous door to the
Drive Sub Door.- DO NOT enable the Main Sub Door for this door.
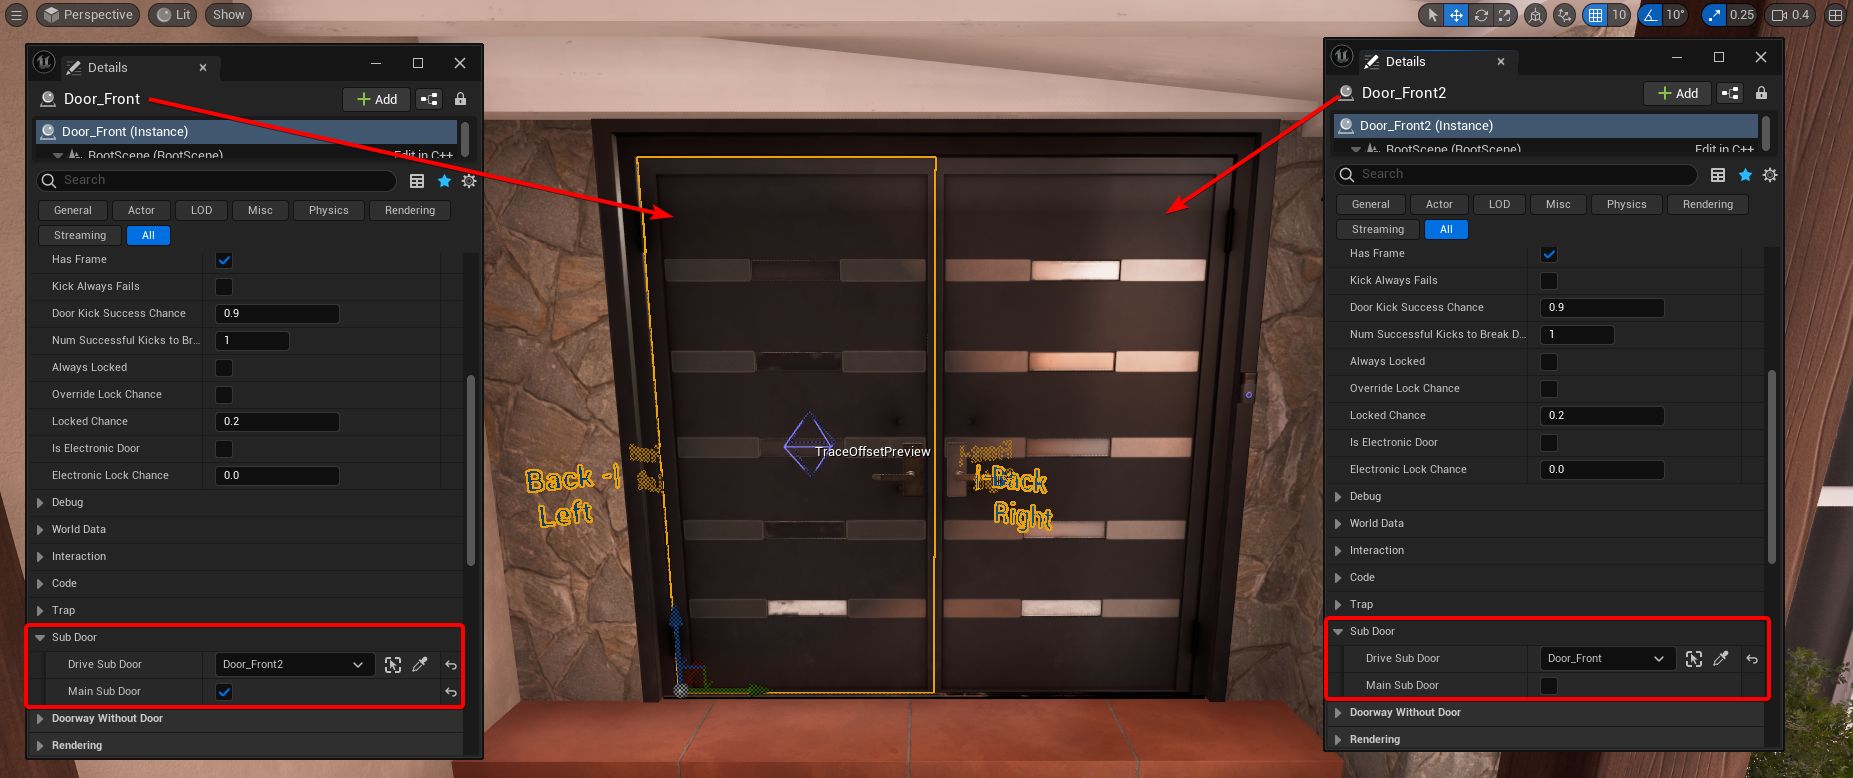 Double Door Setup
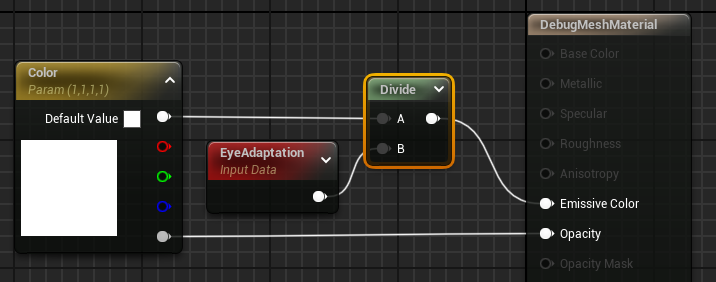
NavMesh
UE5 NavMesh does not work well with Physically Based Lighting/Bright values and often looks black. You can fix this by editing the Engine Material
DebugMeshMaterialto match the image below:
Cleaning the NavMesh
You should restrict the NavMesh to only the playable area. The larger the NavMesh, the longer it takes for World Gen to complete. If you have areas where the player cannot access, the World Gen will still create data points there.
You also want to restrict situtations where the NavMesh creates little islands of un-navigatable areas. Common places for this are on top of furniture (like beds and tables), beneath the map or on top of roofs.
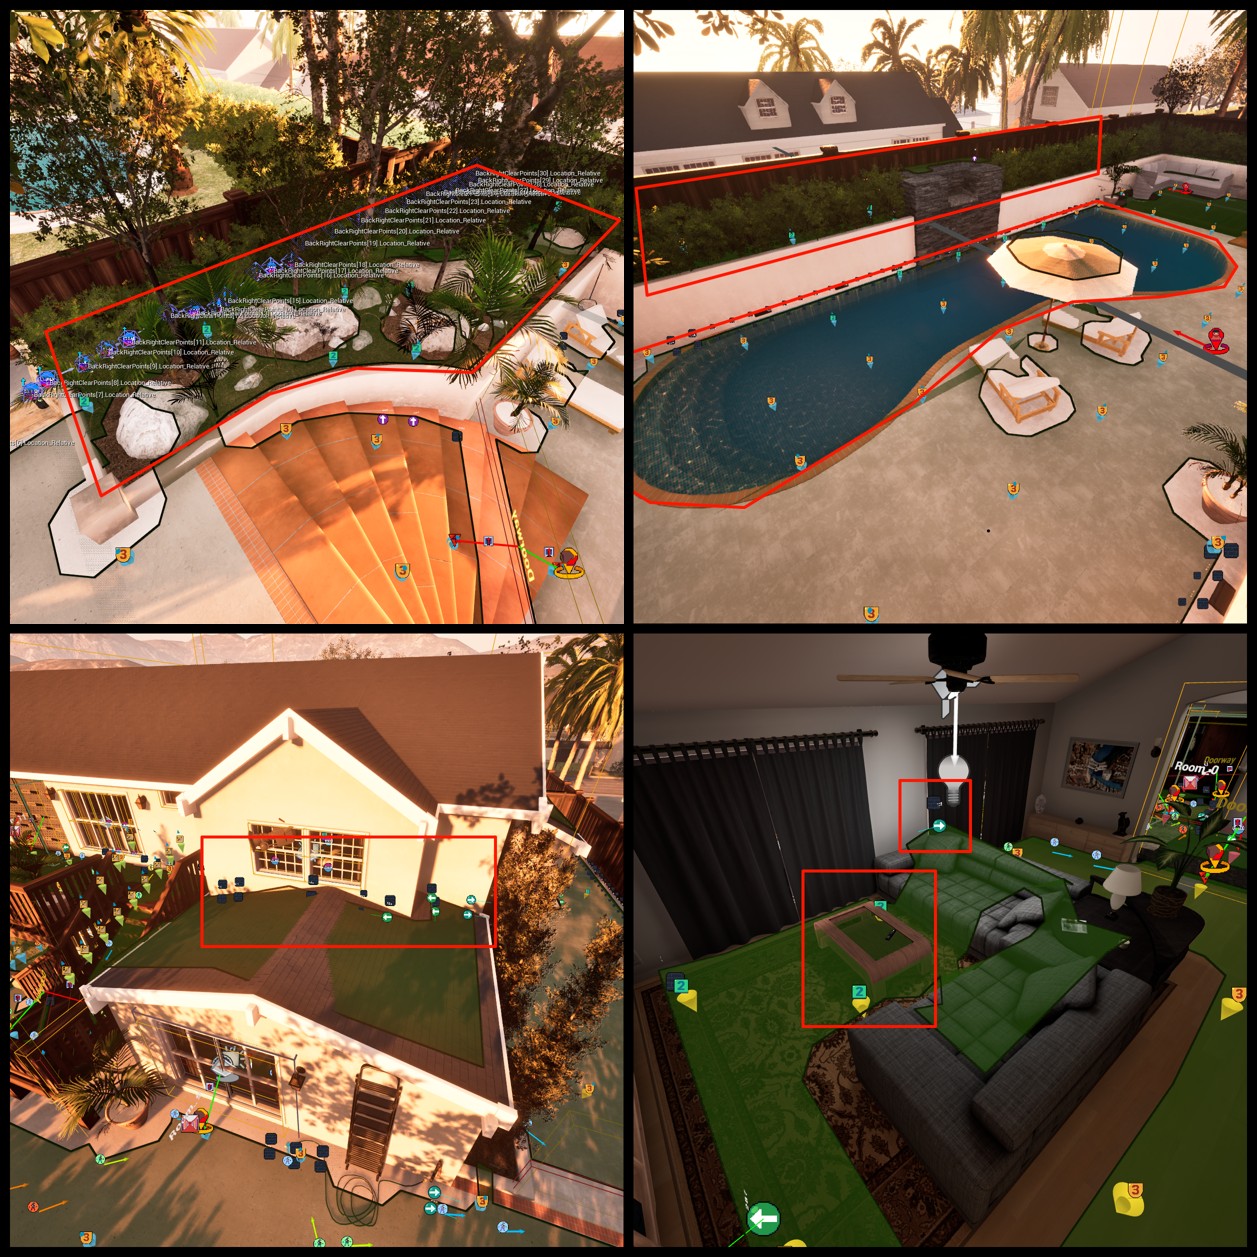 A bunch of scenarios showing the World Generation being created in areas that are technically non-playable areas. To note, the Clear Points in the first image also extend into the non-playable area.
There are 3 main methods for cleaning up your NavMesh:
- Make your Nav Mesh Bounds Volumes only cover the playable area
- Use Nav Modifier Volumes with the
Area Classset to “NavArea_Null” to remove unwanted areas/islands- This is the best way of nulling out the NavMesh - straight forward and easy to place down.
- Use Blocking Volumes to restrict the NavMesh by providing collision over the area
- This method works most of the time, but it still allows the NavMesh to create little islands inside the volume if it is too large and on top of it.
- You should also change the
Collision Presetsto “InvisibleWallDynamic” so particle effects dont get stuck on the volumes.
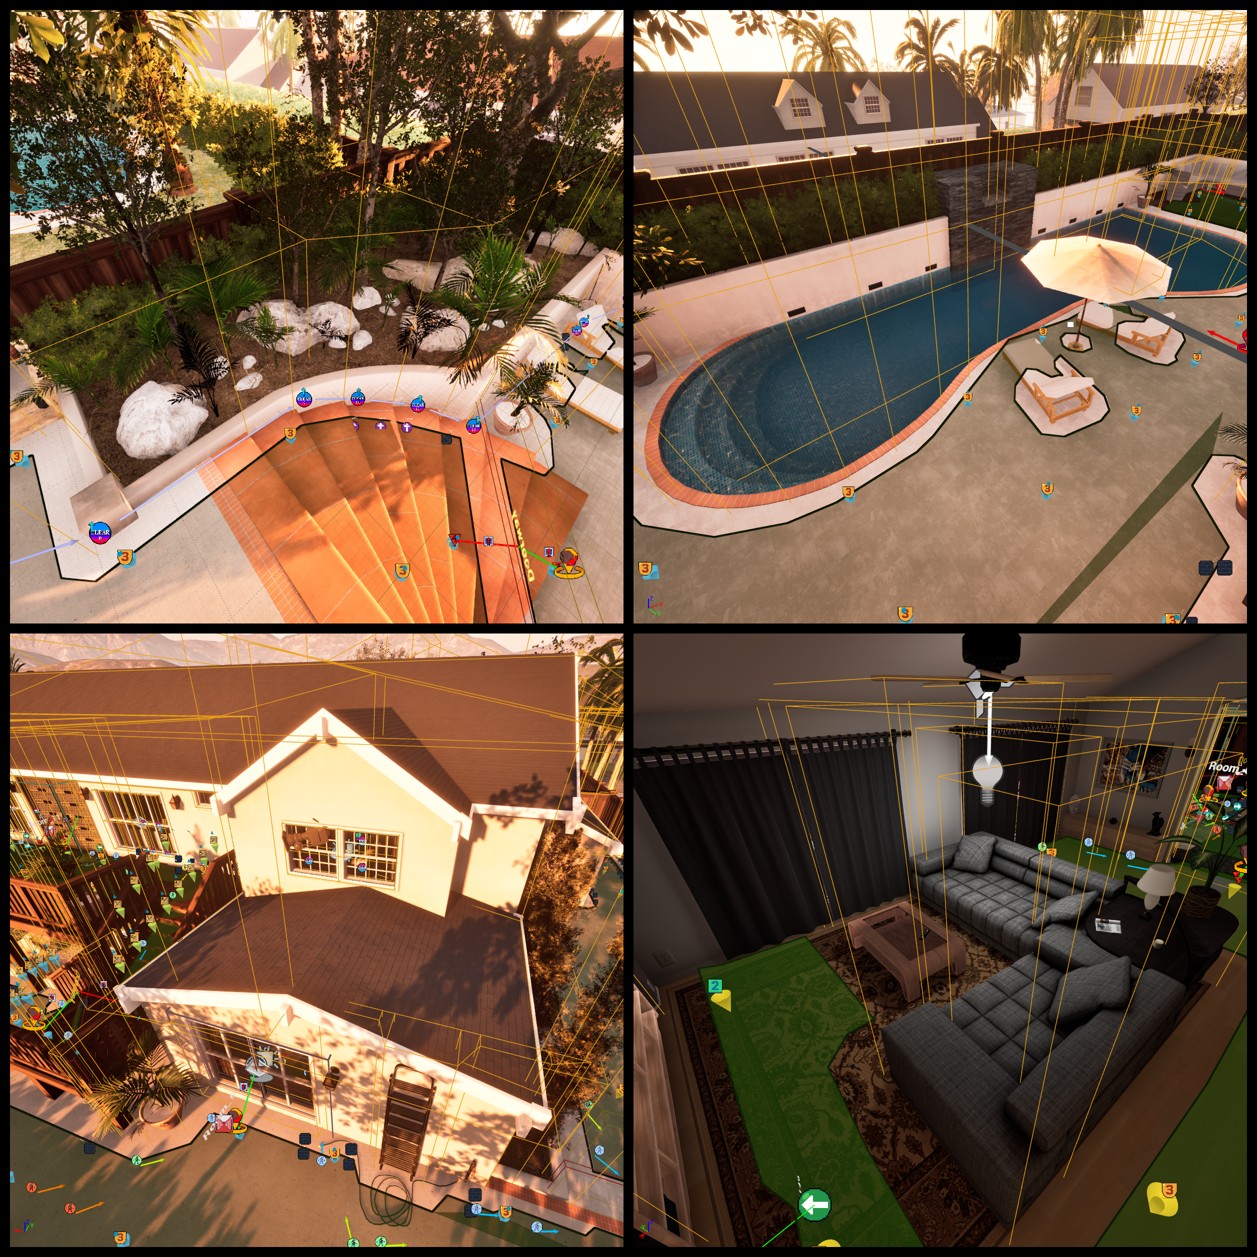 The previous issues above are fixed using a combination of Blocking and Modifier Volumes. The Clear Points are also looking better in this scenario. The total amount of World Data actors went from 1224 to 856, and the build World Gen time went from 13.4s to 4.2s after optimizing the NavMesh. You can imagine the implication of this on slower machines and larger maps.
Designating “No Suspect” Zones
“No Suspect” zones turn the NavMesh red and prevent suspects from being able to path to the marked areas. Technically not required, but it may be useful to prevent AI from encroaching on Spawns/Safe places.
- Place down and shape a Nav Modifier Volume like usual
- Change the
Area Classto “NavArea_NoSuspects”The drop down contains a lot of other area classes, but only “No Suspects” are used in Official maps. The rest of the modifiers either do not work or are remenants from very early development and are unusable.
Importing WorldGen.sav
How to Import
- Make sure you delete any previous WorldGen.sav of your map.
These are located at:
C:\Users\Username\AppData\Local\ReadyOrNot\Saved\SaveGamesIf you do not delete existing WorldGen.sav files, than World Data will not be generated again if it sees existing files, and you will use old data.
They will be named something along the lines of: “HCttH_WorldGen_112610.sav”. It will be named after your Level’s filename not the pak, and the numbers at the end represent the game version it was generated on.
Cook, Pak and Play your Map as usual. After your map fully loads and you Spawn In you can close the game and go back to the Editor.
While in the Bearcat as the timer sits at 0s, the game is running the world generation. You will only Spawn into the game when generation has completed - so you will need to wait until this happens. This can take a varying amount of time based on the size of your NavMesh.
- Run the World Data Helper (if not already running)
- Right-Click and Run
EUW_Tool_WorldDataHelper_Frameworklocated at: Content > Mods > Tools > EUW_Tool_WorldDataHelper_Framework - Alternatively, on the toolbar open the Framework dropdown and click
Open World Data Helper
- Right-Click and Run
- Run the World Gen Loader
- Right-Click and Run
EUW_Tool_WorldGenLoaderlocated at: Content > Mods > Tools > EUW_Tool_WorldGenLoader - Alternatively, on the toolbar open the Framework dropdown and click
Open World Gen Loader
- Right-Click and Run
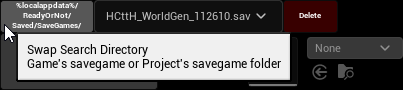
- The World Gen Loader tool should automatically find the WorldGen.sav file if it exists in the directory while your map is open.
![SwapSearchDirectory]()
- If it does exists and doesn’t show, press the most top-left button (Swap Search Directoy) once or twice to “Change Directory” to refresh the tool.
![LoadWorldDataButton]() Click
Click Load World Data...and it should make the other buttons available.Before continuing, It is highly recommended that you save your map, just in case the Editor freezes and needs restarting.
- Click
![CreateAllActorsButton]()
- The checkbox on the button determines whether you want to import
Stack-UpActors. If disabled, it will not import/override existing ones.
- The checkbox on the button determines whether you want to import
- Once complete, then click
![ApplyValuesToActorsButton]()
- The checkbox on the button determines whether you want to assign
Stack-Up&Clear Pointactors to doors. If disabled, it will not override existing values.
The World Gen Loader also has buttons to manually add World Data elements one-by-one instead of all at once.
- The checkbox on the button determines whether you want to assign
- Congratulations! Your map now has World Data! The next step is to go through and check the data to see if there are any errors.
 Click
Click 

Cleaning and Reimporting
If you end up editing your map or need to regenerate the World Data, then you will need to delete the existing imported data and repak & play your map again.
- Within the World Gen Loader tool, press
![DeleteWorldDataButton]()
- If you have edited
Stack-Up Points, make sure you disable the checkmark on the button to keep these actors.You do not need to remove the Stack-Up and Clear Point Arrays for Doors - the tool will clean this up for you when you import new World Gen - unless the previously mentioned flag is enabled.
The
World Data Generatoractor should be deleted when you press this button as well. If your map doesn’t create new WorldGen.sav files make sure that it is actually removed from the map. - If you have edited
- Delete the previous WorldGen.sav of your map.
![DeleteWorldSav]() You can delete this quickly by using the World Gen Loader tool and clicking the red
You can delete this quickly by using the World Gen Loader tool and clicking the red Deletebutton next to the .sav- Or just delete it through the Explorer.
- Recook, pak and play your map again
- Follow the previous to reimport your newly generated WorldGen.sav and reassess the changes.
- If you have edited
Stack-UporClear Points, than make sure you have disabled the checkmarks next on the Create All Actors & Apply Values to Actors buttons make sure you do not override your changes!
- If you have edited

 You can delete this quickly by using the World Gen Loader tool and clicking the red
 Finalizing
Once you are satisfied with how your World Data looks, we need to make sure the level no longer generates WorldGen.sav files.
- In the Place Actors window, drag a
![WDA]()
World Data Generatorinto your scene. - It will automatically populate and set the
Has World Ever Been Generatedto TRUE. - Save your map and you’re done!
If you do not include a
World Data Generator, when someone plays your map they will generate their own WorldGen.sav and it will override your imported World Data.
Checking the Data and Fixing Common Issues
Most of these issues will require you to regeneration the WorldGen.sav after fixing them in the Editor. You can manually fix it up without regenerating them - but you are likely to miss something and it is cleaner/faster to just let the game redo it.
You should check the following in order of importance. Once one is solved, move to the next:
- Do the newly created rooms actually make sense?
- Check to see if they are connected and the doors are linked correctly.
- Do all areas on the NavMesh where the SWAT need to clear contain
Threat Awareness Actors? - Are there any instances of TAAs or Cover Points outside the playable area?
- Check every single door
- Does each door contain
Stack-Up Points? - Do the
Clear Pointscover the entire room? Do they clip through Geometry?
- Does each door contain
- Check Double Doors
ISSUE: Rooms & Doors are generating incorrectly or not making sense.
The most likely candidate is that the door’s Doorway components are not set up correctly or the doors do not isolate & separate the NavMesh into clear Room islands.
SOLUTION: Double check Doorway components on the affected areas
- If you haven’t already, make sure you have named all your Doors - this will greatly help you to mentally parse the World Data.
- Make sure the World Data Helper is running - this helps identify which doors and rooms are linked by displaying arrows to them.
- Make sure the doors are not overly scaled, the
Doorwaycomponent is scaled to (1,1,1) and that you are only adjusting the Doorway’sBox Extent. - Check to make sure the Door actually carves into the NavMesh and separates the map into distinct NavMesh Islands/Rooms.
ISSUE: Treat Awareness Actors are not generating in areas SWAT need to clear.
- The entire NavMesh does not need to be completely covered in TAAs, only bits relevant to SWAT clearing.
- HOWEVER: If TAAs are missing from an area SWAT needs to clear, this is often caused by ground/playable space being more than 50uu from the location of the door.
- There is a rule in the generation to avoid creating TAA when the ground gets too low beneath a door (think balcony overhangs or blocking volumes under the map).
SOLUTION: Add additional Door Actors at the lower area to help generate TAAs
- This allows the generation to create TAA at the Z-level of the new doors.
- Change these Doors to Doorways and Disable
Can Issue Orders on Front Side&Can Issue Orders on Back Side- This will not generate a new Room where the new doors are added, and will be simply be part of the existing room.
- This is important for larger rooms/exteriors that may need to clear the entire area instead of segmenting it into illogical rooms.
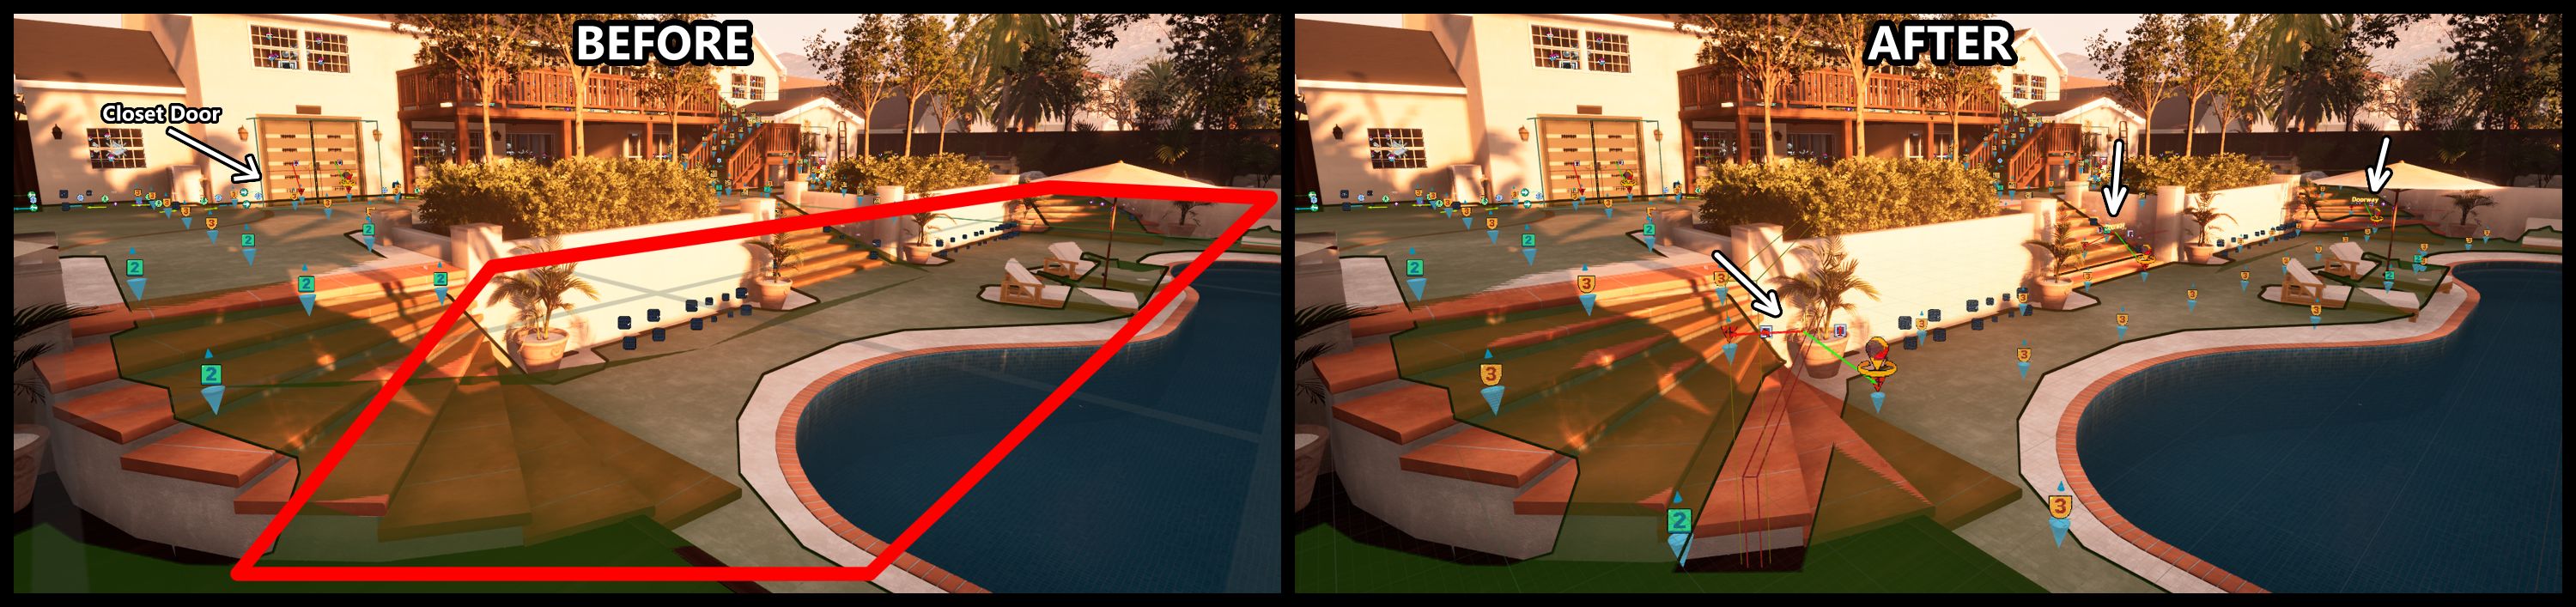 TAAs are missing on the lower portion of the yard, it was over 50uu below the closet door and World Gen considered it an overhang despite stairs being present. The solution was to introduce doors to the bottom of the stairs which help generate TAAs correctly.
NOTE: A lack of TAAs is not a game breaking bug, but they should definitely be present in any location suspects can roam and SWAT can clear.
Example: If there are missing TAAs at spawn or the perimeter of the map, where suspects cannot path to, this is not a massive deal and can probably be safely ignored (Official VOID maps also are set up like this).
ISSUE: No Stack-Up Points Generated on one side of the Door
- This is likely caused by the room on that side of the door being too small for any points to be generated.
- This is not a bug and is intentional.
- If the room is so small that points cannot be generated, in real life it would be unlikely that you would attempt to stack up in a tiny room. It would be an in-n-out sort of situation.
SOLUTION: Manually Add Stack-Up Points
- If it is absolutely critical that you need points than you will need to manually add them.
- Details here: Adjusting Stack-Up Points
ISSUE: Clear Points clip through the Geometry.
- This is actually not an issue, SWAT will still be able to clear the room. This usually happens with rooms that have concave and complex NavMeshes.
- If the visual line connecting Clear Points goes through Rooms, it is fine as long as the points are all in the original same Room.
- If a Clear Point node touches another Room, this is a problem.
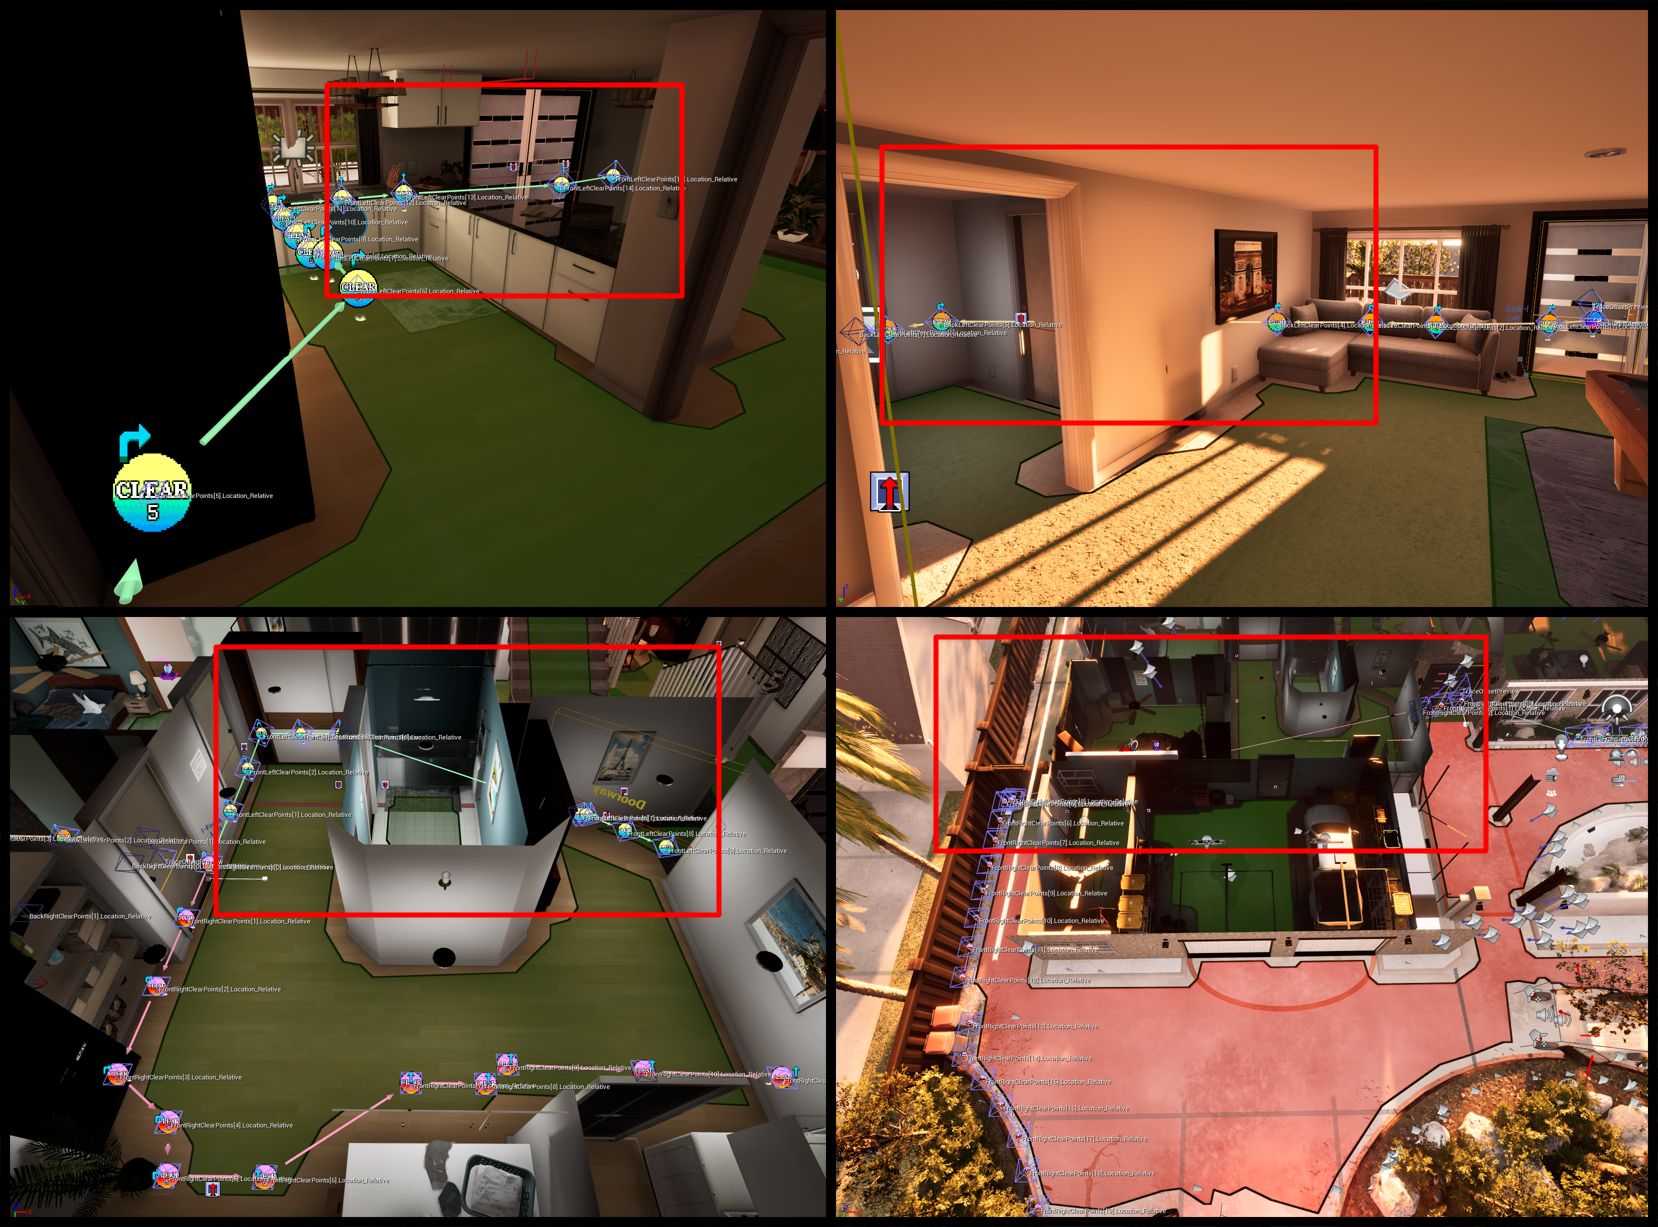 Some examples of the Clear Points clipping through the map/geometry. These are all in rooms that have complex concave layouts with the NavMesh but all points are in the same room. Despite visuals, SWAT are still able to successfully clear these rooms and do not have any gameplay issues.
SOLUTION 1: Test the map and confirm that it is working
- Although the clearing path may look a little janky in the Editor, it might actually be “good enough” in game.
- It is best to actually just playtest your map. You can remove all AI apart from 1 so you can take your time and test each door from either side.
- If there are issues move onto the next solution.
SOLUTION 2: Edit the Clear Points on how you think it should work.
- Simply move the Clear Points to make sense. A full guide is discussed below: Adjusting Clear Points
SOLUTION 3: Double check your Door/Doorway set-up
- If Stack-Up points are actually going into other rooms, it is likely the Rooms/Doors were not generated correctly. You will need to double check to see if they are: ISSUE: Rooms & Doors are generating incorrectly or not making sense.
ISSUE: One of the Sub-Doors of Double Doors will have their Stack-Up Points and Clear Points reversed/wrong.
This is currently an issue with importing the World Data. Usually one door will have its data reversed (eg: the Back Stack-Up/Clear points will be incorrectly imported as the Front, and vice-versa), but luckily we have a 1 click solution.
SOLUTION: Check every Double Door, and flip the values with the World Gen Loader tool
- Find and select the Sub Door with the inverted/reversed Stack-Up and Clear Points.
![]() With the door selected, press
With the door selected, press Flip Selected Sub Doorsbutton on the World Gen Loader tool
 With the door selected, press
 ISSUE: Cover Points/Threat Awareness Actors are generating outside the playable space
- This is likely caused by rogue NavMesh islands around the map that were not removed.
SOLUTION: Clean up the NavMesh
- Simply remove any NavMesh islands that you see outside of the playable space or where Players/SWAT cannot walk on with Navmesh Modifier Volumes set to NavArea_Null
- As discussed above: Cleaning the NavMesh
You should avoid deleting actors while using the Auto-Gen because the more you edit it, the more you have to maintain it with each iteration/update of the map. Having a 1 or 2 of instances of World Data in undesirable locations is far from game breaking and not worth the effort stressing over it. When in doubt, play test it.
Editing World Data
Each of these Actors have a dedicated and comprehensive guide in the World Data Authoring Guide, but here are some general notes when it comes to editing so you know what you are getting yourself into.
Adjusting Stack-Up Points
You can move Stack-Up Points virtually anywhere you want but there are a couple of things to note:
- All points should be contained within a single Room and on the NavMesh
- Do not have them overflow into other Rooms
- You do not need to have 4 points on both Left/Right sides of a door
- A lot of the time Auto Gen will generate only 1 or 2 if there is not enough space.
- This just means that if asked to stack on that side, the remaining SWAT that cannot reach a spot will move to the opposite side.
- You ARE allowed to have stack up points on exclusively Left or Right sides of the door
- If there are not points on the opposing side, the command will just be disabled.
- A lot of the time Auto Gen will generate only 1 or 2 if there is not enough space.
- If no points exist on one side of the door, you will not be able to command SWAT from that side.
- Example: If you have no points on the Back side of the door, you will not be able to command SWAT from that side.
- If deleting points, make sure there are no empty entries in the Door’s
Stack UpArrays- If there are empty array values, it may cause a CTD. These should be deleted instead of remaining empty.
- Make sure the points are on the correct side of the Door
- Example: Back Stack-Up Points are on the Front side of the Door
- If you do not, you will immediately CTD when you look at the Door.
Further Reading: World Data Authoring Guide - Stack-Up Actors
Adjusting Clear Points
You can freely move Clear Points around a room (just make sure keep them to one room only). However, adding/removing points should be done with the World Data Helper tool.
After any modifications to Clear Points, it is required that you to press the Clear Point Trace LOS and Clear Point Direction by Angle buttons on the World Data Helper. ![]()
![]()
Further Reading: World Data Authoring Guide - Clear Points
Adjusting Threat Awareness Actors
For the Auto-Gen method it is highly recommended to avoid moving or adding/deleting TAAs entirely.
Further Reading: World Data Authoring Guide - Threats
Look-At Points
The most likely reason to adjust TAA is to add additional Look-At points. You should leave these as what the game thinks they are, but there may be situations that need manual adjustment.
- Example: You have large open windows that you may want the SWAT to pay attention to, you can add an
Editor Only Look-At Proxyand assign it to the relevant
Further Reading: World Data Authoring Guide - Look-At Points
Adjusting Cover Points
Much like editing TAAs, it is advised against modifying them.
There may be instances where you want to create some Cover for unique scenarios, in this case it is best to follow the original guide below.
Further Reading: World Data Authoring Guide: Cover Points