
The Los Suenos Stories update to the Community Framework, reworked the following world gen related assets to the base game Door class rather than Door Spawners.
The old guide is hidden, but available here. You can still use that guide to create world data for your existing door spawner copies or those in the Deprecated.zip
If you are making a new map or are reworking to use the base Doors, DO NOT use that linked guide.
Overview
World data is the info needed by AI to know about rooms. It is intertwined with doors to let SWAT know how to stack up, clear rooms, know where to look as-well-as by the suspects and civilians for fleeing and retreating. 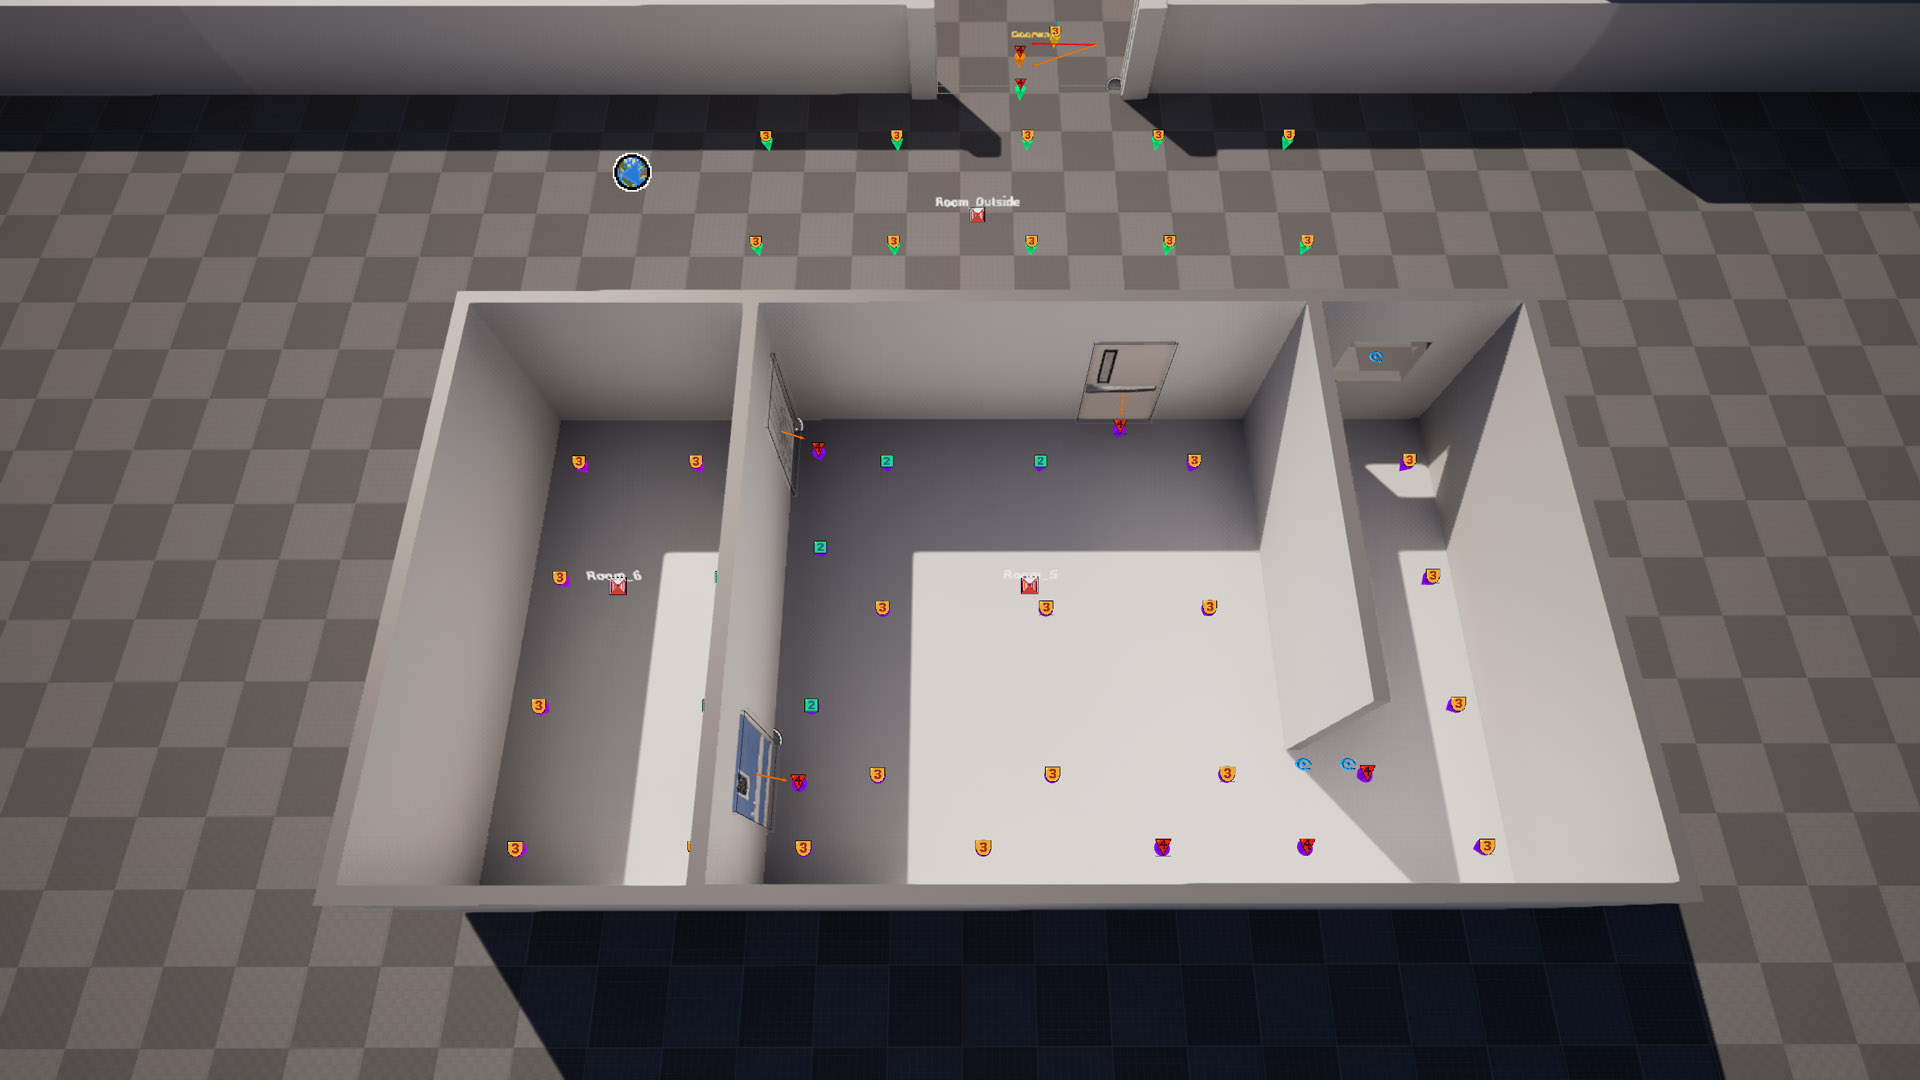 An example of world data for 3 rooms
This is a brief overview of the classes which you will be using to author your level’s World Data.
Overview: World Data Actor ![]()

The core of the world data in your level is contained in a single actor in your level; the World Data Generator Ready Or Not class.
This World Data actor contains an array of Room Data which contains a reference to their Doors and Threat Awareness Actors, along with a unique name, location and other linked rooms.
Rather than trying to manually populate the room values, the Framework instead provides the Editor Only actor class Editor Only Room Proxy which will populate the Room Data|Rooms in the data generator when it’s construction script is run.
Placing one in your level will disable automatic world data generation in game due to “Has World Ever Been Generated” being automatically set to True.
Overview: Editor Only Room Proxy ![]()

Editor Only Room Proxy
This is a Framework only class which is used to contain a single room’s Room Data in a visual form, so that you’re less likely to make mistakes when setting things up.
It has selection based visuals for assigned doors and linked rooms, as well as an automatic name check so you can’t create conflicts.
The rooms’ “Threats” arrays will also be auto-populated based on the name.
Overview: Threat Awareness Actors ![]()

These are scattered throughout a room, usually at a 250x250 grid interval, but tighter in narrow nav areas.
They have 3 main functions.
- When
clearinga room, SWAT needs to clear each by getting line-of-sight to it’s position. - They are used by SWAT to determine where to stand in a room based on the
Threat Level. - The nearest Threat will have an array of
Swat Look At Pointsso they have an appropriate angle to cover when not in combat.
The Framework’s Threat Awareness Actor has loads of helpful construction script logic and visuals. Notably, the essential Pathable Threat Awareness Actors array will be auto-populated based on the assigned “Owning Room” and “Pathable Group ID”
Overview: Editor Only Look At Proxy ![]()
![]()


Editor Only Look At Proxy
This is a Framework, Editor Only helper actor which is used to auto-populate and/or auto-trace additional “Swat Look at Points” when using the World Data Helper tool
Setting Up World Data
This guide will cover setting up a simple map with 3 rooms, but can be extrapolated to any sized map.
Keep in mind, in vanilla RoN maps, world data is mostly automatically generated, so manually setting this up isn’t an exact science concerning measurements/spacing.
Tool
This guide makes heavy use of the Editor Utility Widget called EUW_Tool_WorldDataHelper_Framework.
It’s also used to display extra actor visuals when they are selected. If I refer to “the Tool” in the guide, I’m referencing this widget.
To run it; find it in /Content/Game/Mods/Tools/EUW_Tool_WorldDataHelper_Framework and press Right-Click | Run Editor Utility Widget
In the DarkWaters framework, this was in /Content/Game/Mods/Tempalte/Blueprints/WorldData/
With the Door update, this tool is no longer hard-coded to reference door spawners and other bps and instead works with the base game classes.
1. World Data Generator
- Place a single
World Data Generatoranywhere in your level. - Make sure
Has World Ever Been Generatedis True. This will skip the game’s auto-generation at run-time.
Make sure there are no other
World Data Generatorplaced in your level
After placing a World Data Generator with
Has World Ever Been Generated=True, your map will no longer have any cover point generation.
To remedy this you should place aBP_CoverGen_Frameworkand RoNCover Gen Override Volumesin your level.
2. Rooms
- I’d suggest just setting up two rooms to begin with, even if you have placed all your doors already. You can expand later.
- A room should always have it’s nav-mesh separated by a door or doorway
- Outdoor areas should also be rooms. Large spaces should be split at thresholds to limit how much SWAT needs to clear, but it’s not required.

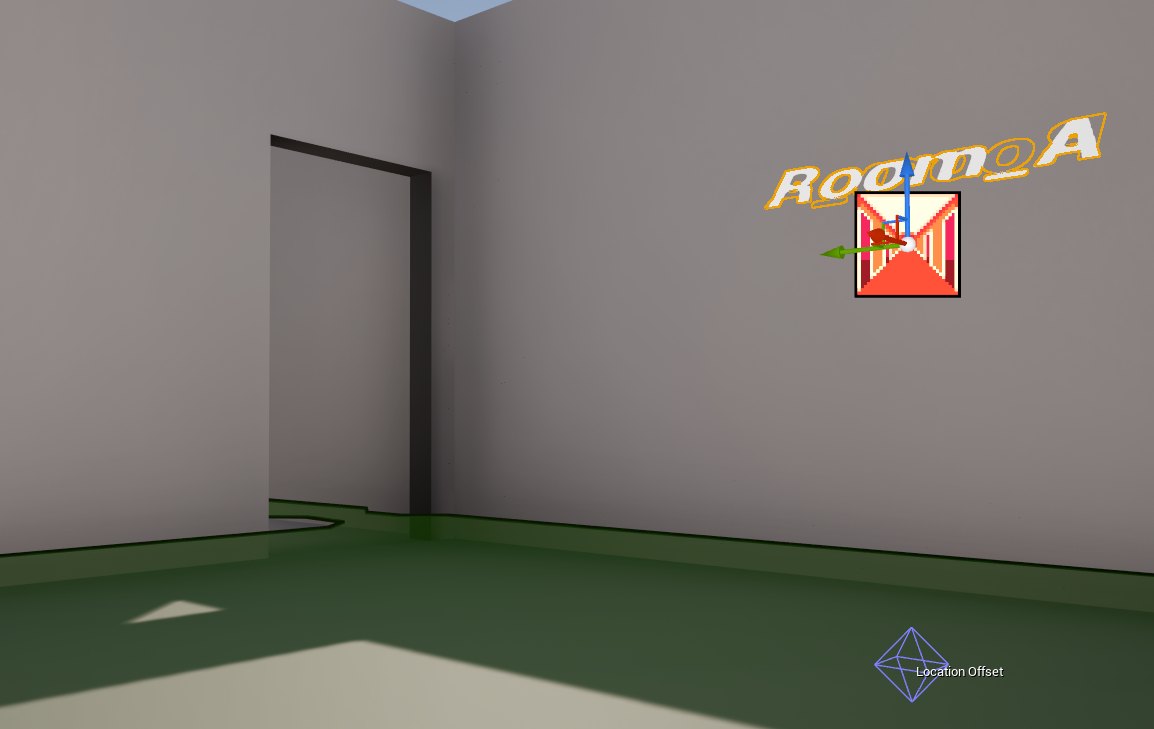
- Place two Editor Only Room Proxy on either side of a threshold where there is/will be a door or doorway.
- The “Location Offset” visual, should be at the height of the nav mesh.
- The
Room | Locationwill be auto-calculated from this offset location. - Room XY position isn’t too critical, just try to make it centred and visible for yourself.

- Each room needs a unique
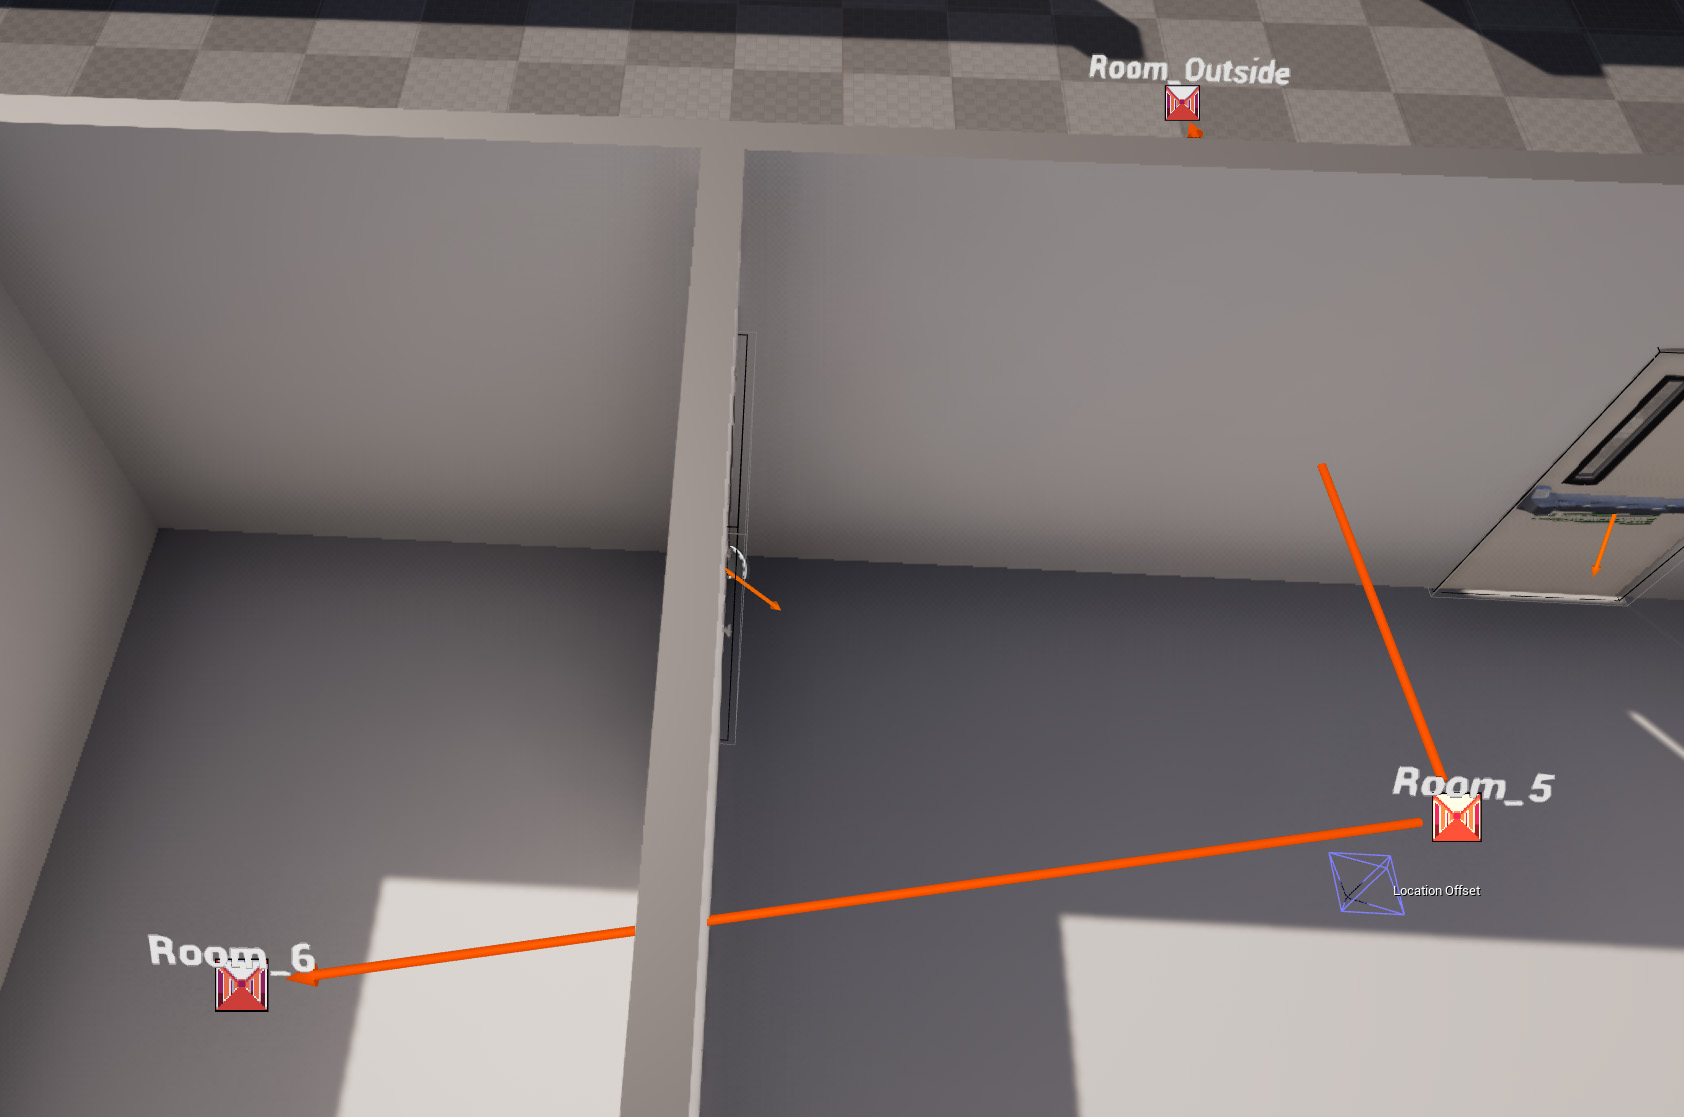
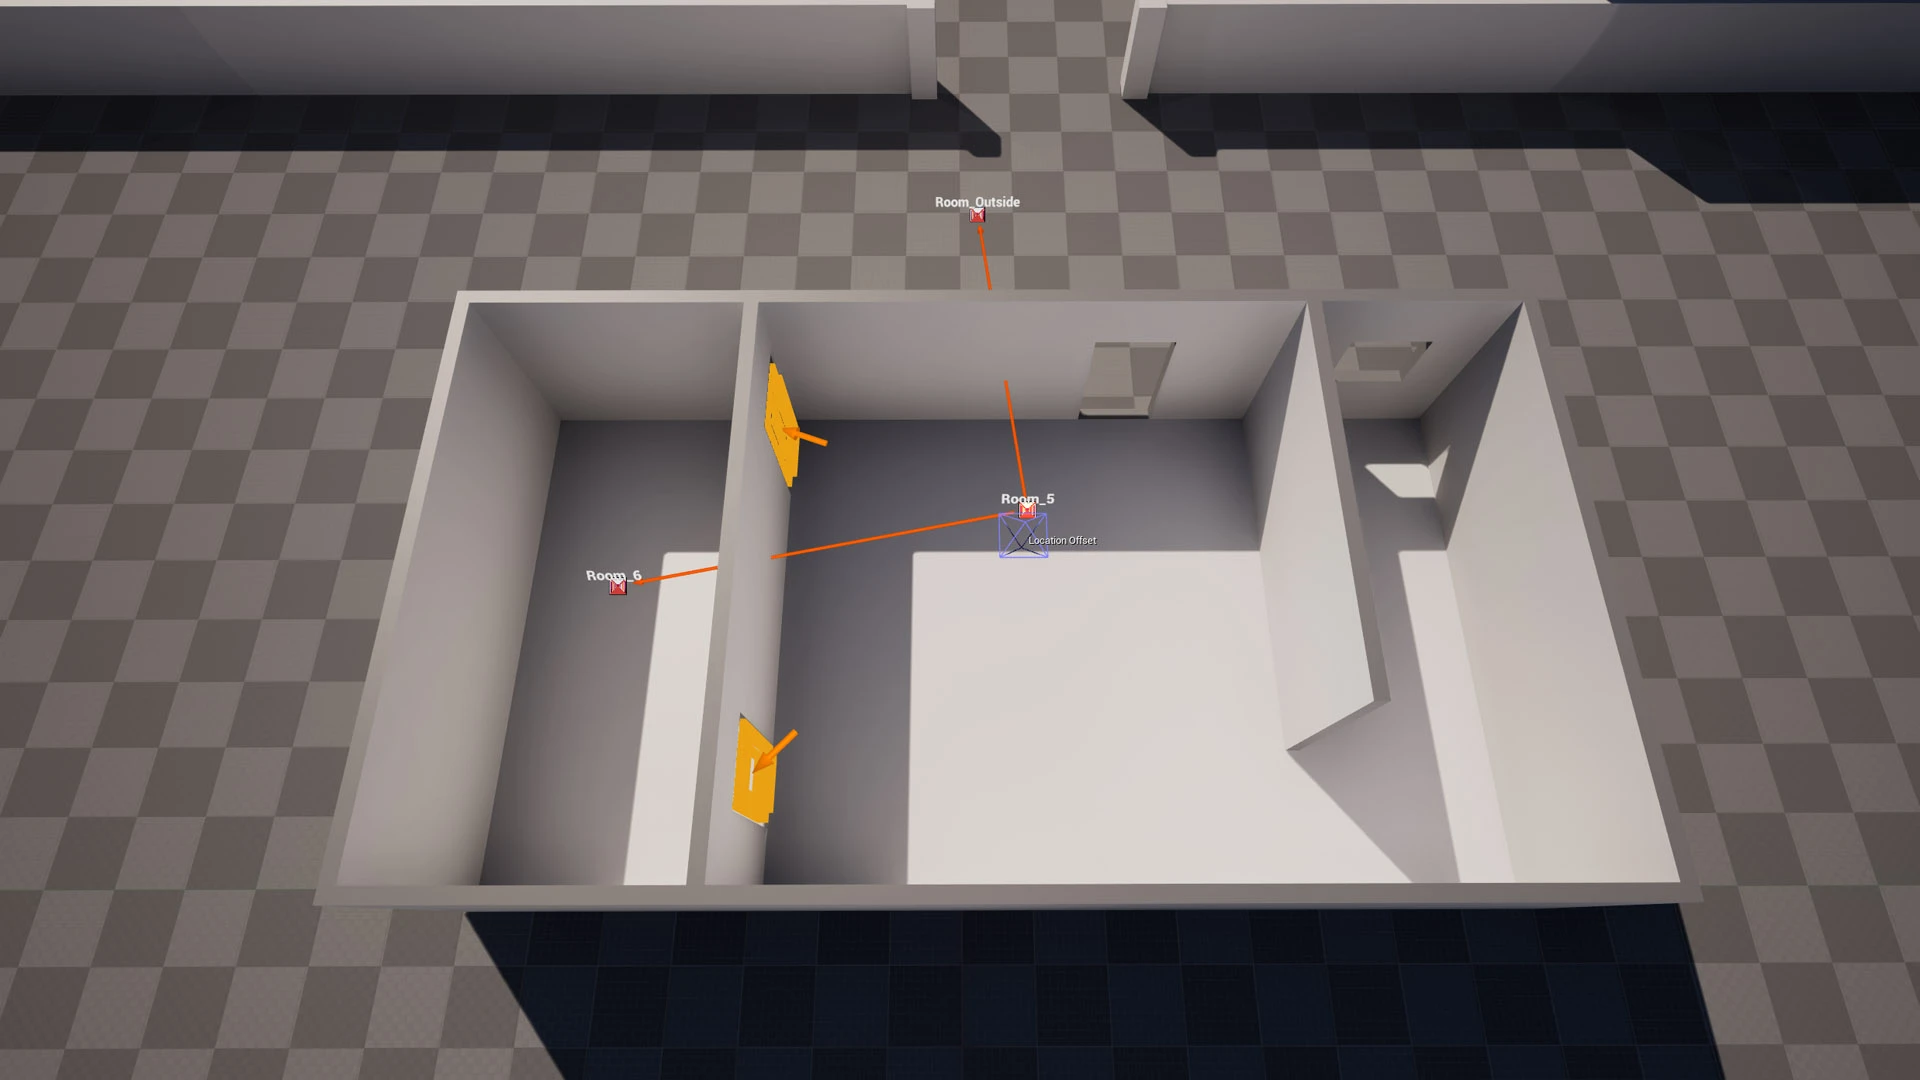
Name. The construction script will give a new one if a conflict is found in the level. Connecting Roomsneeds to be populated with each room directly connected with a door in the current room. (Rooms that share doors)- To avoid mistakes, you should use the
Quick Add Connecting Roomspicker to do this, as it will also populate the other room’s list with the currently selected room. - If the Tool is running, you should see a large arrow pointing at connected rooms when a room is selected.


- To avoid mistakes, you should use the
Root Doorneeds to be assigned.- This can be shared between other rooms.
- See Doors Placement briefly if you don’t have doors yet.
Additional Root DoorsAll other doors for the room should be assigned.- This needs the Root Door assigned too. Construction script will try to add it.
 Root Door and Additional Root Doors
If you are duplicating rooms and changed the
Root Door, be sure to remove it fromAdditional Root Doorsif needed.
Threatswill need to be populated, but we will come back to this later
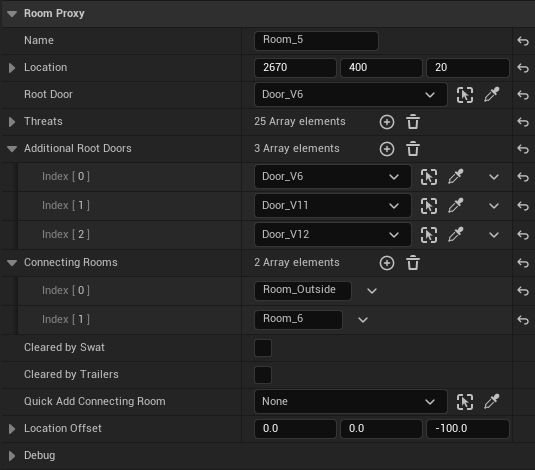 Example Room Details View
3. Threats
For each room;
- Place a
Threat Awareness Actorin the room. It should have nav mesh near it, placed just above nav-mesh height. - Set the
Owning Room- This can be set with the
Quick Add Roompicker to avoid typos. - Each room name will generate a randomly coloured cone that should match the other’s in the room.
- This can be set with the
- Check
Is Outsideif applicable. - Keep duplicating your threats to cover the entire nav-mesh of your room. See placement;
- Auto generation spaces them at 150-250u with closer points when nav-mesh edges are closer.
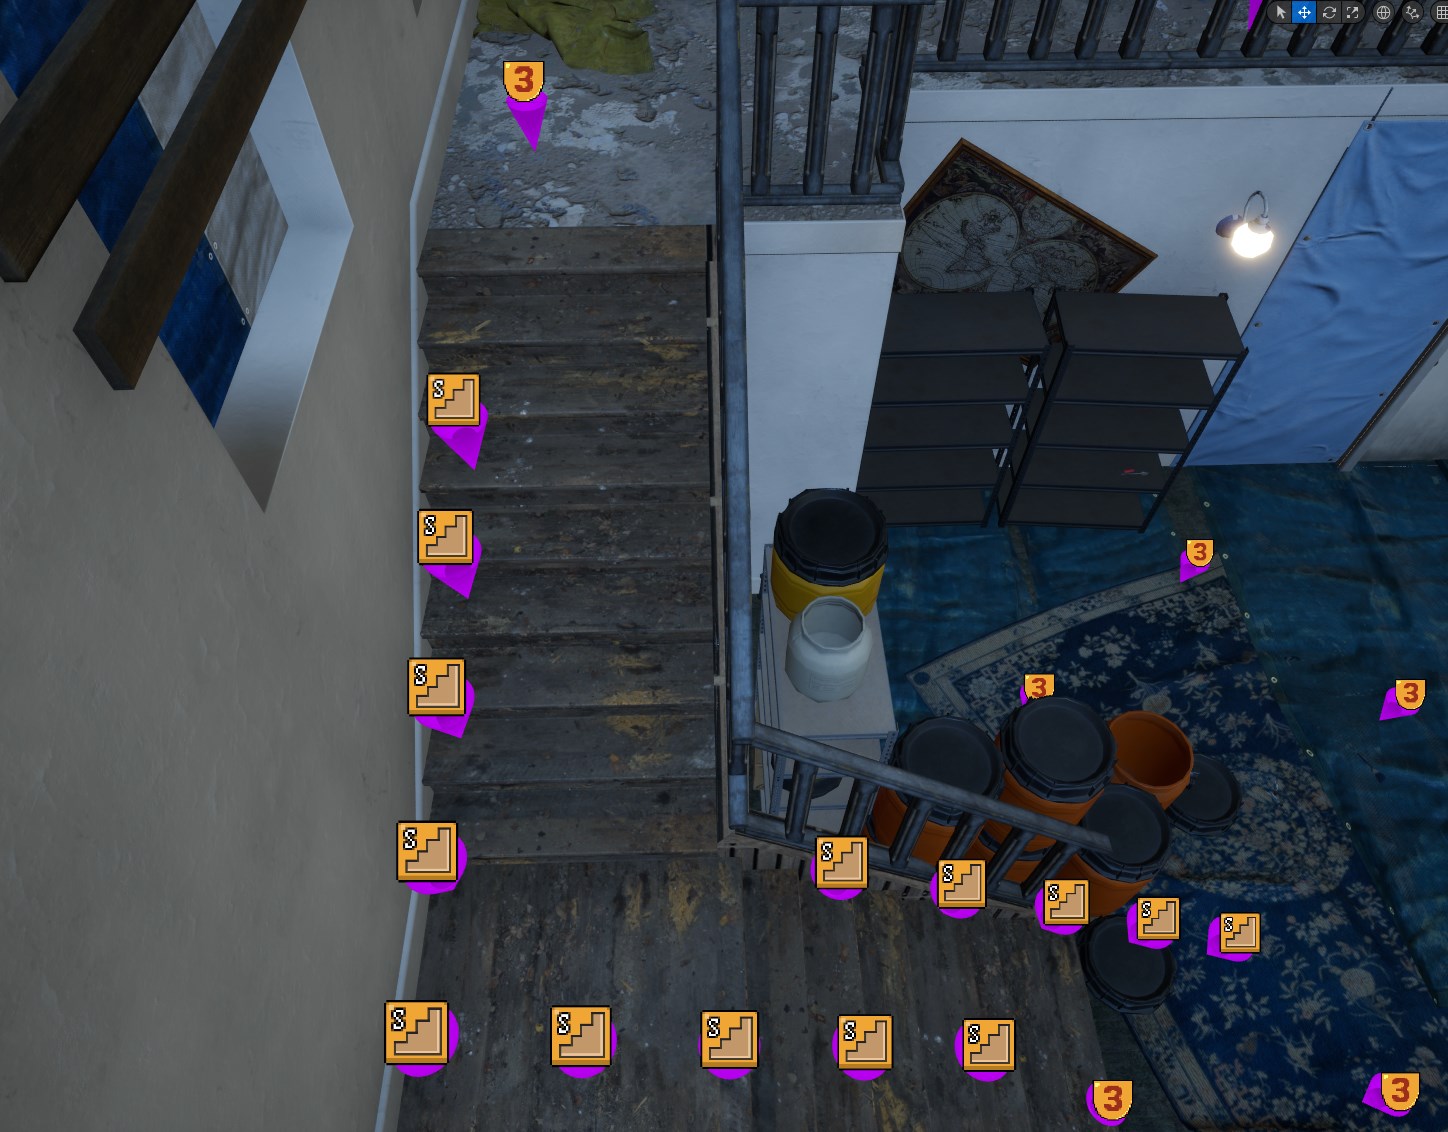
 Meth Outside Threats
 - Threats are points that the SWAT has to visually check in order to clear a room. If SWAT can see all points from their clear path, they will stop following the path and resume their other activities. Keep that in mind for corners, you may want to offset a threat closer to an inside wall or behind an obstruction of a corner so that SWAT has to check more of an angle in that location.
- Threats are also used to determine where the SWAT should stand to minimise their perceived threat.
![]()
![]() Most maps have a single default threat level with one safer threat level to mark preferred safe standing locations in a room.
Most maps have a single default threat level with one safer threat level to mark preferred safe standing locations in a room.
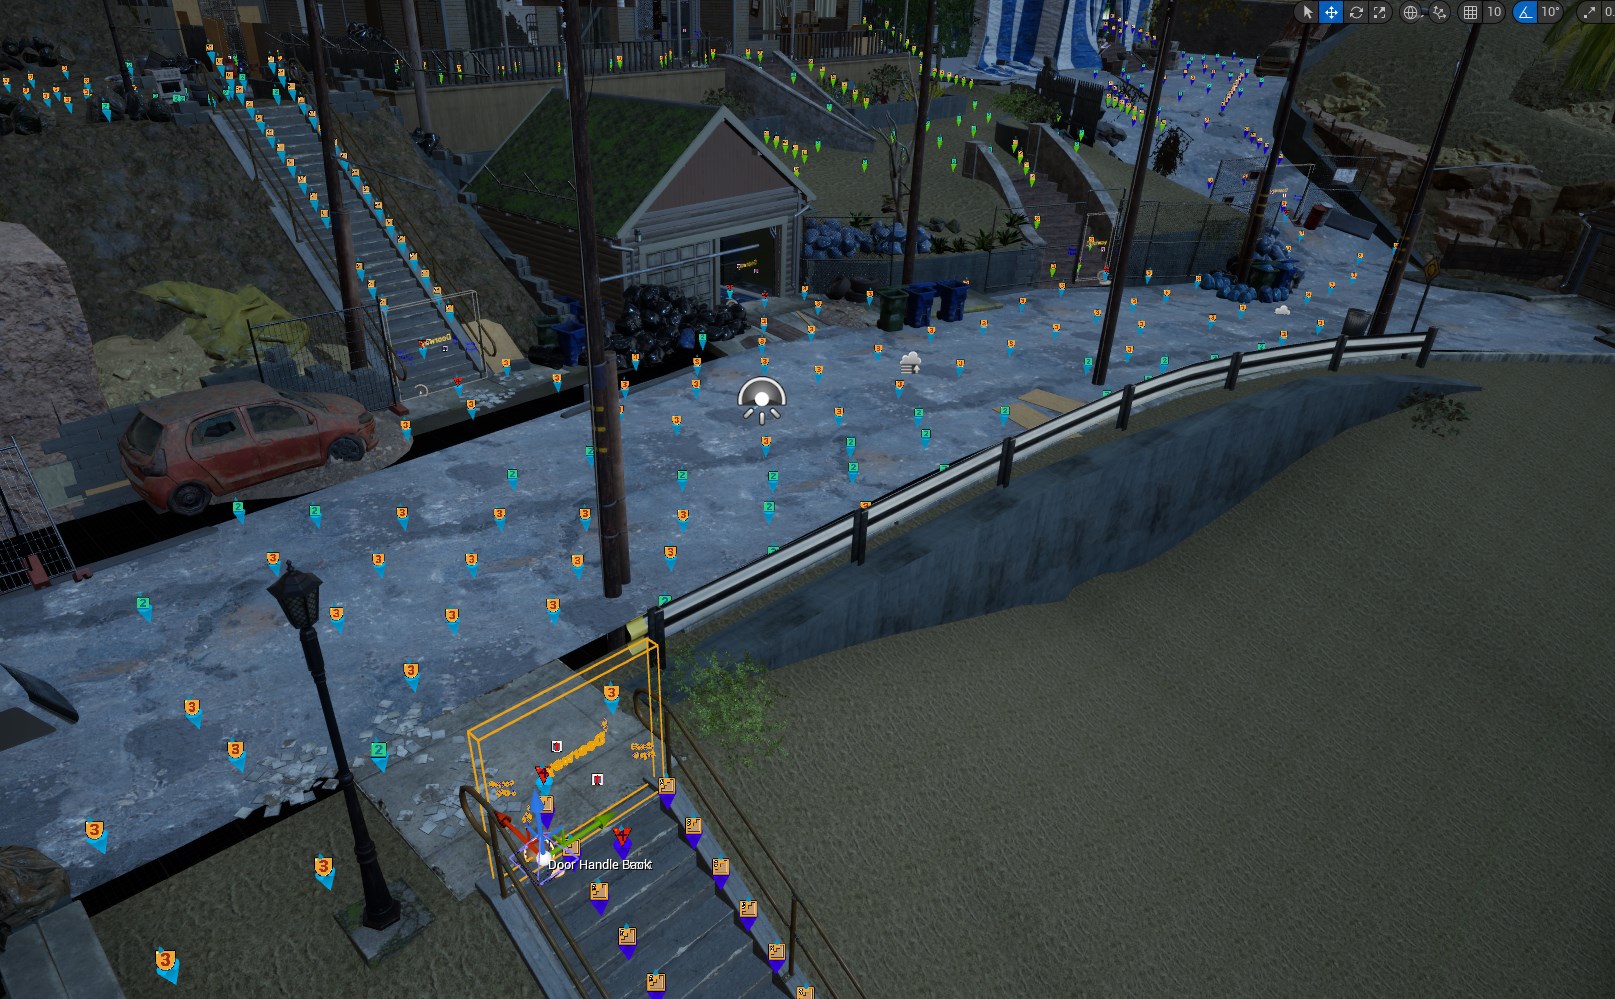
![]() Doors always have extra
Doors always have extra TL Extremethreats placed in front/back of them. They are almost always off place from the main grid spacing, about 80 units away from each side.
 Meth Door Threat Placement
- Stair threats use the
TL Stairsthreat level and should be;![]()
- Placed on one side of the nav-mesh boundary (or both if wide enough)
- Elevated much higher, usually above any balustrades or rails so that look-at-traces have clearer line-of-sights to doors and proxies for tracing.
- Placed much tighter together, about 60 units. This is probably to give more accurate SWAT look-at-points.
 Meth Stair Threats
- Auto generation spaces them at 150-250u with closer points when nav-mesh edges are closer.
![]() You can mark a single threat per room as
You can mark a single threat per room as Preferred Exitfor use in the later sync step.- Exits are supposed to be used by suspects and civs in some capacity when fleeing or retreating.
- I don’t have much more info beyond that, most RON maps seem pretty random where this is placed in each room, but I’d imagine somewhere with cover or a corner would be preferred.
- If one isn’t manually assigned for a room, it will be randomly chosen for each room later.
 Meth Outside Threats
 Most maps have a single default threat level with one safer threat level to mark preferred safe standing locations in a room.
 Doors always have extra
 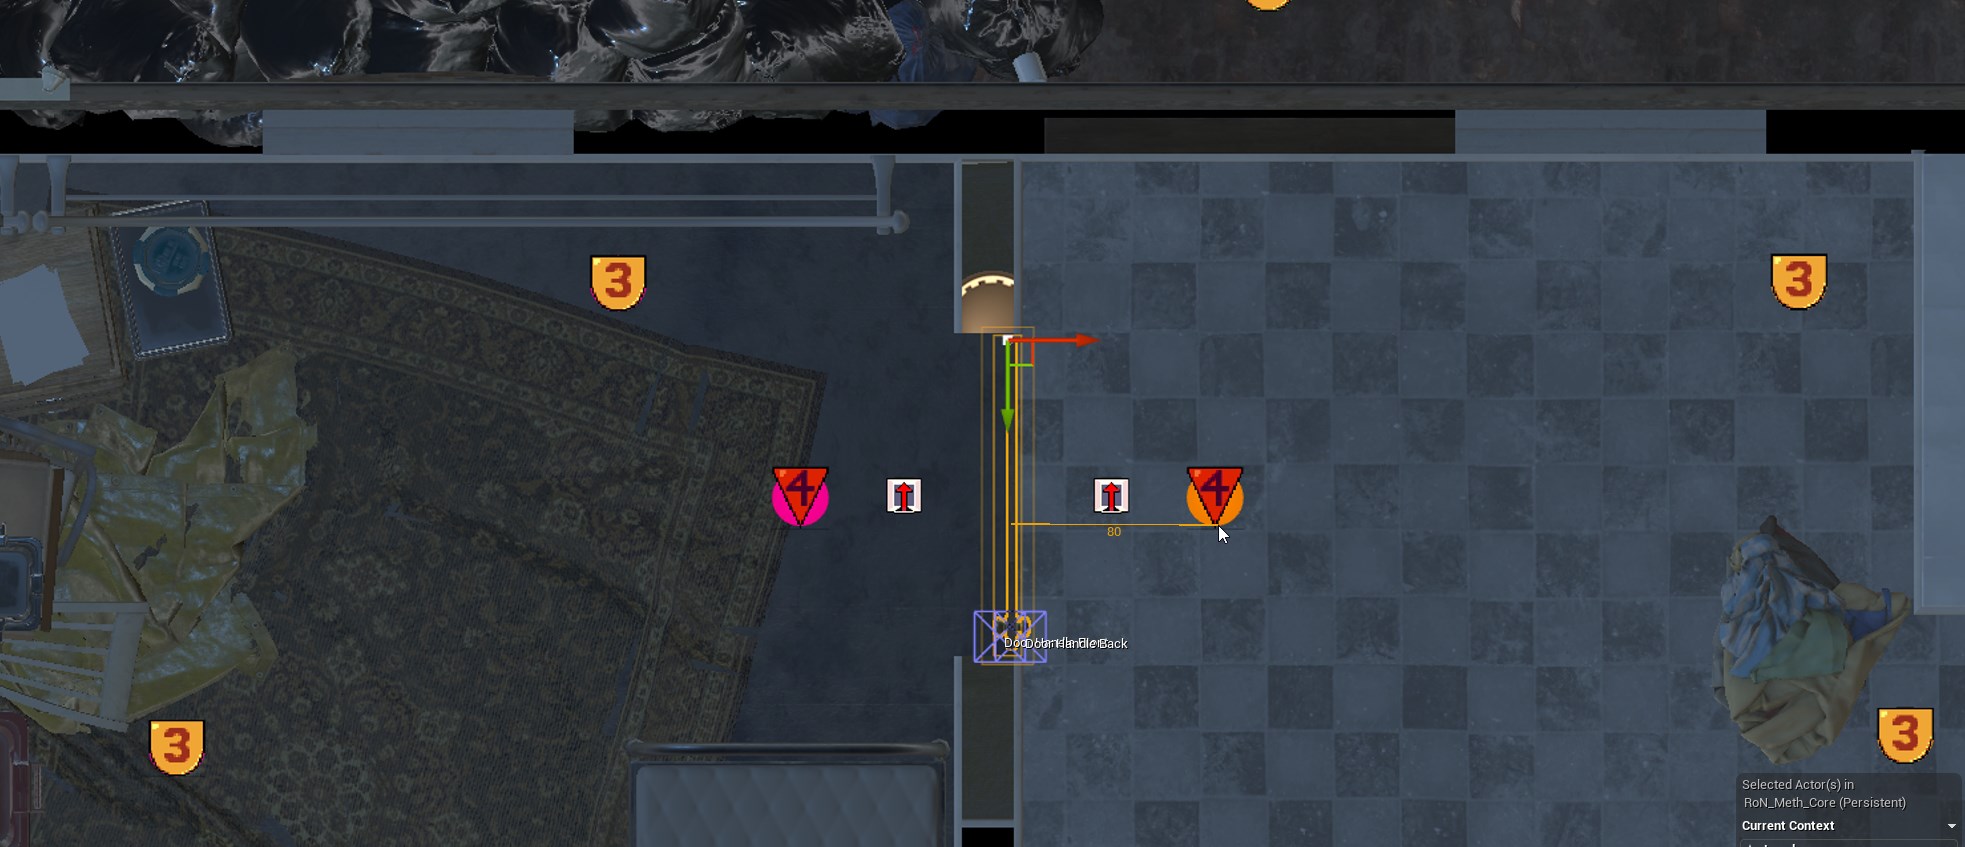 Meth Door Threat Placement
 Meth Stair Threats
 You can mark a single threat per room as
  Example Threats for 3 rooms
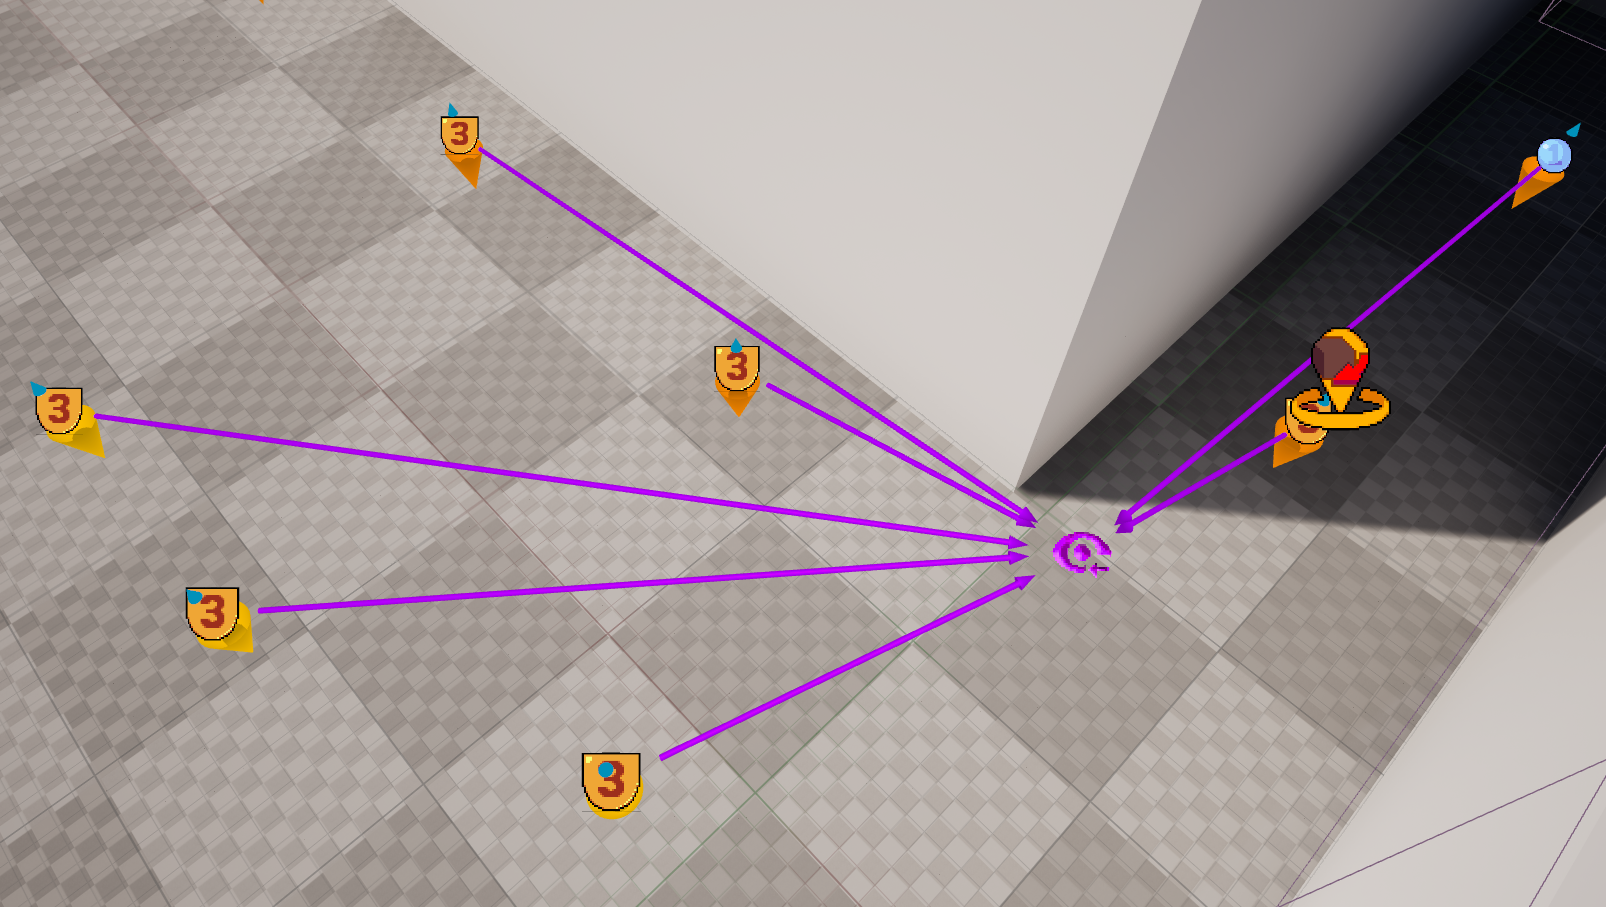
Pathable Threat Awareness Actorswill need to be populated with all the other room’s threats.
This is done by the BP’s construction script so long as theOwning Roommatches, thePathable Group IDmatches andSetup Pathable Automaticallyis enabled.
However a construction script is only ran when the placed actor is modified, so in a later step we will use the Tool’sSync Threat Awarenessbutton to ensure all the threats are linked.- If the Tool is running, you should see arrows pointed at nearby pathable threats when a threat is selected. Just keep in mind, for editor responsiveness, this wont show EVERY linked threat if there’s many in the same room or they are too far.
You should see your Room Proxies’Room | Threatsarrays also populate after pressing.
Select by PathableTool button when you have a threat selected, to add all the other room’s threats to your selected actors.
SWAT Look At Points

- Each Threat can have an array of
Swat Look at Pointswhich is usually populated with world-space locations of visible doors.
Instead of directly editing that, the BP_ThreatAwarenessActor class has an array calledSwat Look at Point Proxywhich will populate that other array at run time. Locations in this array are in local-space, so you can use the 3D gizmo to edit/visulize them. - The proxy structure used can also optionally link to a Door or Editor Only Look At Proxy which the construction script uses to keep the locations up to date.
- To populate the
Swat Look at Point Proxy, you should use the Tool’sDo Look At Traceswith the Threats selected that you want to edit.
Without needing to do any additional setup, this will trace to nearby doors and add them to theSwat Look at Point Proxyarray if there is a clear line-of-sight.- If you want a door to be ignored for tracing (for a doorway for example), in the door’s details you can enable the
Ignore for Look Atvariable.
- If you want a door to be ignored for tracing (for a doorway for example), in the door’s details you can enable the
![]()
Clear Debug Linesbutton at the top of the Tool.
- You can also manually add extra locations to the
Swat Look at Point Proxyfor each Threat that theDo Look At Traceswill ignore when running. But to help with automating that instead, you can use the Framework’s Editor Only Look At Proxy actors.
Editor Only Look At Proxy
- Place these at extra locations you’d like SWAT to look at.
- You can add Threats to the
Forced Linked Threat Awarenessarray which will add this proxies’ location to them whenDo Look At Tracesis pressed. - Selecting a proxy after
Do Look At Tracesis run will show where it’s used (unless it was forced, then it’s always shown)
The selection-only debug previews only work/update when the Tool is open.
 Selected Proxy with Forced Threats
You can also switch the proxy to an automatic mode which will perform a trace by enabling Use for Auto Trace. This will make the proxy’s icon blue instead of purple and show radius previews for the Auto Min Distance and Auto Max Distance
Auto Min DistanceandAuto Max Distancecan be used to constrain the trace. Not too close so the SWAT doesn’t twist weirdly and not too far for optimisation.Use Clip Planewill use theClip Planetransform to further constrain valid Threats.- You can use this make SWAT look at upstairs balconies from below but not above or at a corner from one side, but not the other etc.
Clip Planecan be selected in the view-port to be moved or rotated.- The plane is infinite, with Threats on the green side being kept.
- If you’ve already ran
Do Look At Traces, you will see a temporary debug coloured point as you adjust the plane.
 Selected Proxy with Auto Trace and a Clip Plane
4. Doors
The selection-only debug previews only work/update when the Tool is open. That includes Front/Back text, clear-points and stack-up point info.
Placement
- A room should always have it’s nav-mesh separated by a door or doorway
- Large spaces should be split at thresholds (usually with a doorway) to limit how much SWAT needs to clear, but it’s not required.
- Doors should NOT be scaled, instead you should select the
Door Waycomponent and edit it’sBox Extentvariable. DO NOT scale it. - The
Door Waycan be moved on the Y and Z axis. The actor’s root seems to usually be in the corner or towards the centre of a doorways threshold.
- Doors should NOT be scaled, instead you should select the
- Using a custom door mesh smaller than the RoN door sizes is not recommended. Often this will lead to AI being able to path normally through a door, but SWAT not being able to do clear activities (probably due to the swung door’s nav modifier blocking the small threshold)
 A Doorway box component on Meth that is offset slightly from the actor root
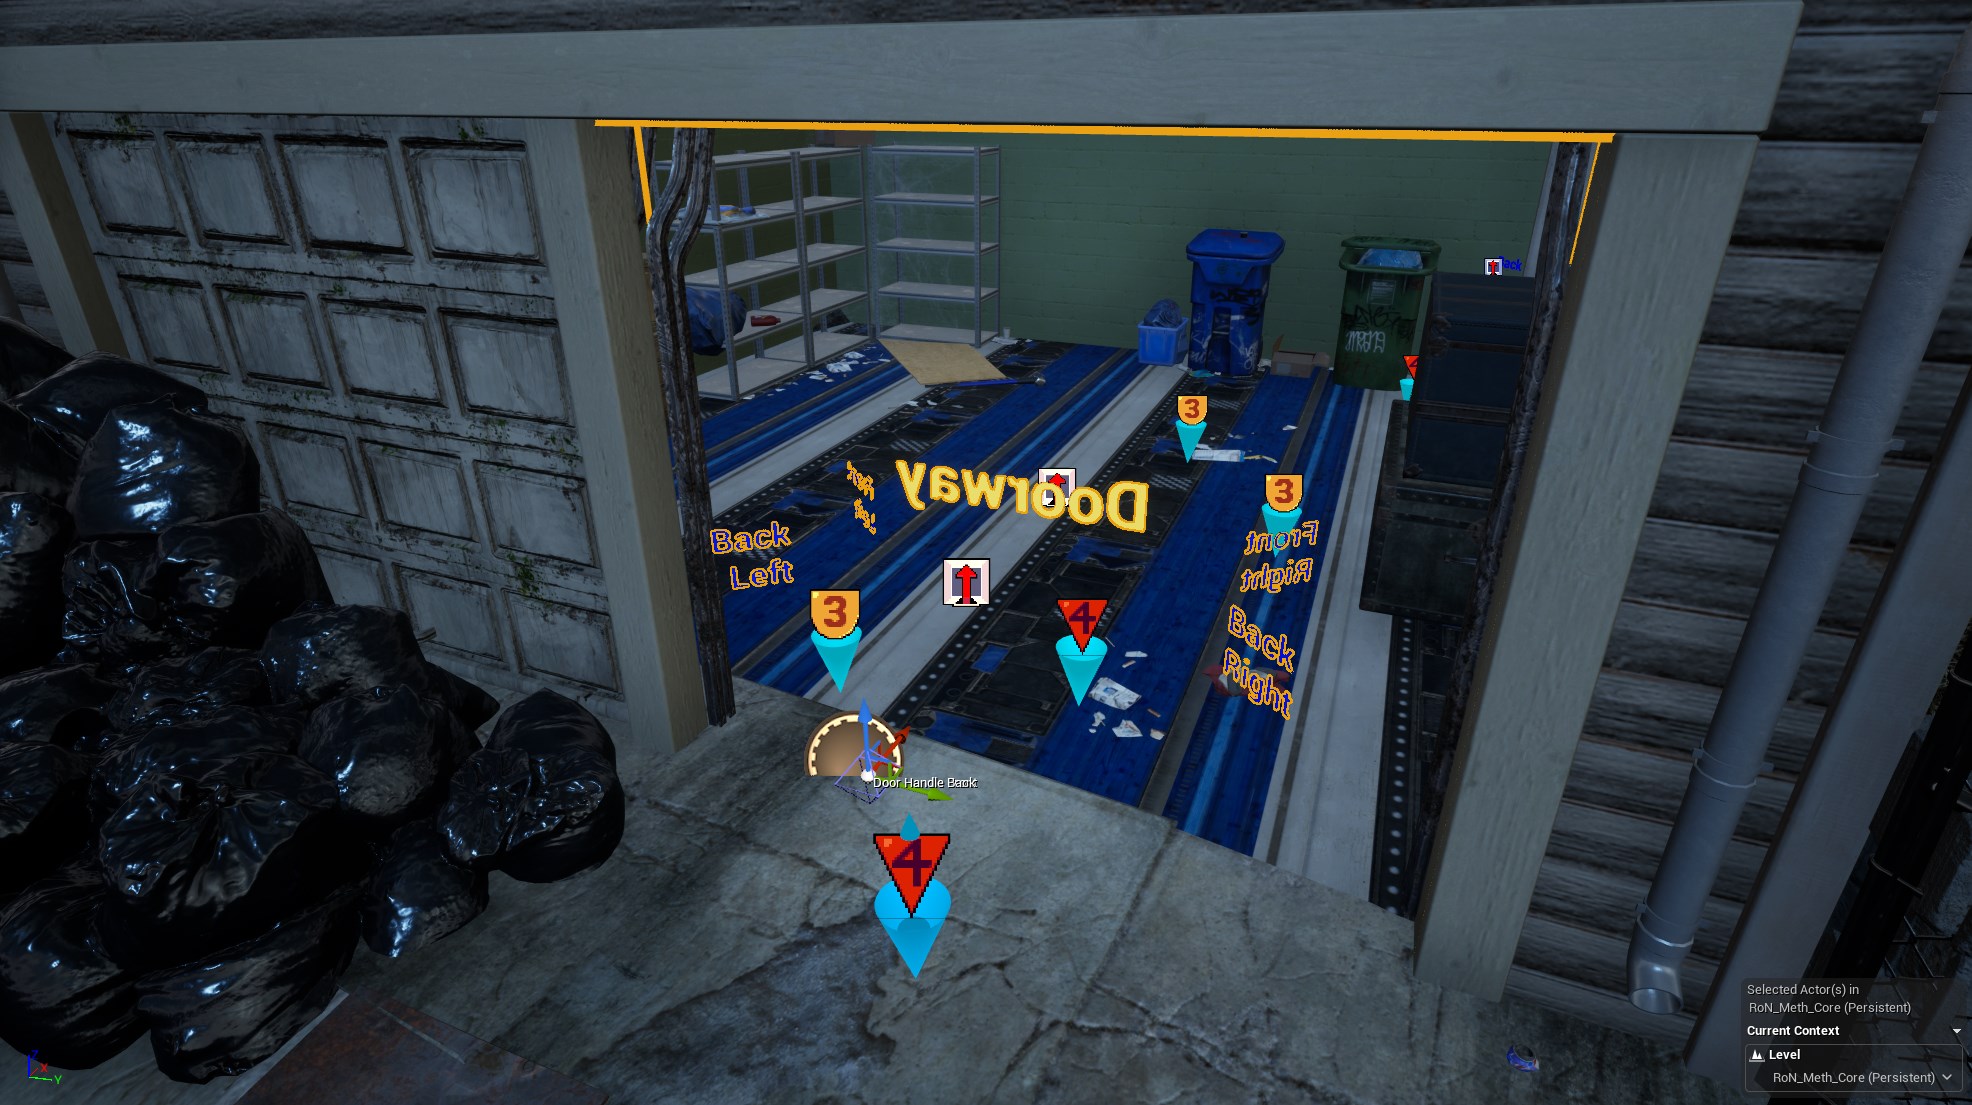
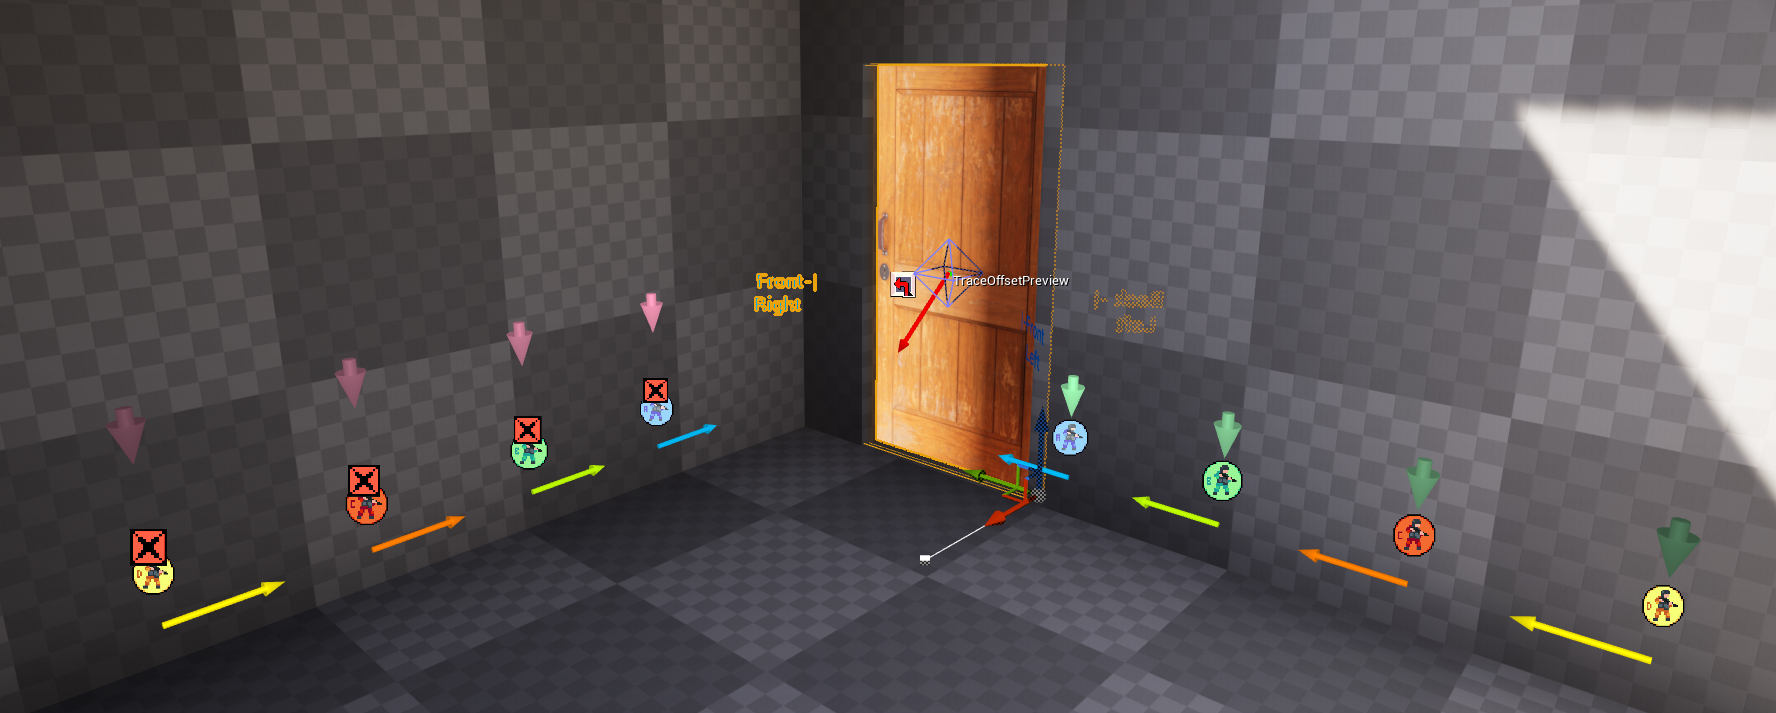
Front & Back Threats
Front Threatshould be assigned to anTL Extremethreat placed right in front of the door with the correct room.Back Threatshould be assigned to anTL Extremethreat placed right in back of the door with the correct room.When you select a door with the tool open, you will see front/back left/right texts which indicate what side you are facing.
When the text is readable, you are on that side of the door.Once assigned, a green arrow (front) and red arrow (back) will be permanently visible to indicate assigned threats.
- In the tool, press the
Sync Threat Awarenessbutton.
This will populate theFront/Back Threat Awareness Pointsarrays on ALL your door based on the two above assigned threats.
These are super critical. Your SWAT will stack, but not clear if these are missing.
If these are assigned to the wrong room your game will crash when SWAT tries to clear the door, so be careful when duplicating already configured doors.
Stack-Up Actors
- There should be 4 for each position;
Front/Back left/Right Stack Up Points. These are variable arrays on the door, in theWorld Data > Stack Upcategory. DepthandStack Up Positionneed to match on the Stack Up actors.0 = SP Alpha,1 = SP BetaetcDoorshould be linked on each BP_StackUpActor to it’s owning door.- To avoid manually doing this, you should use the Tool.
- Select a door.
- In the tool, press the
Add Stackup Pointsbutton. - Adjust the location of each
Stack Up Actoras needed.- Make sure it is above valid nav-mesh
- Keep in mind the swing of the Door
- When selected, you will see the capsule size of the player/SWAT so you can place them far enough apart.
- You can rotate (usually the last two) points so SWAT covers more angles.
![]() Add Stackup Points
Add Stackup Points
Place in Frontcan be more useful for corners or doorways placed 90° against a wall.
You can use
Undoto remove the added stack up actors, but double-check that there are not empty references left in your door’s stack up arrays.
 Stackup Points when selected show assigned door and capsule size
- Room position can be used to limit stack-up points to one side in the command menu, but SWAT may not always respect it or may still “Pie it” or “Check the threshold”.
In that case, you should delete the undesired side’sStack Up Actorsfrom the level and assign the desired side’s array to the undesired now empty array in the door’s properties.
You can copy a variable quickly by
Shift + Right Mouse Buttonclicking on the source andShift + Left Mouse Buttonclicking on the target.
 Stackup Points in a Corner, with room position indicating undesired
 [X] stack up actors
Clear Points
![]()
- There are 4 clear point arrays for each door;
Front/Back left/Right Stack Up Points. These are in theWorld Data > Clear Pointscategory. - For the arrow and sprite previews to be visible when selected, the Tool needs to be running.
- For each clear point added to the array;
- The first clear point in each array, index [0] should usually be right in front of the door’s swing and
DirectionMUST be set toNone - The next Clear Points’ Directions should be
Rightand incrementingStage. Clear Point Trace Door LOScan be run from the tool with door/s selected to set the Has Line of Sight to Door bool variable on each clear point.- Each clear point has a diamond-shaped gizmo to control it’s location in the viewport.
- The first clear point in each array, index [0] should usually be right in front of the door’s swing and
I’d recommend using the Add Clear Point and Remove Clear Point buttons in the tool, since it will set all of this automatically and give a nice offset based on the last point.
Add Clear Point
- Select a door.
- In the tool, under the Add Clear Point button, chose which side and face to work on, such as
Front Left To the right of the working side drop down selector, there is a check-box. This will change the sprite previews of the clear points when the door is selected, showing only the currently “active” clear point array with colours. - In the tool, press the
Add Clear Pointbutton. - I’d recommend adding the first clear point for each side and face, as it will be added at an offset, indicating which way the clear path should head off in.
 Clear Points
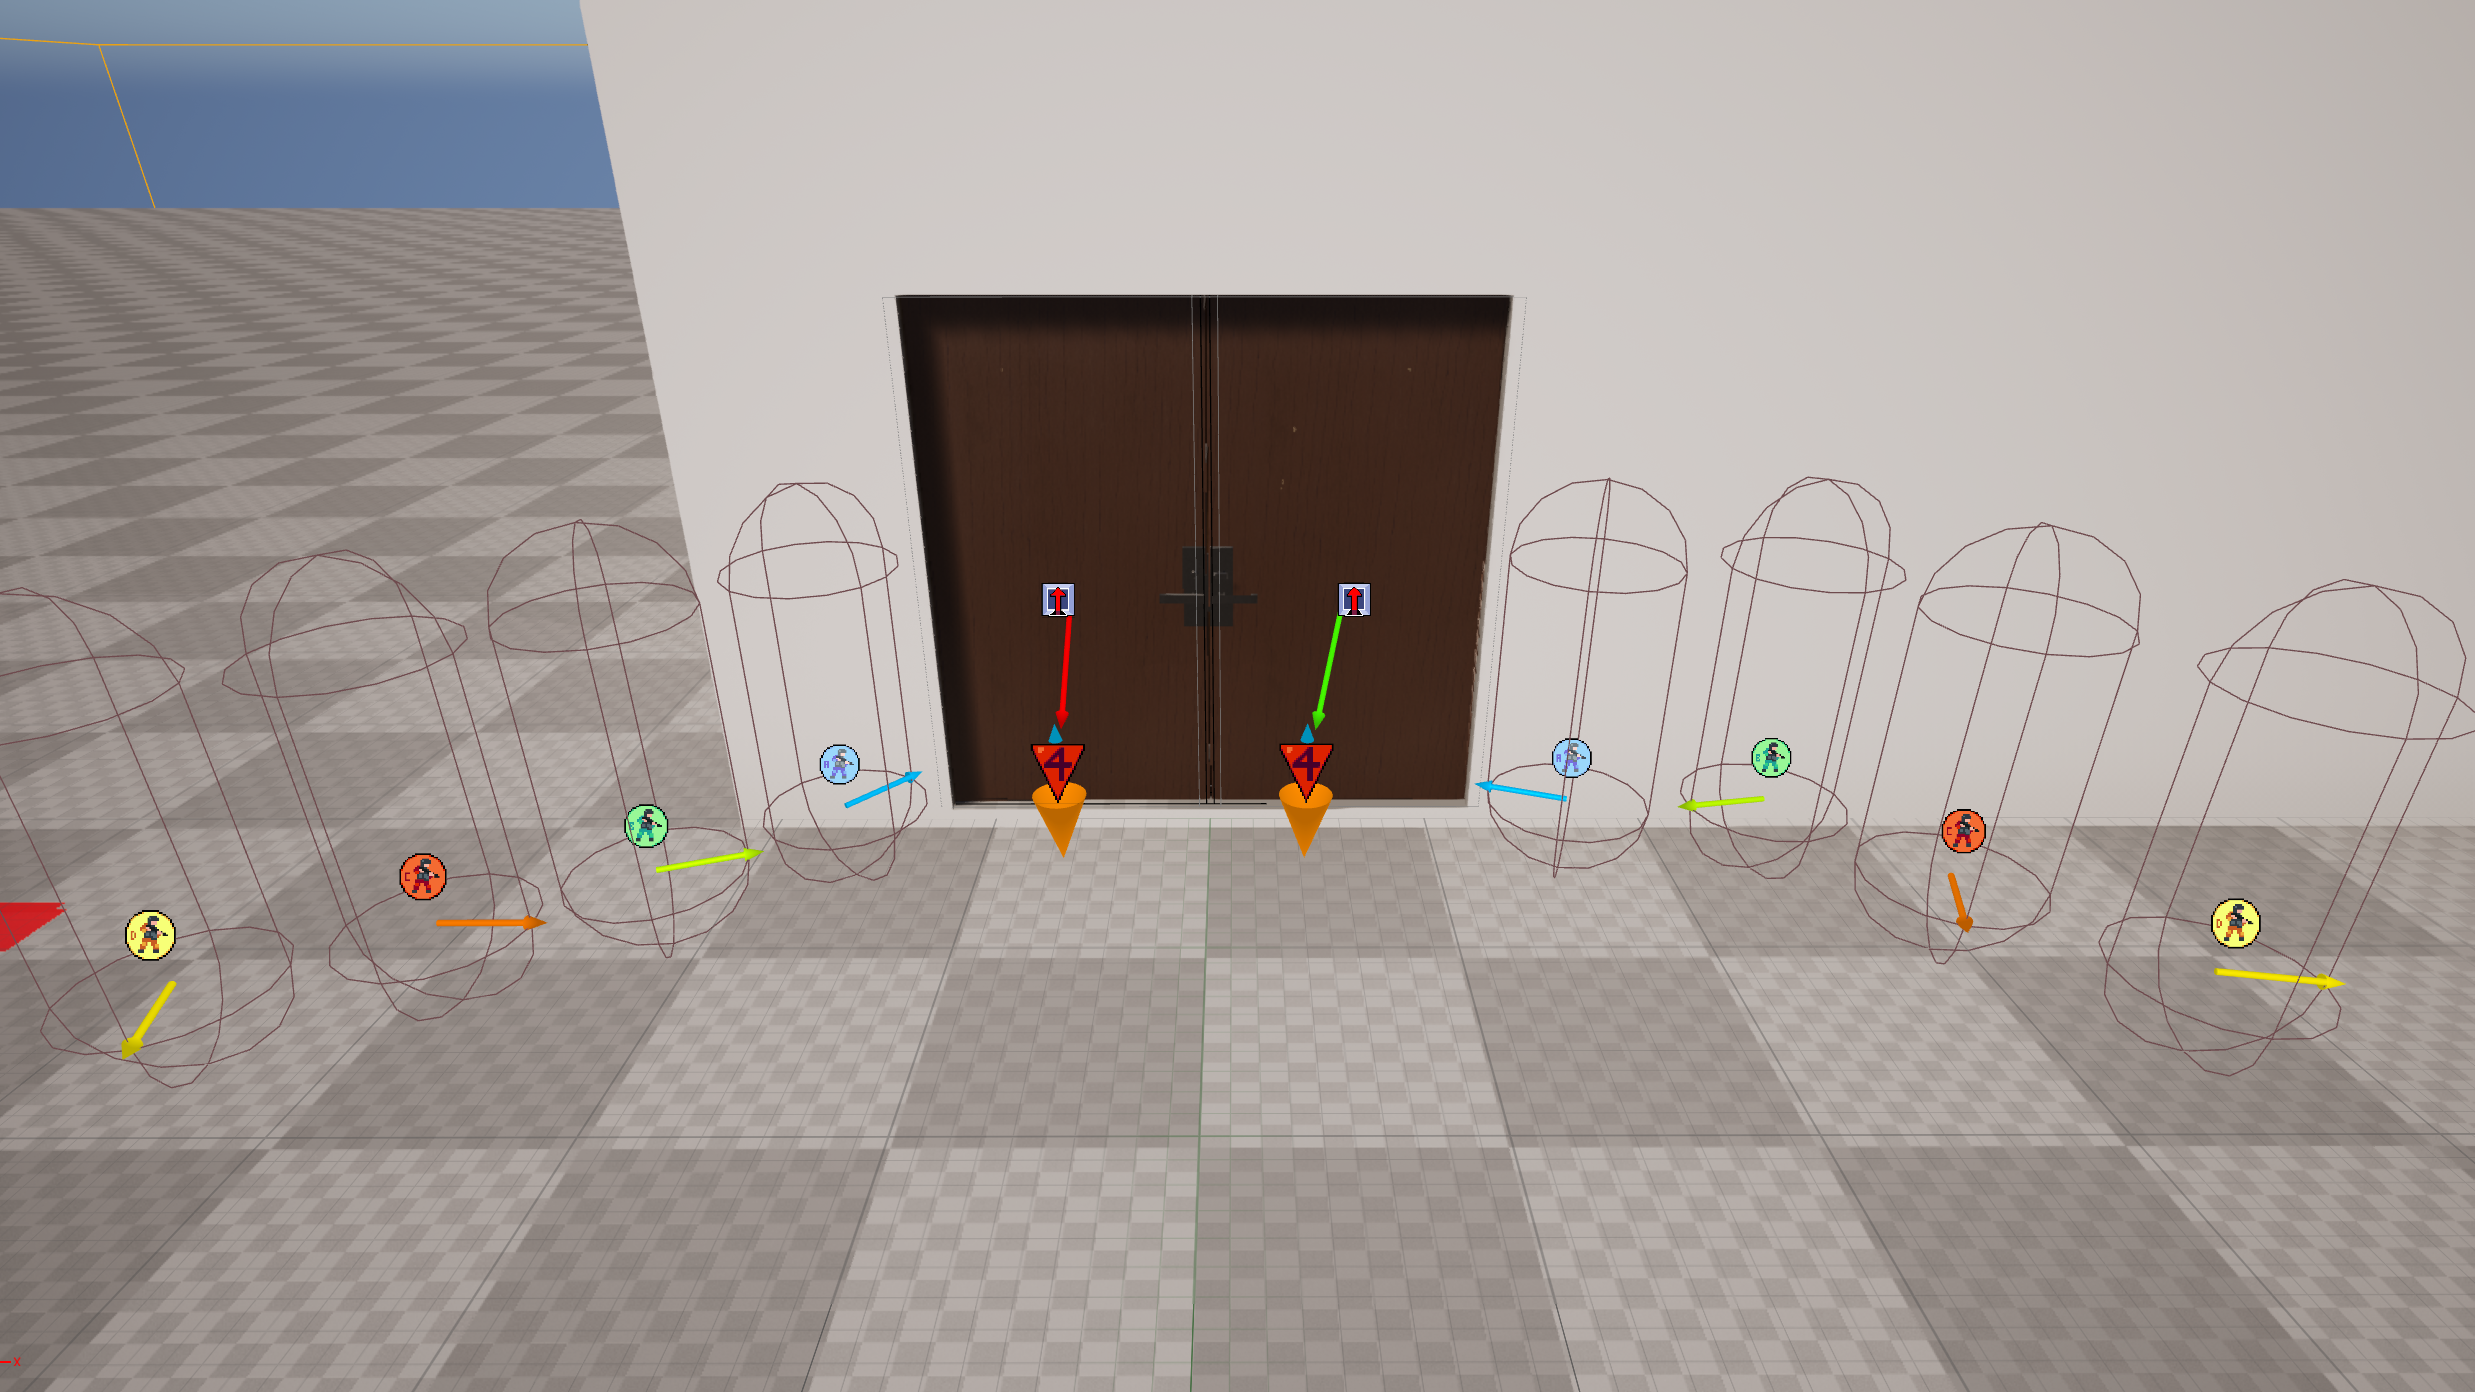
 [0]added with the Tool button. Each will have slight offset - The first point
[0]should be placed in front of the door. It can be offset (along the doors threshold) for very long doorways, closer to the stack up actors. For double doors, it should be near the centre of the overall threshold, but offset to the relevant side. See Wide Doorway Image - Keep using the
Add Clear Pointbutton to add to the clear path, following the outer edge of your room usually. Keep in mind;- You should try to visit every Threat Awareness Actor in the room with either the Left or Right clear path for that face of the door.
- The first clear points should be close (~100 units) to the stack up points, so that the 2nd SWAT isn’t waiting for the 1st to reach his first clear point to enter the room and start their own clear.
- Clear points should be above nav-mesh and the clear path shouldn’t leave the room.
- Usually for the final element on each clear path, you should add the nearest Cover Landmarks to the relevant array. Each landmark should be added to one clear point element.
- Repeat the same process for the other 3 sides/faces.
- After placing or editing your clear points, in the tool with the door selected, press the
Clear Point Trace LOSbutton. - And also after editing your clear points, in the tool with the door selected, press the
Clear Point Direction by Anglebutton.
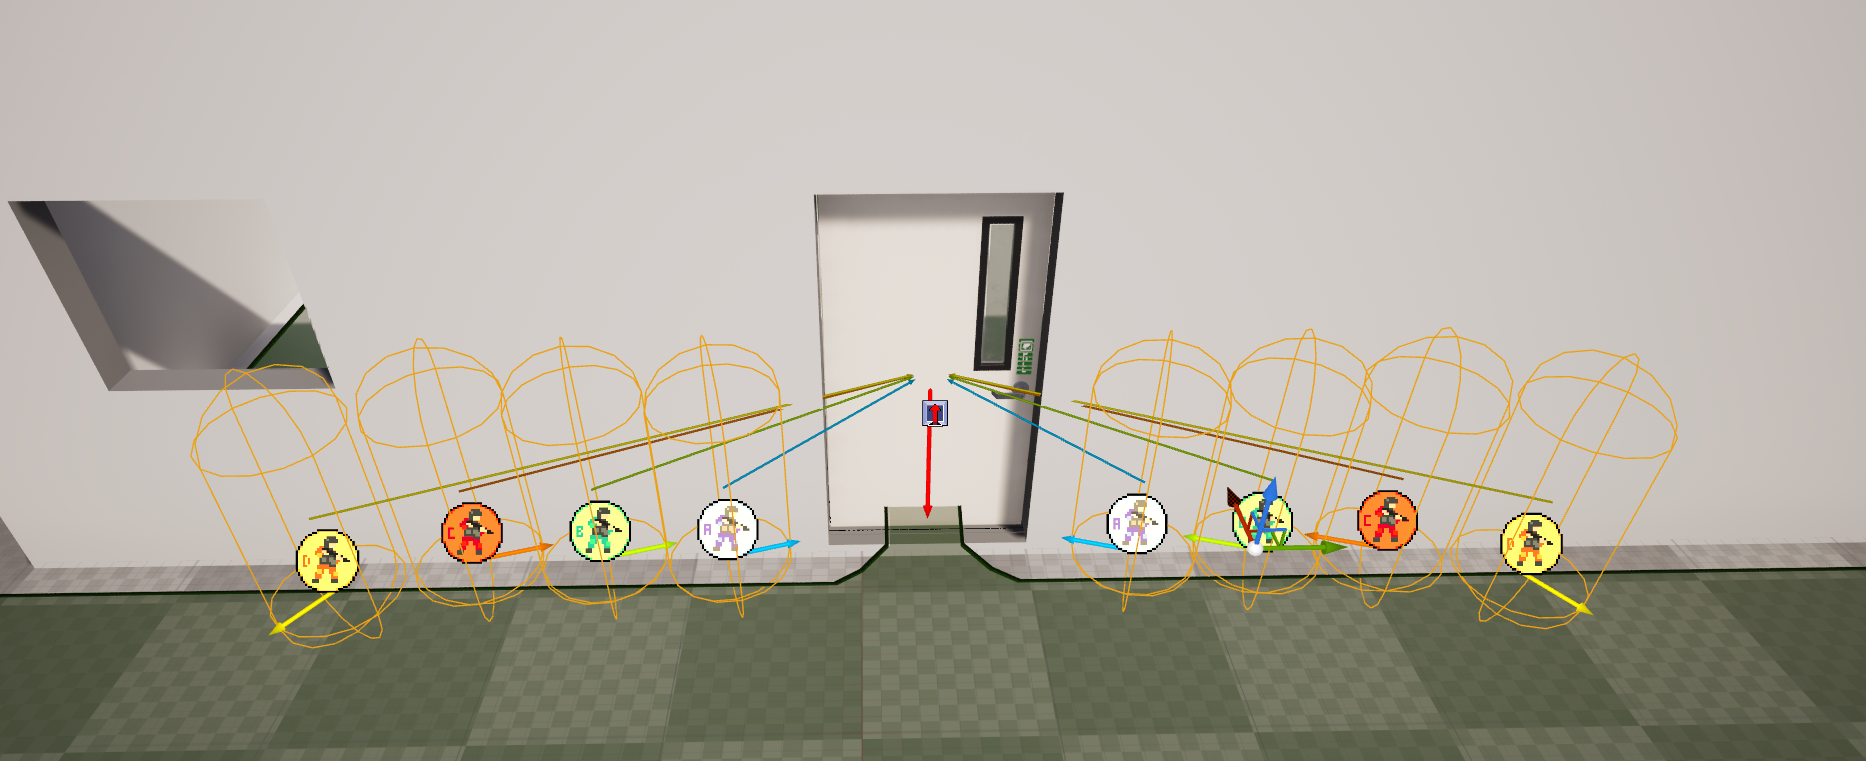
![]() The 4 clear paths of a single door. Note that for each room, the clear points will take the SWAT along a path where they can see every threat.
The 4 clear paths of a single door. Note that for each room, the clear points will take the SWAT along a path where they can see every threat. 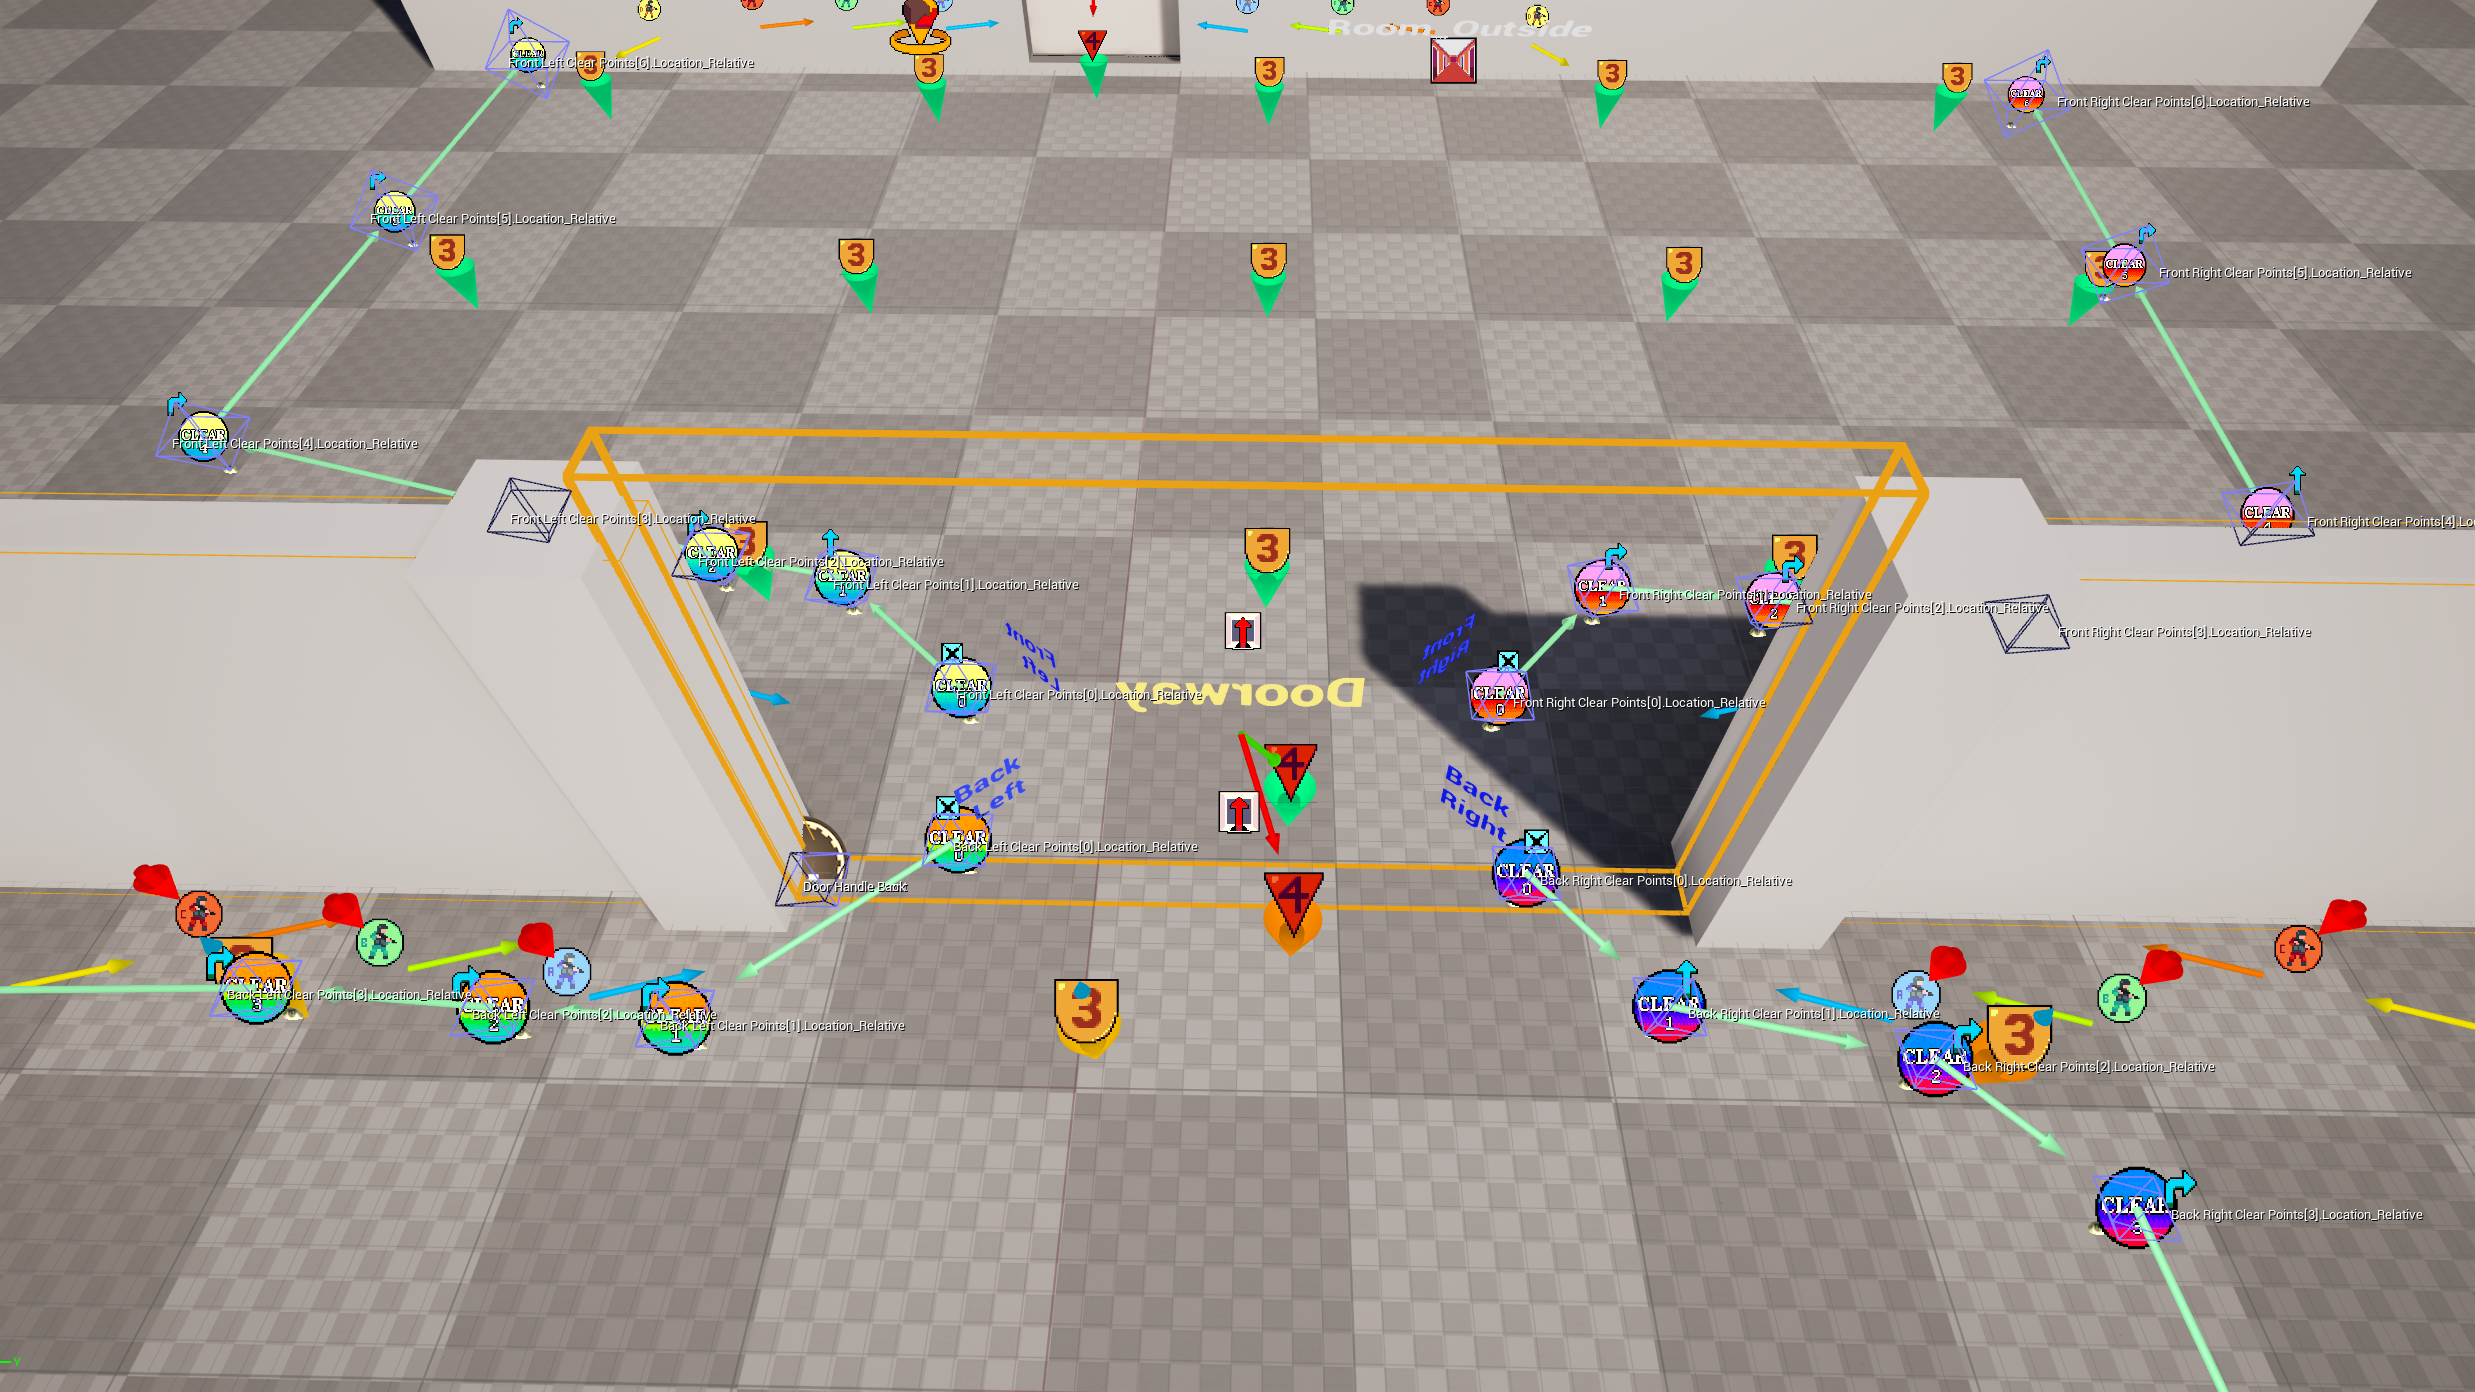 A wide doorway, with the first clear points moved closer to the stack up actors, on the opposite sides
Add Clear Point (by Nav)
If you want a more rapid process for this you can use the Add Clear Point (by Nav) in the tool. This is more useful for large areas like outdoors.
![]()
- Select a door.
- In the tool, above the Add Clear Point (by Nav) button, chose which side and face to work on, such as
Front Left - Ensure at least the first clear point
[0]has been added for the side/face you are working on. Press theAdd Clear Pointbutton if not, and adjust position if needed. - To the right of the Add Clear Point (by Nav) button, use the number input to define your final clear point spacing. 100 is what the auto-gen spaces and is good for small rooms. 150 for medium rooms and 200/250 is great for large spaces.
 The selection numbered sprite previews only go up to 34, so you should probably adjust your spacing if you reach that many clear points 😉
 - Hold shift and select an additional actor (like a Threat) where you would like your path to navigate to.
Add additional actors to your selection as needed to define a path all at once.
- Finally press the
Add Clear Point (by Nav)button. This will try to attempt to find a path from the last element in the clear point array to each additional selected actor. A spline will temporarily be created and sampled along it’s path based on the spacing set in step#4. For each sampled point, a clear point will be added to the array you currently have selected in step#2 - When done, with the door selected press the
Clear Point Trace LOSandClear Point Direction by Anglebuttons like in#9and#10from the above section.
Room Position
World Data > Room Position Room position has a minor effect on SWAT clearing but mainly effects stack up behaviour.
The main differences of Centre vs Hallway are;
- Centre - Allows stack ups on either side of the door Front and Back.
- Hallway - Allows one stack, Front/Back (Not tested.
Can Issue Orders on Front/Back Sidemay be more reliable if needed).
When clearing, after passing the threshold, they will skip corner checks and focus/aim at further distances. SWAT voice lines will also be different when clearing and mirroring.
As mentioned in #Stack-Ups the main purpose I’ve found for room position is to limit the command menu so there is only one stack up option. However SWAT may not always respect a left/right only room position if a stack-up is on the wrong side, or in front of the opening and may also still “PIE it” or “Check the threshold” if both stack-up arrays use separate actors.
In that case, you should delete the undesired side’s Stack Up Actors from the level and assign the desired side’s array to the undesired now empty array in the door’s properties.
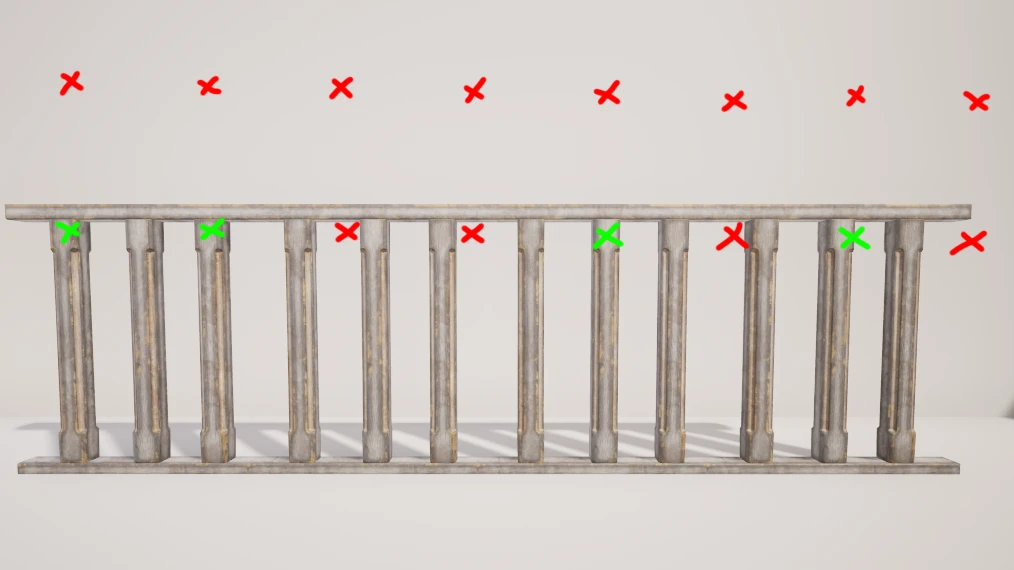
When selecting a left or right room position, a red
[X]will overlay the “disabled” stack-up actors. If the left and right arrays are set to the same actors these are always shown, so just ignore them.
Double Doors
Note, traps don’t cover both doors and should be disabled for double doors.
The basic setup for interactions on doors A and B;
- Set
Drive Sub Dooron door A to door B - Set
Drive Sub Dooron door B to door A - Pick one door, and enable
Main Sub Door. Ensure this is disabled on the other door.
For World Data related values;
- Stack-Up Actors are shared
- Because one door has 180° of yaw rotation, the arrays will need to be re-ordered.
- Room Position would need to be swapped if relevant.
- Clear Points will want to be copied but are going to be 180° in the wrong direction.
- Front and Back threat ABSOULUTELY needs to be re-assigned to the correct Threat actors.
Therefore you can use the Tool to quickly fix this up;
- Start with only one door. Delete the sub-door if it exists. Setup stack up actors and clear points as usual for Door A. Stack up actors should be moved to the sides of the threshold for the side with the sub-door.
The Stack-Up Actors’
Doorvariable can remain pointed at Door A for every side. - Duplicate Door A and rotate/offset the new Door B as needed.
- Set the
Drive Sub Doorreferences andMain Sub Doorvariables on door A and B.Don’t forget to untick
Main Sub Dooron door B if it was enabled for door A when you duplicated it! - For the new door B, be sure to set the new correct
Front ThreatandBack Threatand run theSync Threat AwarenessTool function at some point.If you forget this, your game will probably crash when SWAT interacts with the door.
- Select Door B.
- In the Tool, press the
Flip Stackup Pointsbutton. This should flip the door’s Stack Up Points arrays so that they are correct for a 180° yaw rotation. To check this, use the select button by one of the arrays’ elements to confirm the stack up actor matches the Front/Back Left/Right texts.
 - In the Tool, find the Flip Clear Points button and ensure the selector box to it’s right is set to
2x - In the Tool, press the
Flip Clear Pointsbutton. - Adjust each clear point
[0]element’s position so it’s at the centre of the threshold or at least nearer the side of Door B.
You can also use these buttons if you want to flip a single door around and keep your setup stack-ups and clear points.
Just be sure to set the offset in step #7 to1xbefore running,Flip Stackup Points
Also don’t forget to flip theFront ThreatandBack Threatand runSync Threat Awareness
5. Rooms Final
Now that our Door’s and Threats are placed and referencing each other and assigned to Rooms, we want to ensure our Rooms’ variables are configured correctly.
- For each Room Proxy, select it and;
- Check that each of the Room’s doors are assigned to the
Additional Root Doors. A large orange bounds box and arrow should be surrounding them if the Tool is running. - Check that
Connecting Roomsis populated with the names of the other Rooms which have shared doors with assigned Front/Back threats. A big orange arrow should link them if the Tool is running. - Finally, in the Tool, run the
Sync Threat Awarenessbutton.
Nothing needs to be selected when doing so.
This function will;- For Doors; based on the
Front/Back Threatpopulate theFront/Back Threat Awareness Pointsarrays, by matchingOwning RoomandPathable Group ID. - For Threats; populate the
Pathable Threat Awareness Actorselements based onOwning RoomandPathable Group ID - For EO Room Proxies; populate the
Threatsarray by matchingNameto each threat’sOwning Room - For Threats also; pick a
Preferred Exitfor eachOwning Roomif missing and add it’s world location to each threat’sExitselement[0]
- For Doors; based on the
You must re-run this button once before launching your game if you;
- Delete or add a Threat Actor.
- Change a threats
Owning RoomorPathable ID.- Change a Door’s
Front or Back Threatvariables.- Change Threat Actor’s
Preferred Exitvariable.- Add, remove or update an Editor Only Room Proxy.
Cover Points
Cover Points are locations that Civs or Suspects can use to take cover.
- They are auto generated, pretty well, as long as your collisions are clean or you have helper blocking volumes set to the
Covercollision profile. - They are generated as an element of a collection called a
Rail. Each rail has a Start and End world location and a struct array of the other cover point actors world location and a global unique ID number. - Cover point actors for that reason, usually have a meta-data tag to prevent manual placement (disabled in newer framework builds) and have their transforms/location locked.
- Civilians will crouch/lean against cover.
- Suspects can shoot over or lean around cover based on it’s type.
Cover Point Overview
You should never manually place, copy or duplicate a Cover Point.
- If you need to add a single cover point, use the
BP_CoverPoint_Single_Frameworkactor. - If you want a new Rail of cover points, you will use a
Editor Only Cover Point Rail Previewand the Tool, as explained later. - The location of a cover point is locked and shouldn’t be manually edited along with it’s rotation. You can edit it’s transform with the Tool’s
Cover Railssection, covered in #Cover Rails
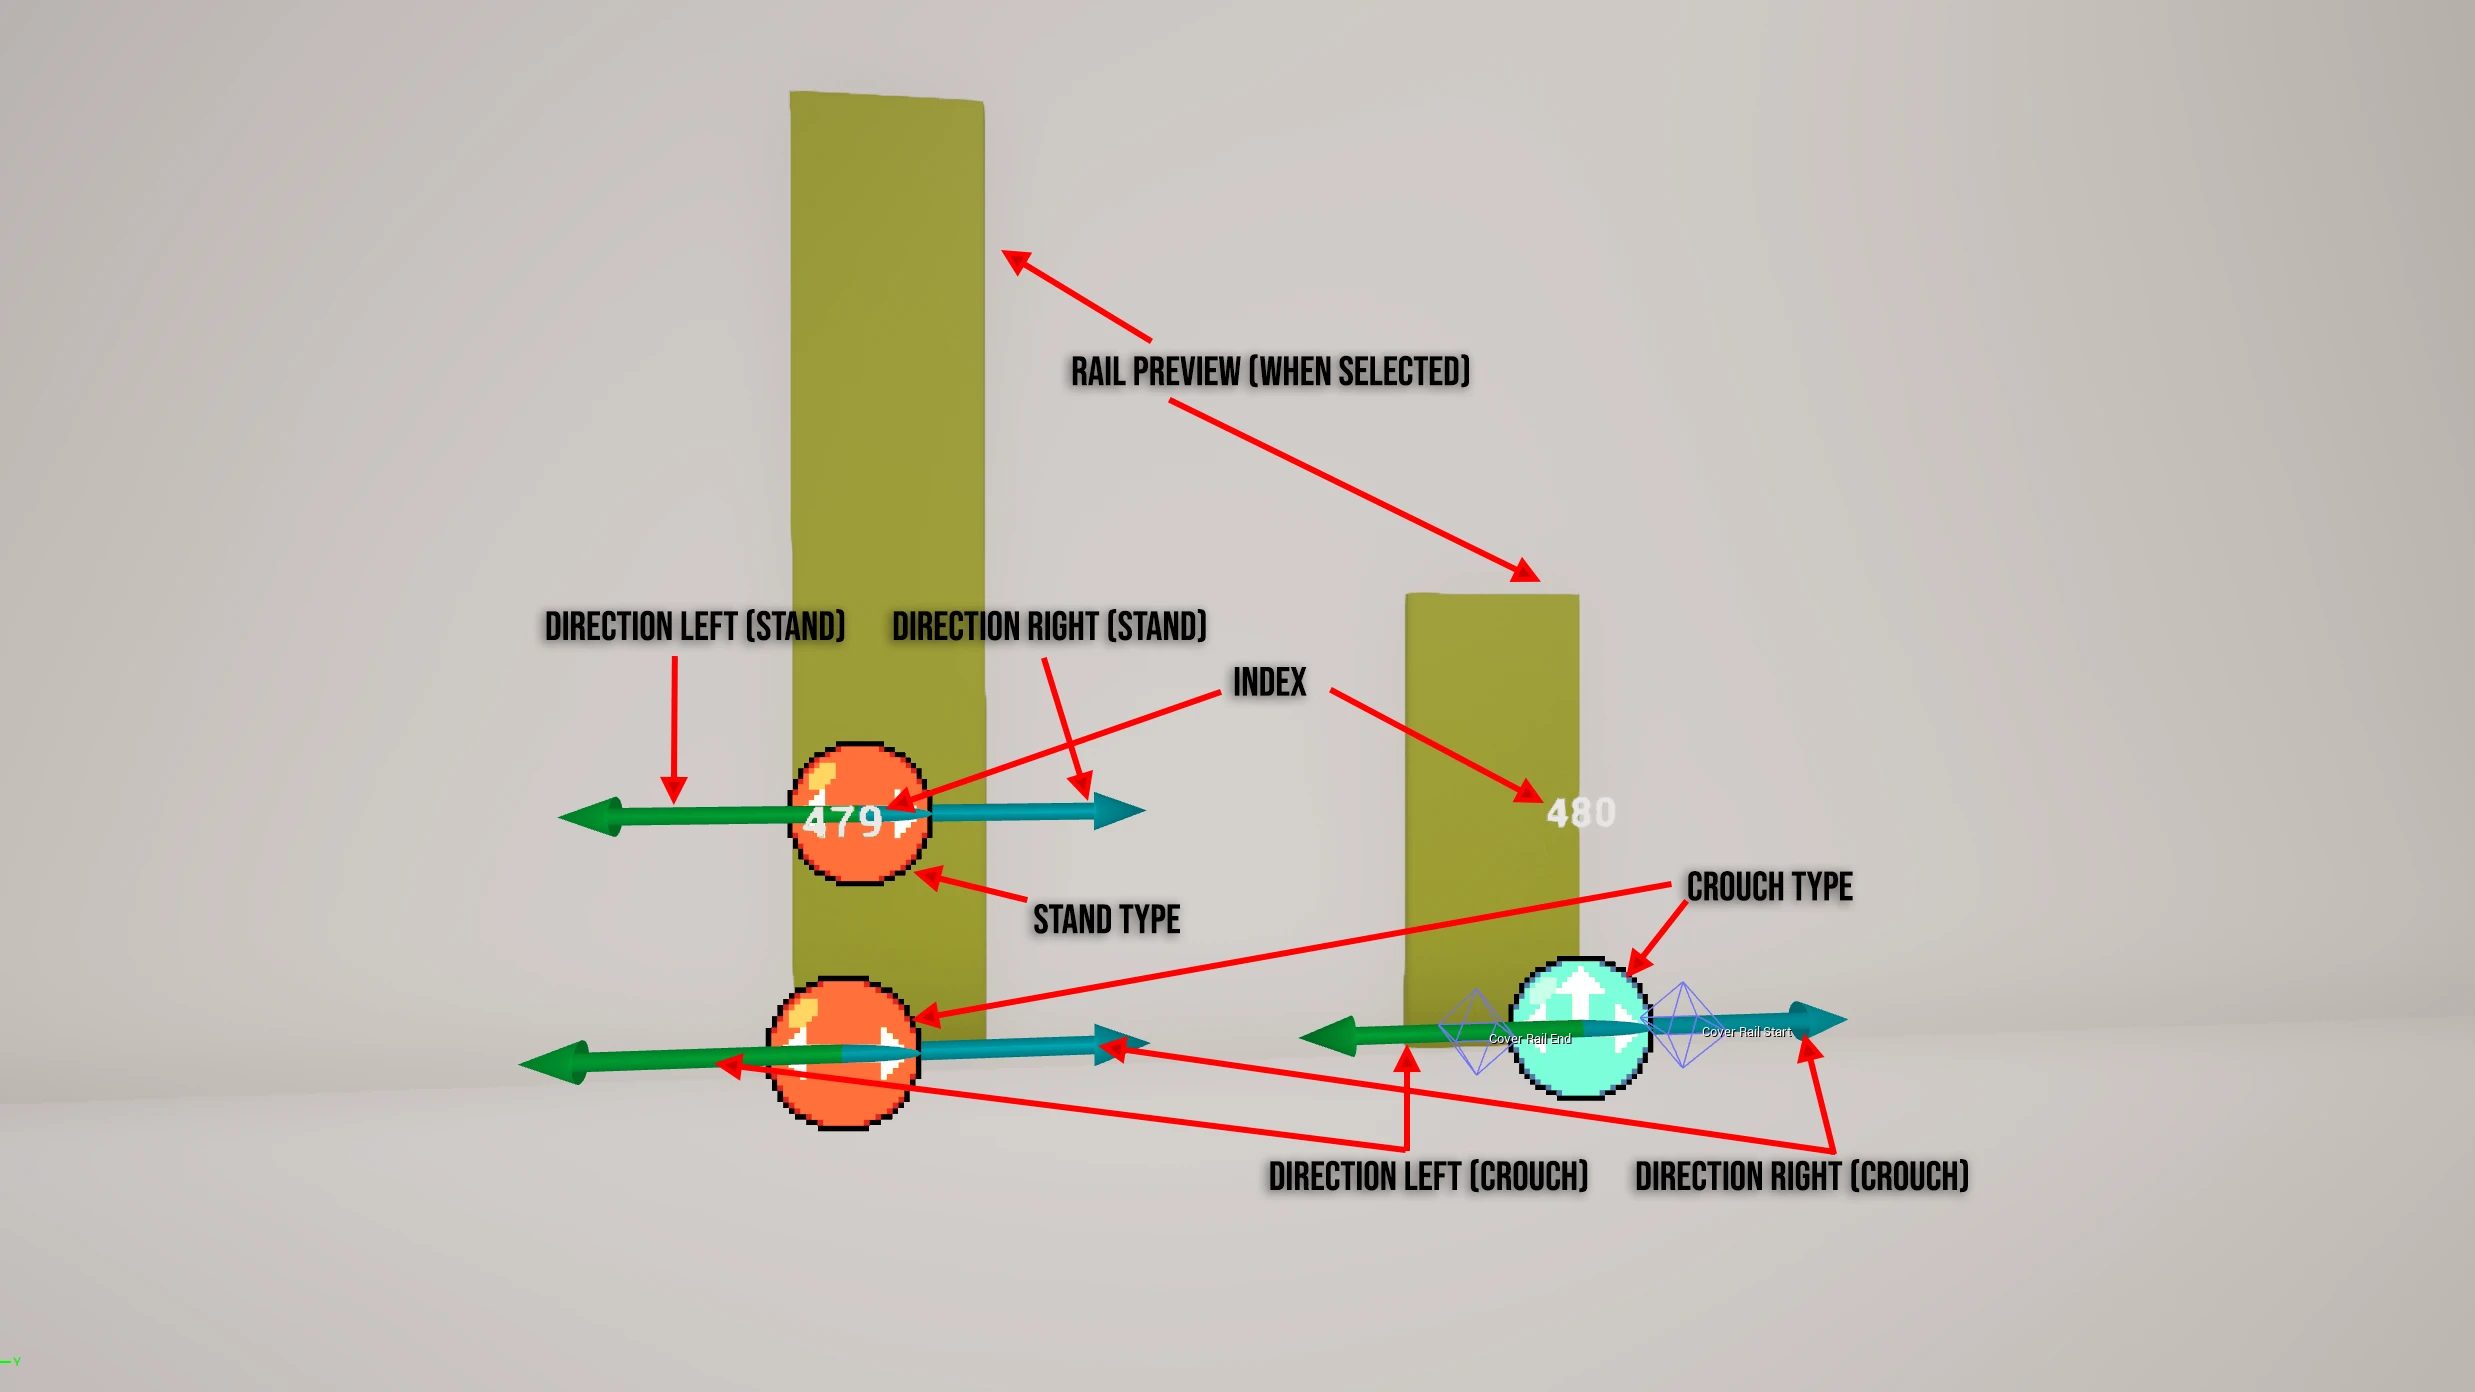
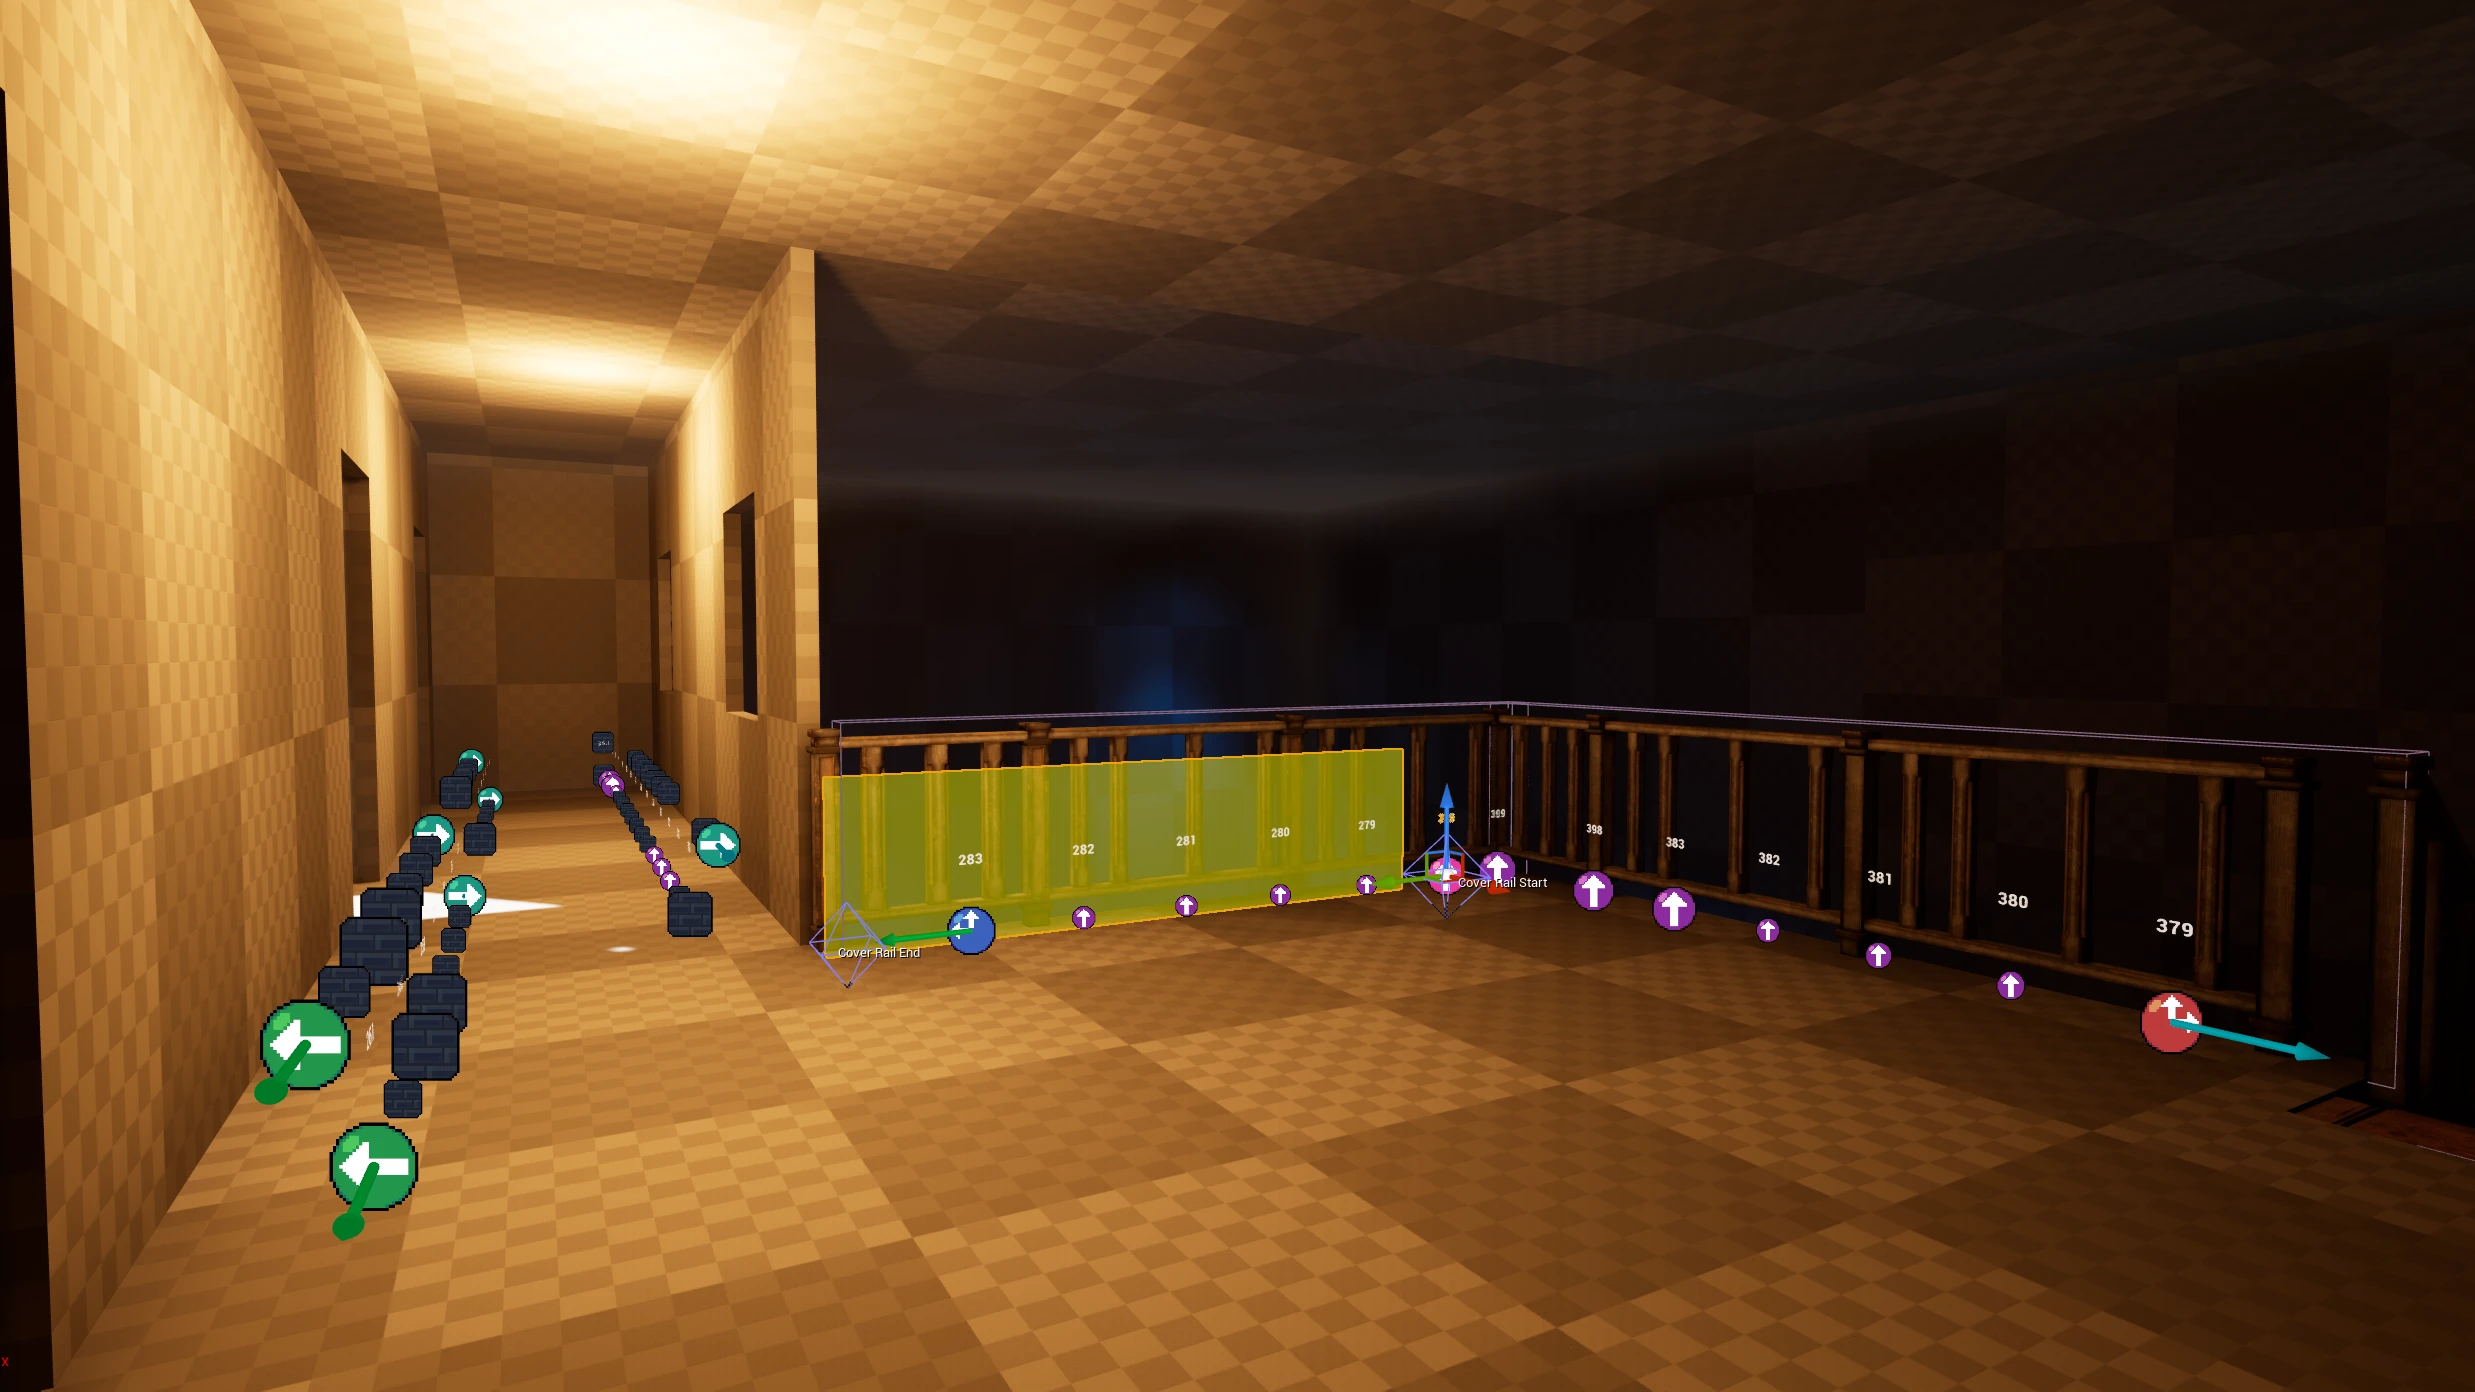
Index: A unique number that needs to be unique across the whole level. This is the number shown in the view-port.Is Crouch Only Cover: Crouch or Crouch+Standing cover. If true, will only show the bottom Type sprite and direction arrows. Also changes the yellow box preview when selected.Stand Cover Type: Whether the user considers this a middle wall section, or if they have the option to lean based on a selected direction. This is shown by the top sprite, which is hidden if Crouch-Only is True.Crouch Cover Type: The same as above, but with the added combination option ofUpif Crouch-Only is True. This is shown by the bottom sprite.- Type sprites sizes are based on their location in a rail. First and Last elements are bigger than the elements in between. (You may require selecting with the Tool open to update this preview sometimes)
Stand Cover Direction/ Crouch Cover Direction: Used when the user leans. The Direction is always just the Rail Start to Rail End vector or inverted, based on Left/Right. This is previewed by the Green Arrow (Left) and Blue arrow (Right)Cover Rail: A struct with the World Position Start and End, Direction and World Position + Index array of self and other Cover Point actors contributing to the rail. The Start and End are previewed by a 3D gizmo when selected.- When selected and the Tool is open, the Rail will also be previewed with a yellow box with a height based on Crouch-Only. This doesn’t actually represent any surface, it’s just a preview I based on how far and high imported generated cover points are usually from the floor/wall.
Automatic Generation
- Place a
BP_CoverGen_Framework - Place one or multiple
Cover Gen Override Volumesto cover the playable nav mesh you want cover points to generate on. Don’t change any settings. - When generating, sample traces will “walk” along the edge of the nav-mesh testing for a hit in the Cover channel at crouch and standing height. For better generation you should plug holes between props where you may want suspects to take cover behind.
Regular Blocking Volumes can be used or they can also be set toCoverto not affect character collisions. You can cover gaps in balustrades, low car engine blocks, barricades of crates, tables and chairs etc. An example of how a ballistrade may be sampled when generating cover which may cause a cover point to not be generated, or an incorrect lean angle to be set
An example of a blocking volume with Covercollision profile, placed over a static mesh to provide cleaner generation. - Nothing more needs to be done if you want to just use automatic cover generation, which I’d recommend when iterating on your level. However, if your level geometry is locked-in you may wish to export out what is being generated and to edit and include with your level.
 An example of how a ballistrade may be sampled when generating cover which may cause a cover point to not be generated, or an incorrect lean angle to be set
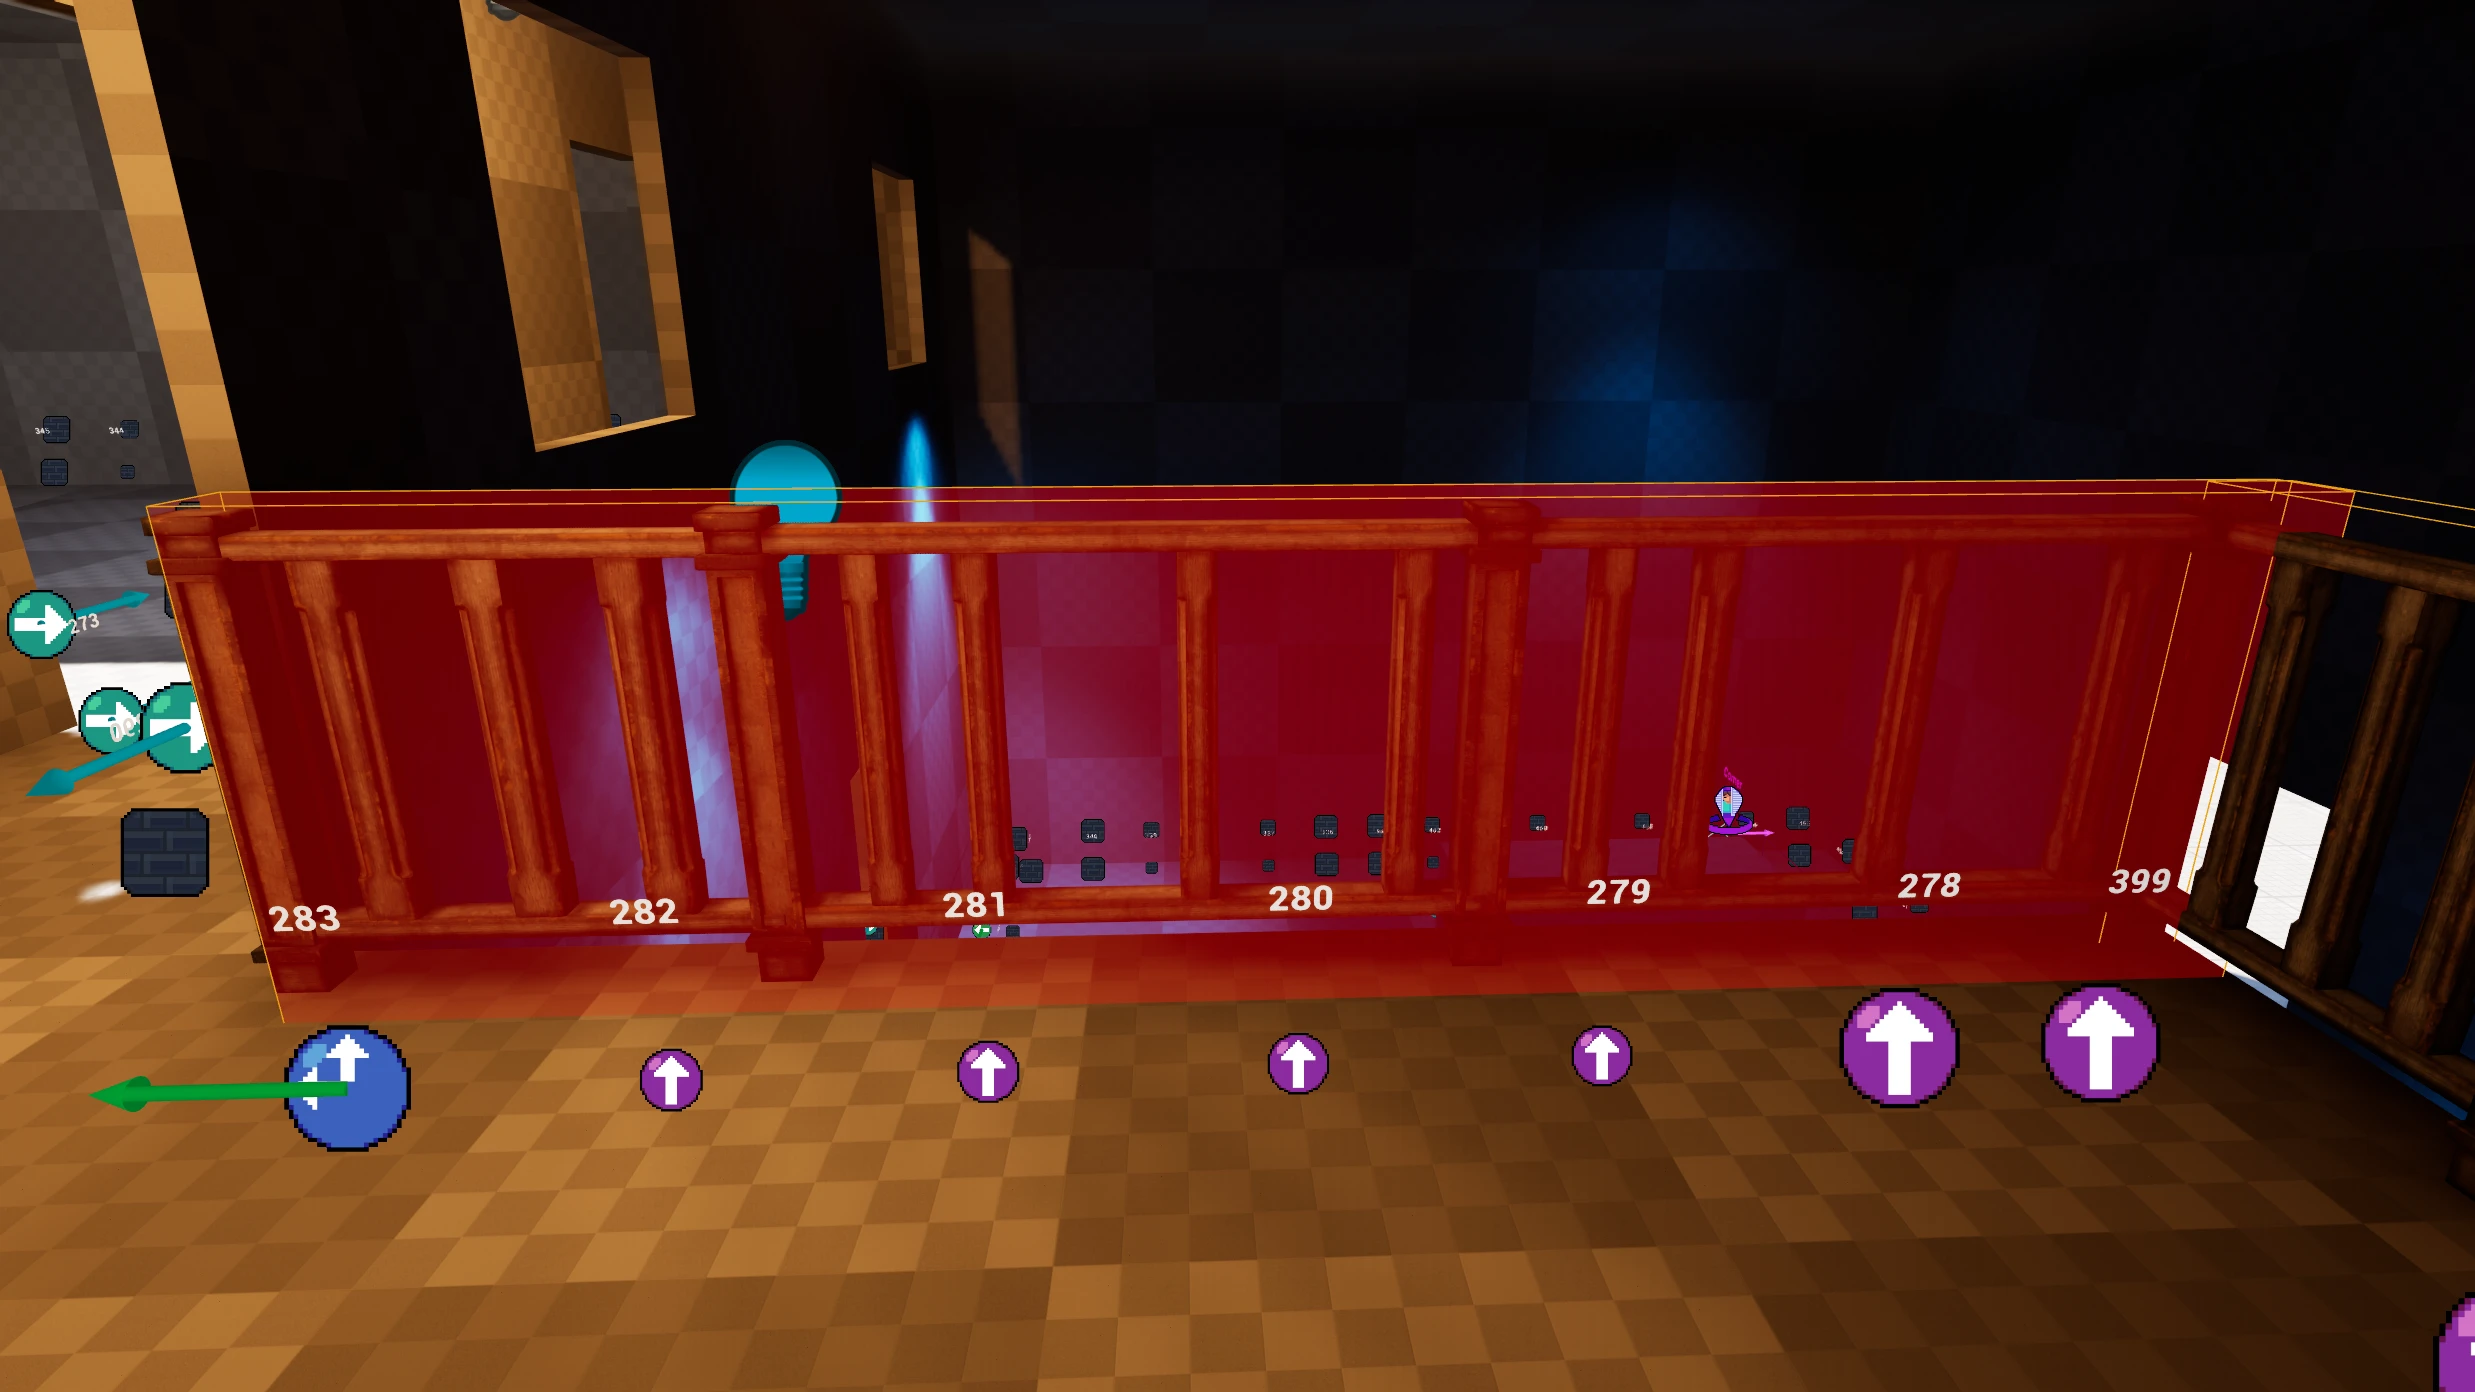 An example of a blocking volume with
 Importing Automatic Generation
- Make sure a
BP_CoverGen_Frameworkand or supporting actors are in the level as per above section. - On the placed
BP_CoverGen_Framework, setSave Cover PointstoTrue(and also make sureEnabledisTrue). - Save, Cook and Pak your level to your game install.
- Open the game and load your level. Wait for the countdown to finish and for you to spawn in game. Wait 4 to 10 seconds for the cover points to generate and save to disk.
- Close the game and navigate to
%localappdata%\ReadyOrNot\Saved\SaveGames\Cover\in windows explorer. In the Tool, there is a button shortcut; - You should find a
.Cover.savfile that has your level name prefixed. Copy it. - In your Framework Project’s directory, navigate to
...\Saved\, from here create aSaveGamesfolder if missing and within, aCoverfolder if missing. In the Tool, there is another button shortcut, which also makes the folders if missing; - Paste your LEVELNAME.cover.sav file into the project’s
\Saved\SaveGames\Cover\folder. - Back in Unreal Engine, with your level open, in the Tool, press the
Load Cover Point Savebutton.
You should see below the number of Cover Point’s that have been read. If “No save file loaded/found.” is displayed, check that the correct level is loaded. You can see what .sav file is trying to be loaded in the text field to the left of the button. - You can now press the
Create Cover Point from Savebutton. A task will start and actors will start to be placed. Keep the editor focused until it completes.After importing and creating the cover points, the Tool will set any
BP_CoverGen_Framework'sEnabledvariable toFalseeffectively disabling it to avoid user error. If you want to iterate making changes for generation and visualising them in editor, you should delete every cover point in your level and set theEnabledtoTruebefore cooking, paking and loading your map.The
BP_CoverGen_Frameworkshould be disabled and can be deleted from the level once cover points have been created/imported.
Editing Cover Points
Clean-up
After importing there may be some overlapping cover points/rails.
- To quickly find these, press the
Select Next Overlapbutton. This will compare every cover point’s location in the level and find overlaps.
It will select one set of cover points by the rail and focus the camera on them. - You can usually press
Deleteto remove the selected cover points rail, then repeat from step#1untilSelect Next Overlapis no longer selecting anything.BUG: Make sure you have no cover point selected before pressing the button. Looks like I forgot to clear your selection, so rails are still selected if nothing overlapping is found.
Type Changing
 Cover Point types
You’ll probably come across a few cover points which you may want to tweak the type on.
Your free to do so, however keep in mind types that didn’t generate with a direction (ie Walls), will have no Direction vectors set.
![]() You can fix this by selecting the cover point/s and pressing the
You can fix this by selecting the cover point/s and pressing the Guess Cover Direction button in the Tool which will pull the direction from the rail locations. Honestly you can probably just select every cover point (Ctrl + Shift + A) and run this if you want, since it seems to match what is generated normally.
Removing Cover Point/s
![]() If you want to remove a cover point that is a part of a remaining rail, you should use use the
If you want to remove a cover point that is a part of a remaining rail, you should use use the Delete Cover Point & Update button in the tool.
If you want to remove an entire rail set of cover points, with them all selected, you can use the regular Delete key since there will be no remaining references.
Select Cover Points by Rail Groupfor quick selecting.
Appending Cover Point
![]() You can add a cover point to a rail using the
You can add a cover point to a rail using the Append Cover Point & Update button.
This is based on the location of the selected cover point in a rail, determining which side of the rail it will be placed. You edit it’s location you can use the Tools #Cover Rails section.
Cover Rails
Gizmo actor
The Editor Only Cover Point Rail Gizmo is a custom Framework actor which is for manipulating the transforms of cover points in a rail. It’s NOT meant to be manually placed. Usage:
- Select a cover point or multiple.
- Press
Create Rail Gizmo from Pointto create a rail gizmo.
If multiple points from the same rail was selected, only one gizmo will be created.
If a rail gizmo already exists for that cover point’s rail, it will be selected instead.
Therefore, if you wanted to create gizmos for the whole level, it is safe to just select every cover point and create rail gizmos.

- Rail gizmos can be freely deleted and remade.
- Rail gizmos are selected via the now always visible blue mesh preview, or the
<--- Rail Gizmo --->text. - Rail gizmos can be moved or rotated to move every cover point in the rail set that it has been assigned. Don’t scale.
- Individual cover point locations can now be manipulated by first selecting the rail gizmo, then using the diamond gizmos to edit. Be sure to select the gizmo’s wire-frame and not the cover point sprite so you don’t change your actor selection.
- The Delete and Append cover point Tool buttons will update rail gizmos when used, but work best on the start and end cover points of a rail. Even then, the logic isn’t great, so you may end up with some weird behaviour with new points on the wrong side or the need to delete and remake a rail gizmo.
Preview Actor
 Preview Rail gizmo handles
The Editor Only Cover Point Rail Preview is a preparation tool. It can be used to create a completely new rail and set of cover actors.
Usage:
- Place a
Editor Only Cover Point Rail Previewin the level. Adjust it’s location so the points are above the ground. The preview wall offset will match what you see when you select a regular cover point. - You can use the Rail Start and End diamond wire-frame gizmos to size your rail and preview your cover points.
- You can edit various variables to automatically set properties on the cover point actors that will be created as-well-as spacing options.
- When ready, press
Convert Rail Previewto create your new cover point actors and delete the preview actor.
The
Convert Rail Previewperforms the actor creation then preview deletion as two separate “Transactions”.
This means if you want to reuse the preview a, you can runUndoonce to get the preview actor while also retaining the new actors.
PressUndotwice to fully undo the operation if needed.
Cover Point Single
 It’s single, not meant to mingle.
The BP_CoverPoint_Single_Framework blueprint is also based on the “CoverPoint” DynamicCoverSystem class, however, it has no transform locks.
- It’s rail is set relative to itself.
- It’s rail is not meant to be expanded with other cover points.
- While the Tool does work with it, you shouldn’t ever use it with this blueprint to append etc.
- Great when you just need an extra cover point somewhere on it’s own, like around a tree trunk or column etc.