
Custom Map Difficulty Overview
With the Los Suenos Stories update, the AILevelData.ini was refactored into three Difficulty.ini
Custom difficulties can also be created and included with your map pak. This can be loaded with your map, without other map or mods conflicting. Users/other modders can also create patch _P difficulty paks specifically for your map if they want to tweak the experience.
This means, optionally, you can stop using the BP_SpawnManager_v3 and instead use the game’s native spawn Min and Max configs as well as spawn groups.
This also lets you configure much more such as
- The number of bomb actors so you don’t need a BP_BombSpawner either. Also bomb times.
- The number of roaming suspects or civs
- Open doors percentage
- Locked doors percentage
- The max amount of traps and pre-placed traps
- Allowed trap types
- Explosive vest civs and suspects
- AS timers
Setup
A) Gameplay Tags
Unreal gameplay tags are used as the “key” values in the gameplay code, so we need to add one for each new difficulty.
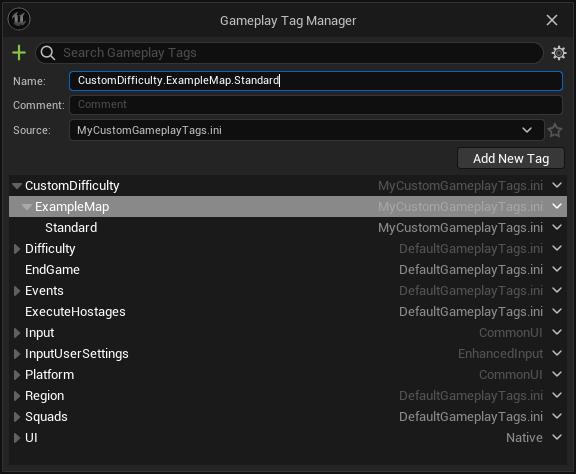
- In Unreal Engine, open Project Settings > Gameplay Tags
- Open
Manage Gameplay Tags... - Select
CustomDifficultyand press the+plus icon. - Name your new tag CustomDifficulty.MAPNAME.DIFFLEVEL
If your just creating one difficulty, just use CustomDifficulty.MAPNAME.Standard
If you want one for each diff add aStandard,Casual, andHardMake sure you create the new diff in the
MyCustomGameplayTags.inisource. You can find this in your configs and can migrate it when the framework updates.
B) Difficulty.ini
- In your project’s
/Config/Difficulties/create your new difficulty either by renaming/copying the example CustomMapDifficulty_RoN_Difficulty_Standard.ini or export a difficulty from the game files using FModel. - Rename your new difficulty CustomMapDifficulty_MAPNAME_DIFFLEVEL.ini
This name doesn’t matter, just a suggested convention.
Delete the example difficulty if you don’t want to do it every time you cook your map.
- Open the new diff to edit.
- Set
DifficultyGameplayTag =to the tag you created in Step A). - Also edit the tag in
GameplayTagListto the tag you created, within"".1 2 3 4 5 6 7 8
[Info] DifficultyGameplayTag = CustomDifficulty.ExampleMap.Standard DifficultyNameKey = DifficultyDescriptionKey = DO NOT USE bIsHidden = true [/Script/GameplayTags.GameplayTagsList] GameplayTagList=(Tag="CustomDifficulty.ExampleMap.Standard",DevComment="")
Ensure
bIsHidden = trueis added to your difficulty. Map diffs are not meant to be played on other or vanilla levels, and so should be hidden from the difficulty selectors. - At the bottom of the ini, add the file name of your custom level with square brackets
[].
If you copied the example ini, you can replace “[RoN_DifficultyExampleMap]” - Add your map configs below this header and save the file.
1
2
3
4
5
6
7
8
9
10
 [RoN_DifficultyExampleMap]
 MinCivilians = 1
 MaxCivilians = 10
 MinSuspects = 1
 MaxSuspects = 10
 UseSpawnGroups = true
 MinSuspects_Group1 = 1
 MinSuspects_Group1 = 3
 MinCivilians_Group1 = 1
 MaxCivilians_Group1 = 1 ; use semi colons for comments
C) Map Setup
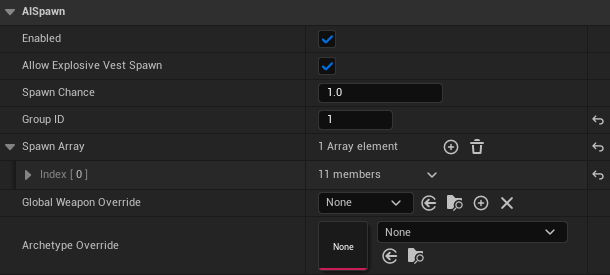
- Delete your spawn manager or set
Is Editor Only Actor = True, so it won’t interfere. - For AI spawns, you won’t be using
Spawn with Tagsfor groups.- Instead, set the
Group IDto the number at the end ofMinSuspects_GrouporMinSuspects_Groupetc that you defined in your CustomDifficulty.ini - I’d recommend NOT using group 0, so that your sure your changes are working.
- If your not using groups, then nothing needs to be set. Civs and suspects will spawn according to the Min/MaxCivilians and Min/MaxSuspects values.

- Instead, set the
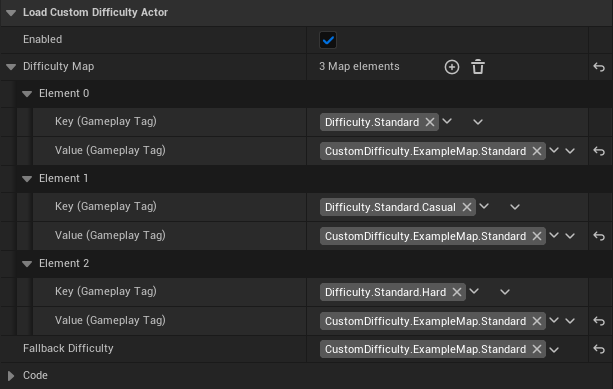
- To load your custom diff, place a
/Content/Mods/Template/Blueprints/BP_LoadCustomDifficultyblueprint in your level. - Set the
Fallback Difficultyto the tag you created in Step A). - Expand the
Difficulty Mapfully (shift + click).- For the value of each key, add your custom gameplay tag.
- If you created 3 difficulties, map each to the relevant vanilla gameplay tag.
This lets the user pick which they want to use based on their vanilla selection.
D) Cooking
By default, unreal won’t copy the /Config/Difficulties/ folder.
To make things easier, we added a custom cook button to the level editor toolbar.
After cooking is completed, /Config/Difficulties/ is copied to your cooked folder, next to content.
To include your CustomDifficulty.ini
- Press the Custom cook button:

You can see successful copy actions in the output log.
You can disable the custom cook copy step in Project Settings > Plugins > Framework Plugin Settings
- When copying your cooked files to be paked, be sure to copy both
/Contentand/Configto your staged mod folder. - If you want to copy without cooking, press the
Copy Non-Uassetsbutton:You can see successful copy actions in the output log.
You can use this to make changes to your CustomDifficulty.ini if your content is unchanged.
Play your map in game to confirm your config has loaded.
If your using the Automated Mod Paker, you can add an entry in your Mod Profile for a “Rename Copy”.
Select your diff from the/PROJECT_DIR/Config/Difficulties/folder, and it will be automatically copied to your staged folder and paked.
Alternatively, you can manually type in/Config/Difficulties/to the “Directories to Copy” if you only have one level.You can update your ini without cooking if you use the “Copy Non-Uassets” button from the Framework menu and then Staging and Paking.