
Practical Hacks to Wrangle Unreal Engine’s Static Lighting
Introduction
Static Lighting has been a staple of the industry for nearly 30 years now. While UE5 moves forward with real-time lighting solutions with Lumen and Megalights, sadly Static lighting improvements are seemingly forgotten. Things such as the incomplete and unreliable GPU Lightmass, and critical improvements desperately needed to the Volumetric Lightmass has resulted in a number of problems that require some creative ways to overcome them. Some of them are even reminiscent of tricks seen decades before!
The following is a collection of different “hacks” I’ve utilized to wrangle weird lighting scenarios that occur with Static light baking. Most of these solutions are a little nuanced, but I will try and explain them as best as possible.
While Ready Or Not is stuck on version UE 5.3.2, it sadly means we are stuck with CPU Lightmass and unable to use the aforementioned GPU Lightmass which is significantly faster.
Why? The 5.3 version is just broken on Rect Lights, Stationary Lights, Emissive light sources, Landscapes and more importantly - Cooked Assets. It is also very unstable.
However! A lot of the techniques discussed here are completely Universal and will apply to GPU Lightmass baking in newer versions, which are working for the most part.
Part 1 - Basic Workarounds
Basics
This isn’t a guide on best lighting practices, so I won’t go over:
- Making sure your Lightmaps are skinned properly to hide seams
- Adjusting SM Lightmap resolutions to have a consistent density to retain visual clarity
- And lowering viable Lightmaps resolutions to optimize memory performance
- How Unreal lighting works best with Physically Based Lighting values, so you should try and normalize values across the map to reflect their real world usage
- But…there is a degree of artistic freedom to be had - we are still making game worlds
- Or that if your scene is too dark or bright very slighting adjusting the Post Processing Volume’s
SlopeandToecan fix most issues instead of having to adjust 100s of other post processing effects.
Oops….I guess I kind of just did go over them 😜
Further Reading:
- Understanding Lightmapping in Unreal Engine
- UDK: 18 Important Principles for Creating/Using Lightmaps (Lightmapping Basics)
Dealing with Light Bleed
I think a lot of newer people coming into UE will suffer from these issues at some point or another. There’s no golden ticket to fix them but here are a couple of things to consider:
- Never judge your lighting on meshes made from Brushes.
- They ALWAYS have some sort of lighting or material issue.
- Check to make sure your Lightmaps have proper padding between UV shells
- Use Thicker Walls
- Walls with a thickness of 10uu or less are common candidates for light bleeding, especially from strong Directional lights.
- Increasing the wall thickness to 20uu will cover most issues encountered.
- Increasing the
Num Dynamic Shadow Cascadeson your Directional light may fix some issues, but it’s never guaranteed and comes with a performance/memory cost.
- Use Continuous Walls/Meshes
- Modular kits are amazing for building out a world quickly, but will never have truly smooth lighting between the seams between pieces
- In fact, levels I have built in the past out of modular kits (Killing Floor 2) are than later consolidated into single meshes with newly generated lightmaps to solve this issue.
- Modular kits are amazing for building out a world quickly, but will never have truly smooth lighting between the seams between pieces
- Extend the walls/floors into each other
- If you end up having walls/floors meet exactly at corners, you sometimes get little gaps of light bleeding through caused by Anti-Aliasing (or lack of).
- Extending surfaces past their mating locations eliminates this issue.
- Finally, if the shadows just don’t look right - double check your Lightmaps
- Sometimes things slip through.
Light Blockers
FOREWORD: Light Blockers mostly deals with solving Dynamic Shadows bleeding, they do have some limited success with baked lighting. However, if you are getting baked lighting bleeds, the root cause is likely something else and I would look again at the list above or double check your lightmaps.
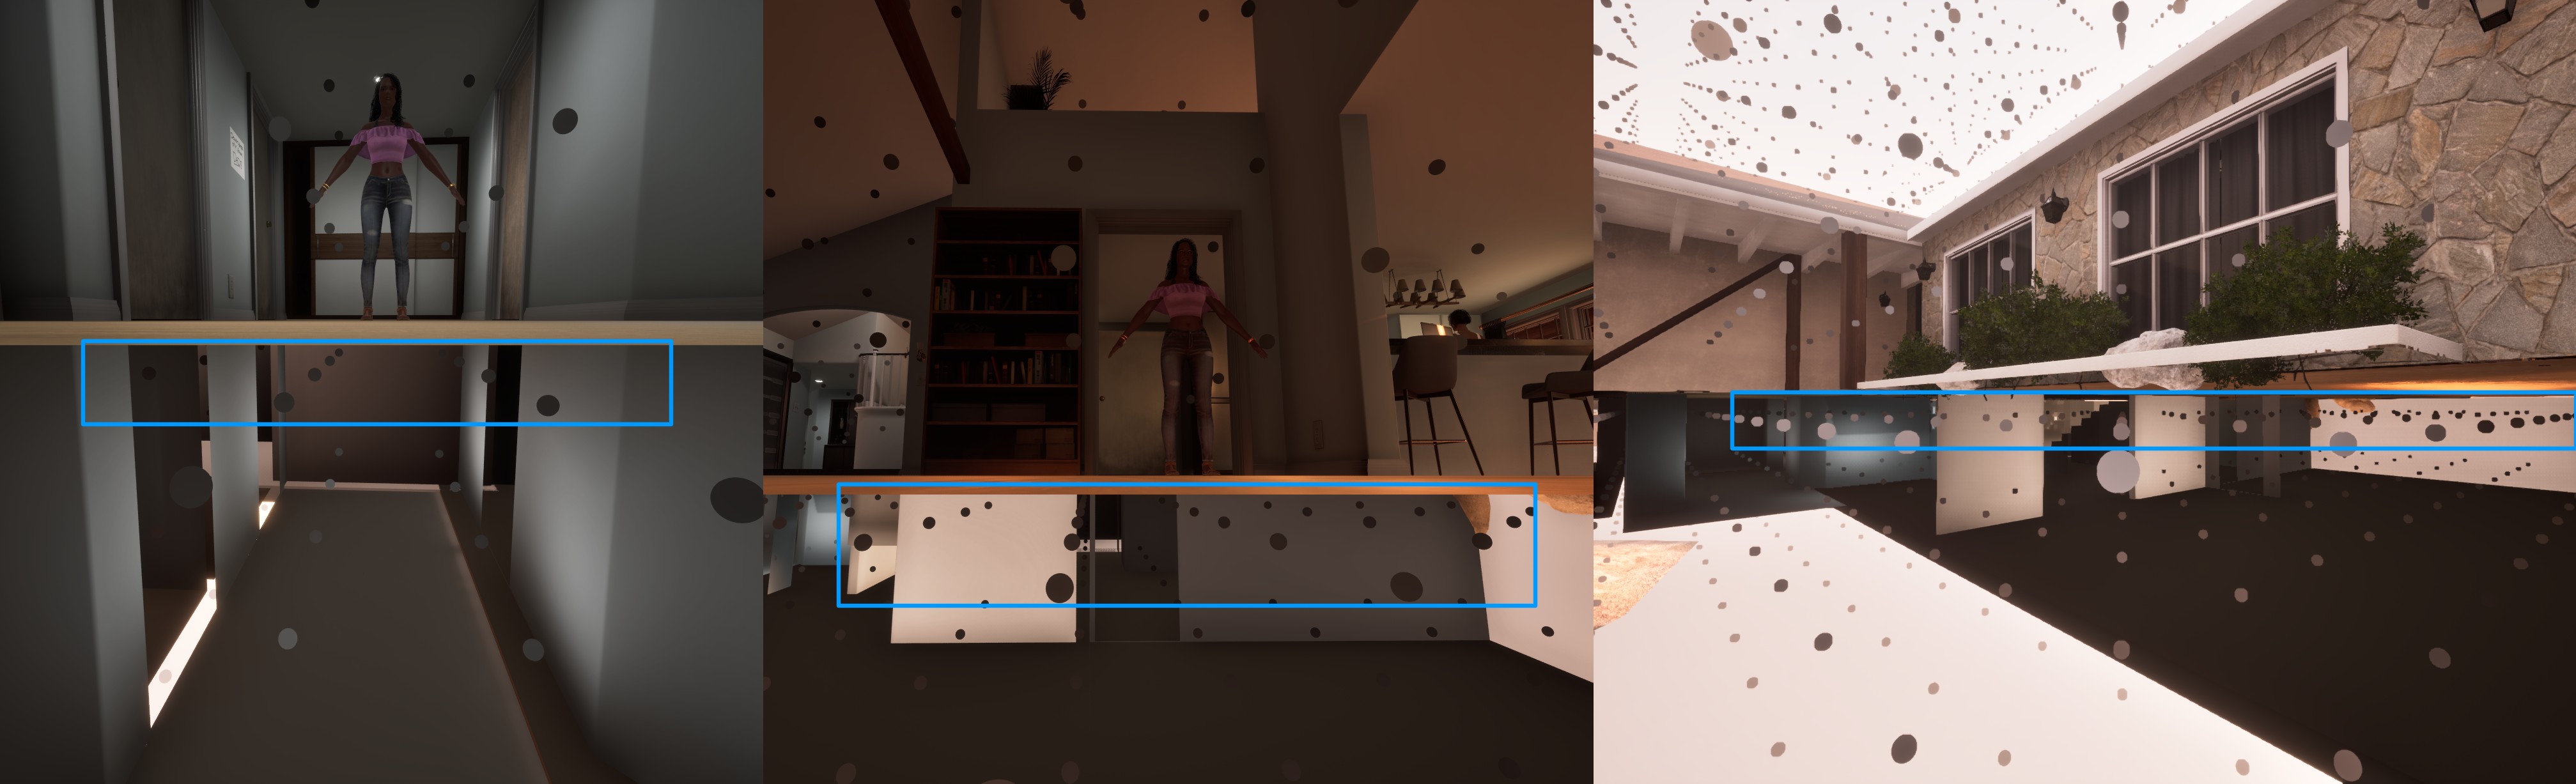
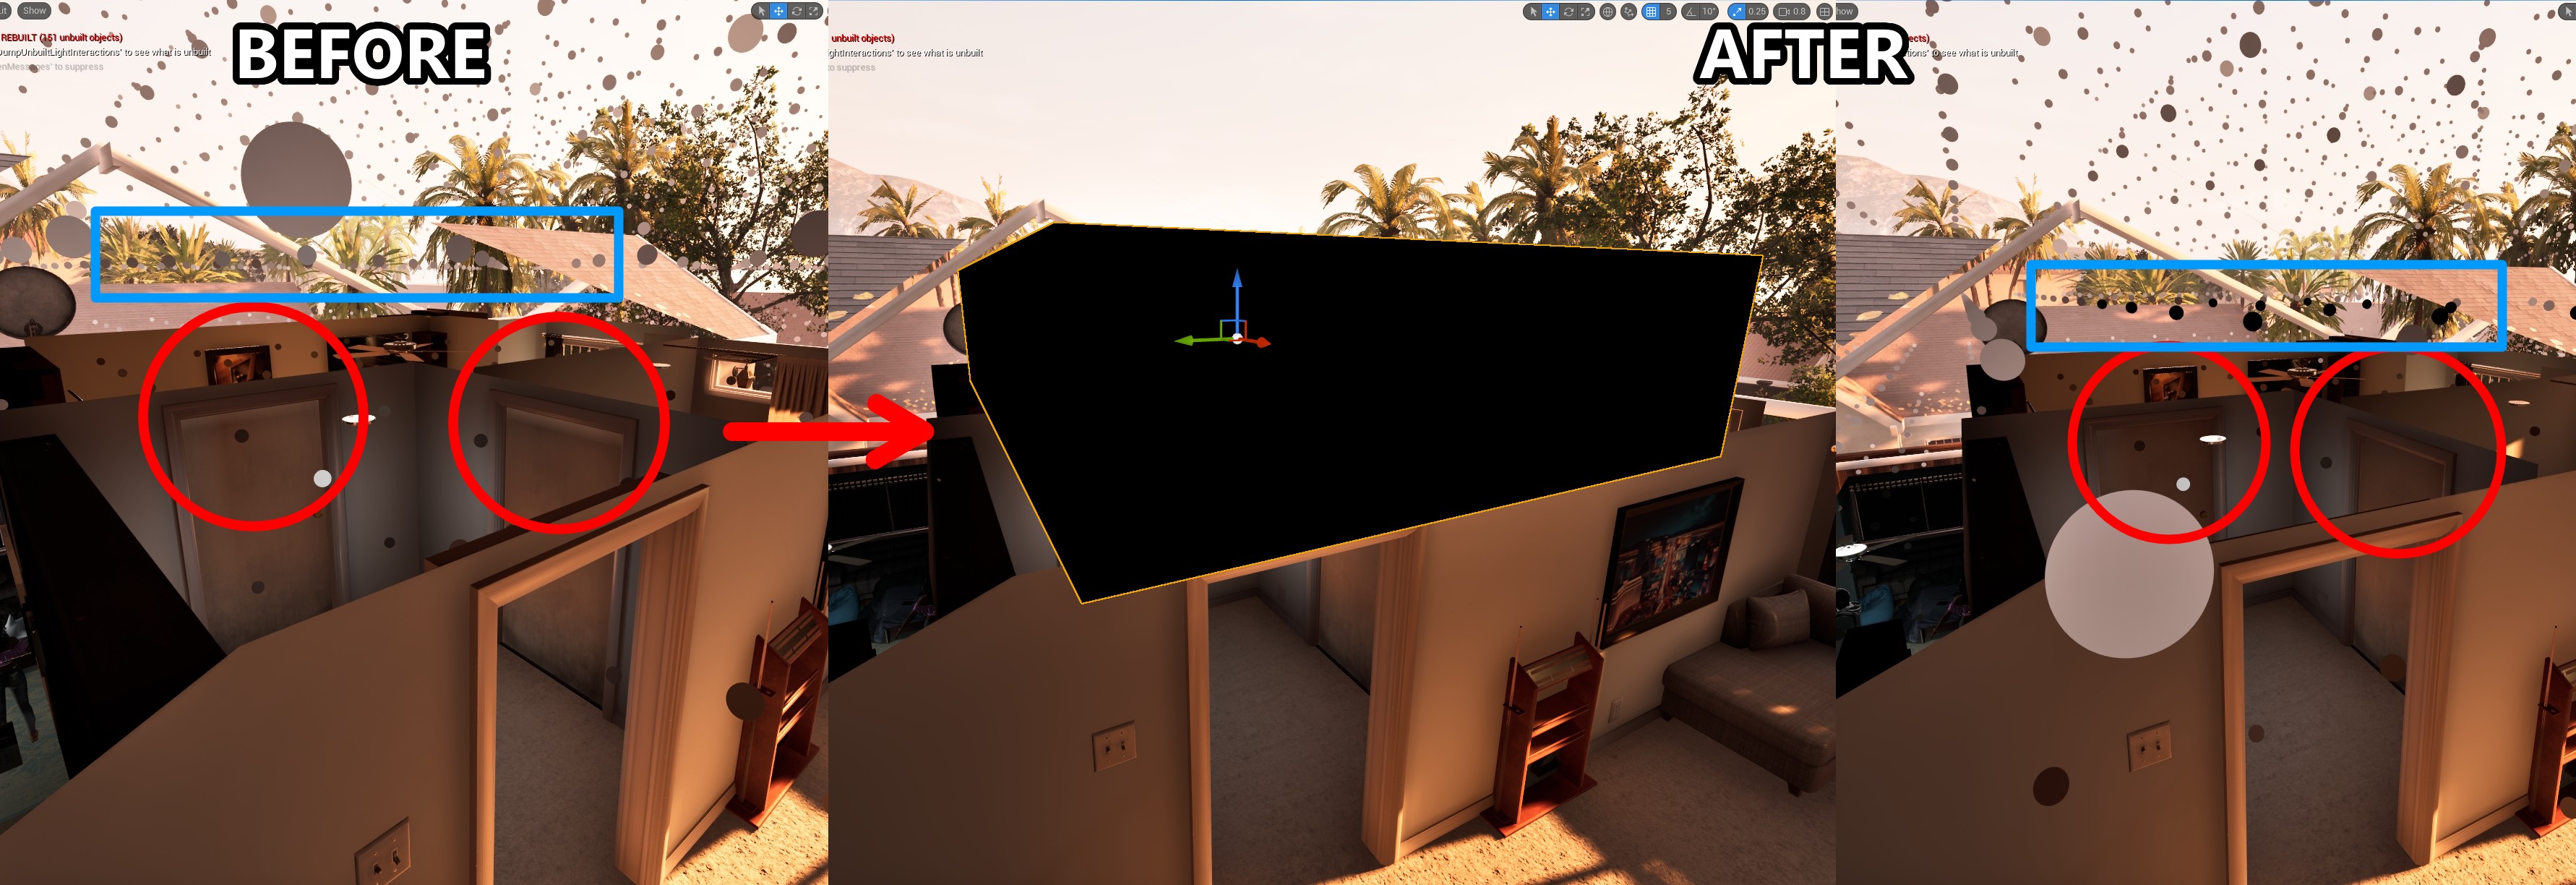
A lot of times you are forced to use planar meshes which don’t have a backside to block incoming light, or sections where meshes connect let light slip through, especially with strong Directional lights. The tried and true method for patching these areas is to add basic cubes as invisible Light Blockers!
These are simple cube meshes scaled to fill the space between walls and act as physical barriers to stop light. You can catch most of the bleeding by using this method. It works pretty well for both Static and Dynamic shadows.
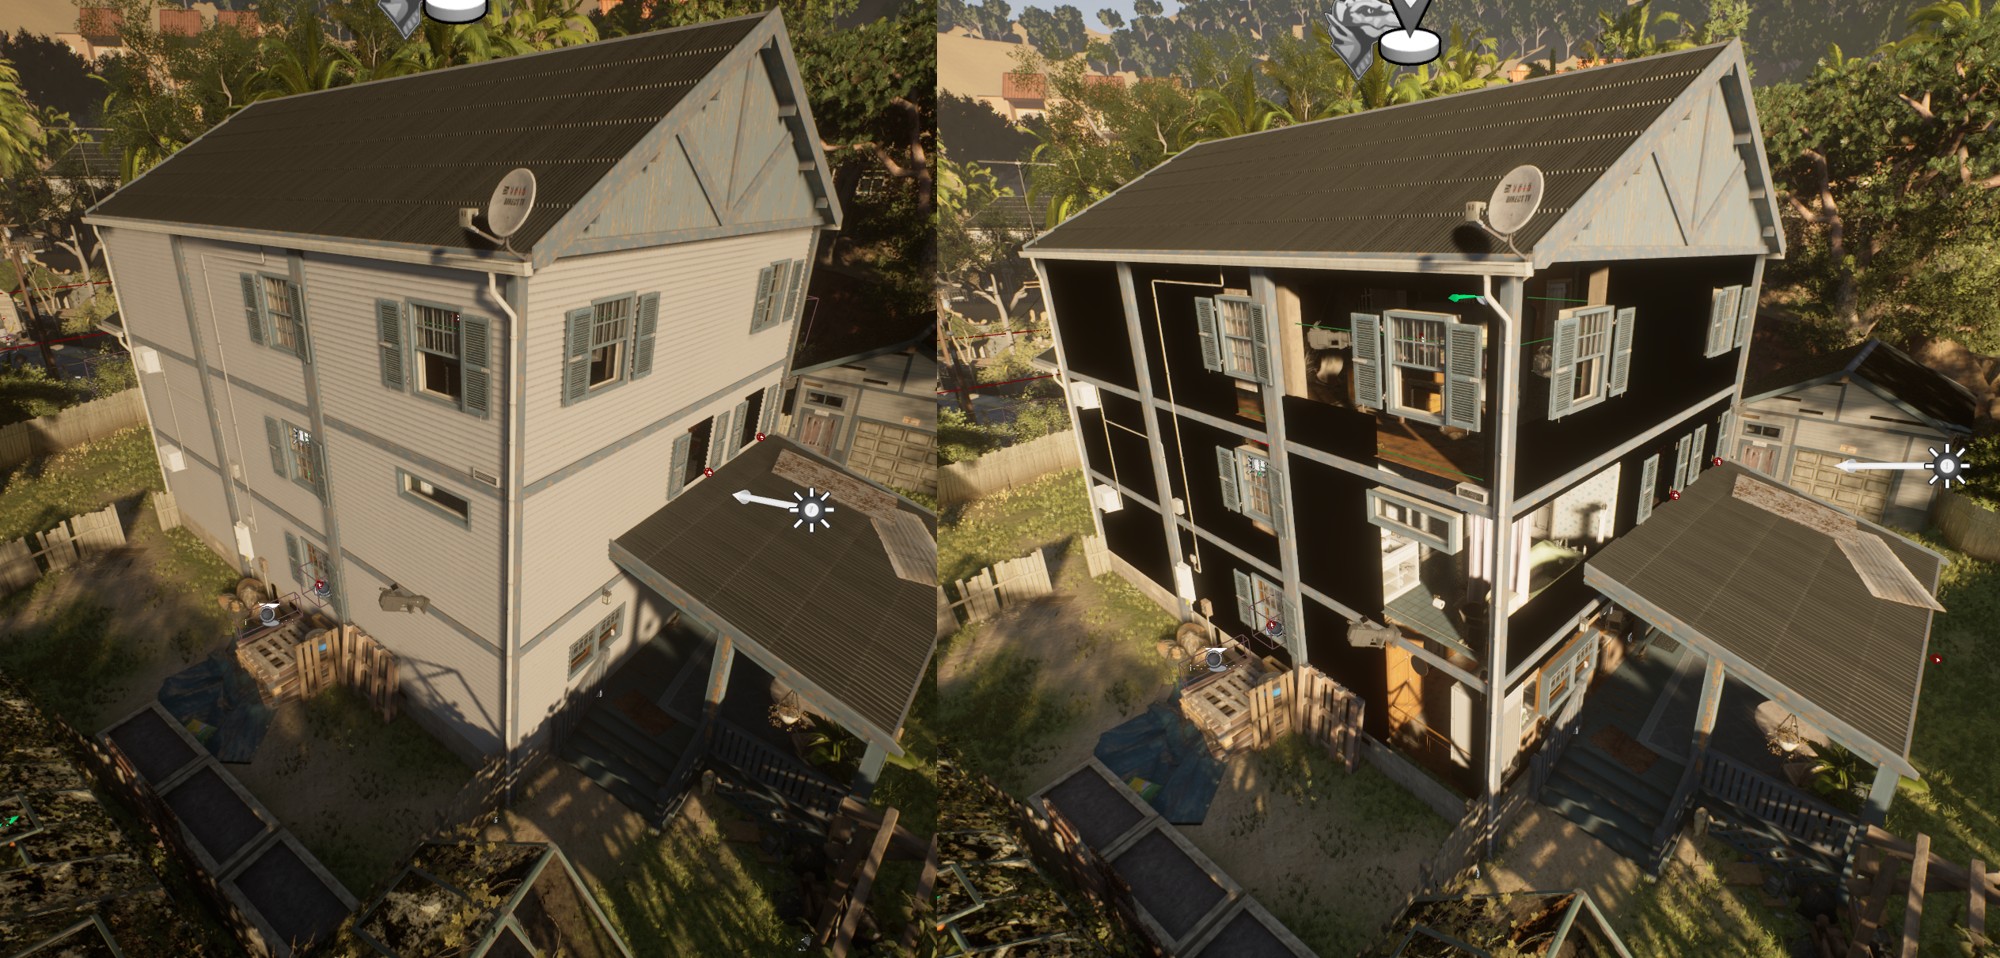 Light blocking cubes within the walls of the building to stop bleed at specific locations
 Take note of the sliver of light where the wall meets the window frame
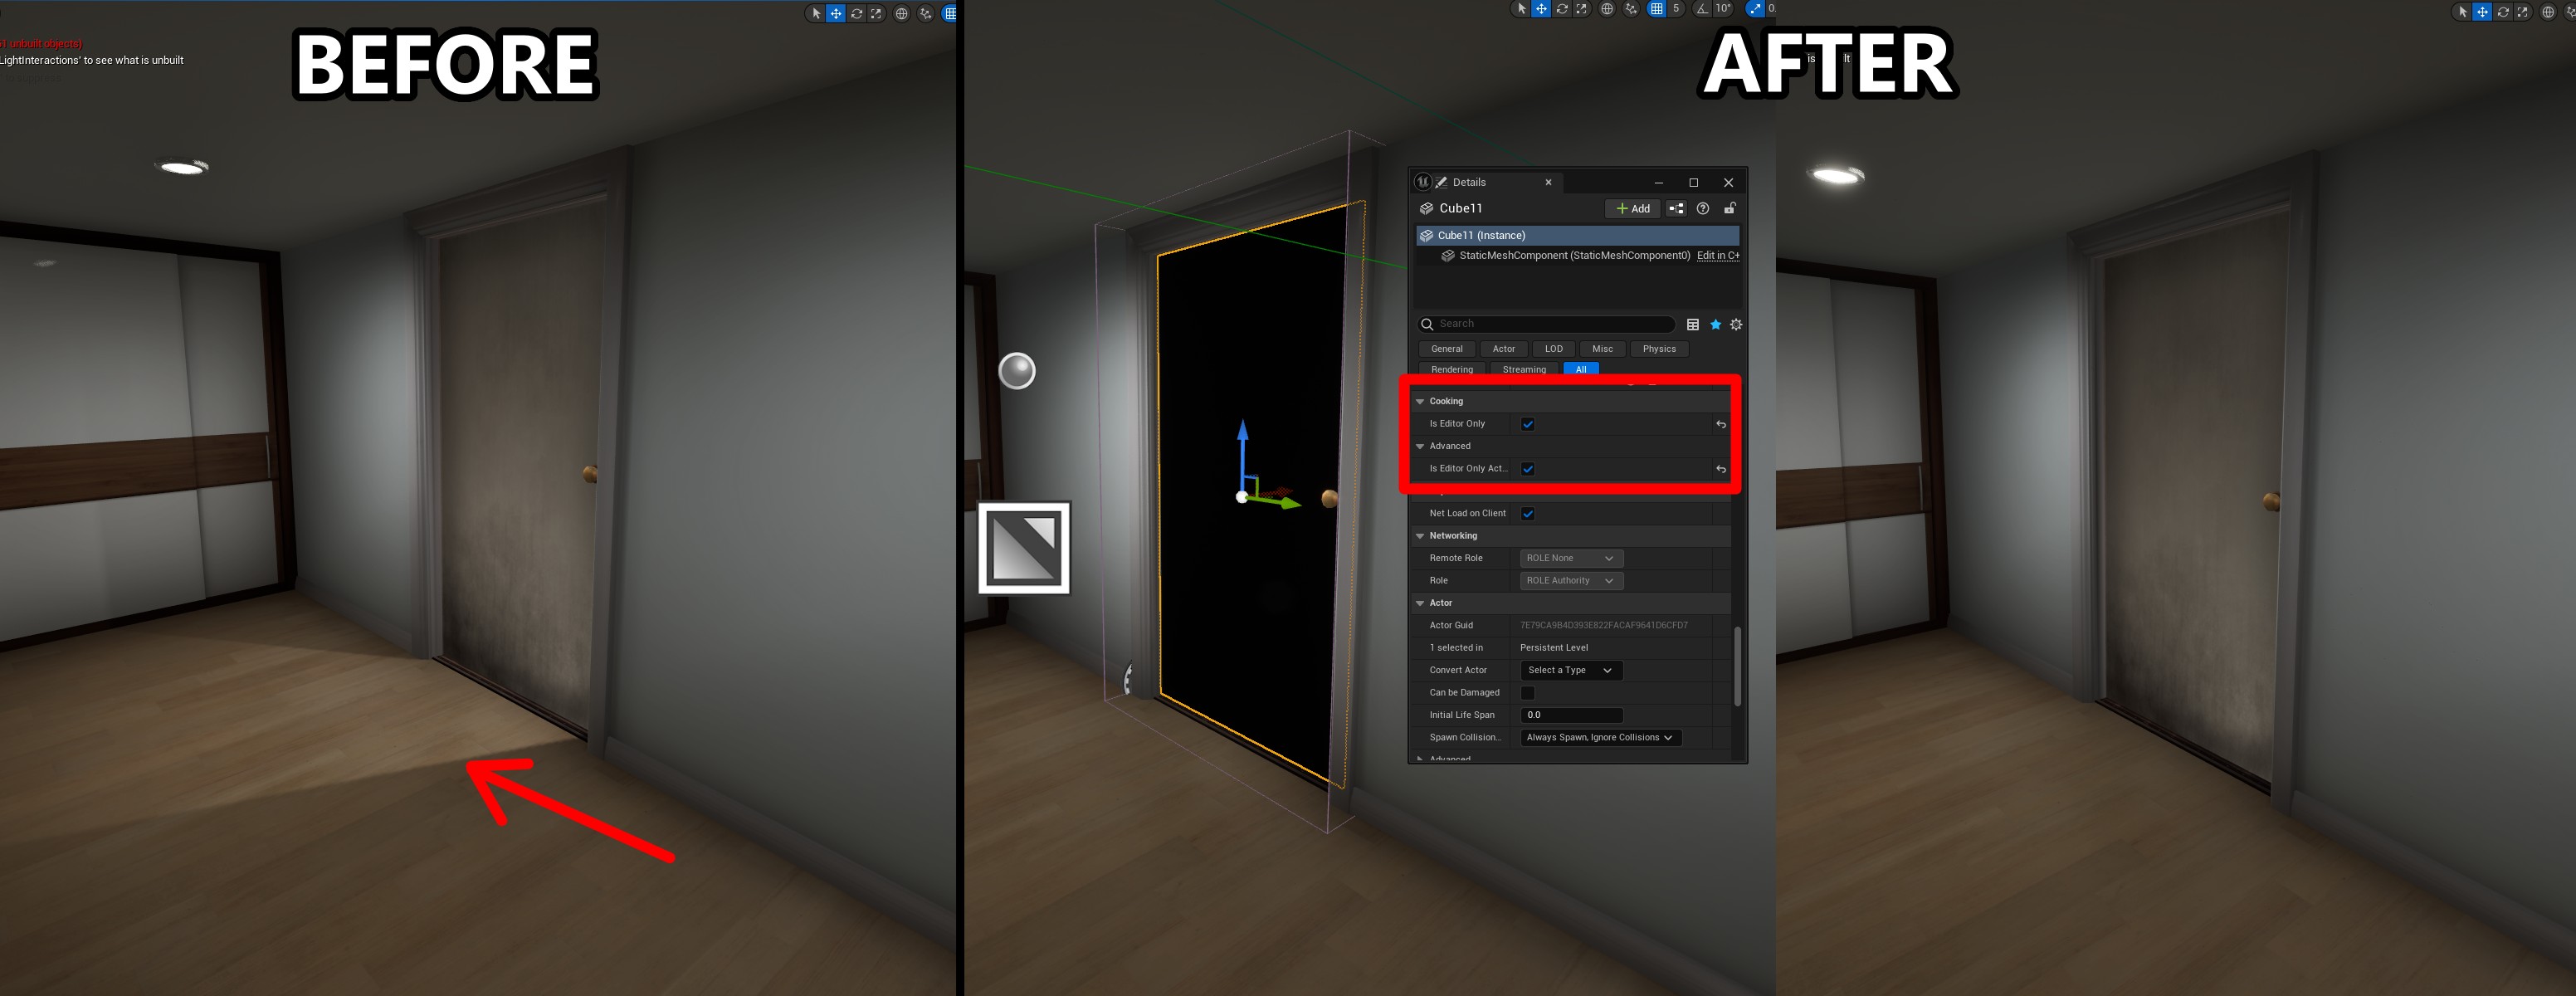
Set these meshes to have following properties to make them hidden within the game, but so the level still receives the benefits from them:
Hidden Shadow: TrueActor Hidden In Game: TrueOverride Light Map Res: 4- We still need static lighting but these are going to be unseen, so the lightmap resolution is not important, so getting it as small as possible is best for performance.
Disabling Collision is also recommended.
Additionally, if you do not need to worry about dynamic shadows and just need a generic light blocker to stop Static light bleeding from 1 room to another, you can set the following instead of making the actor hidden in game:
Is Editor Only: TrueIs Editor Only Actor: True
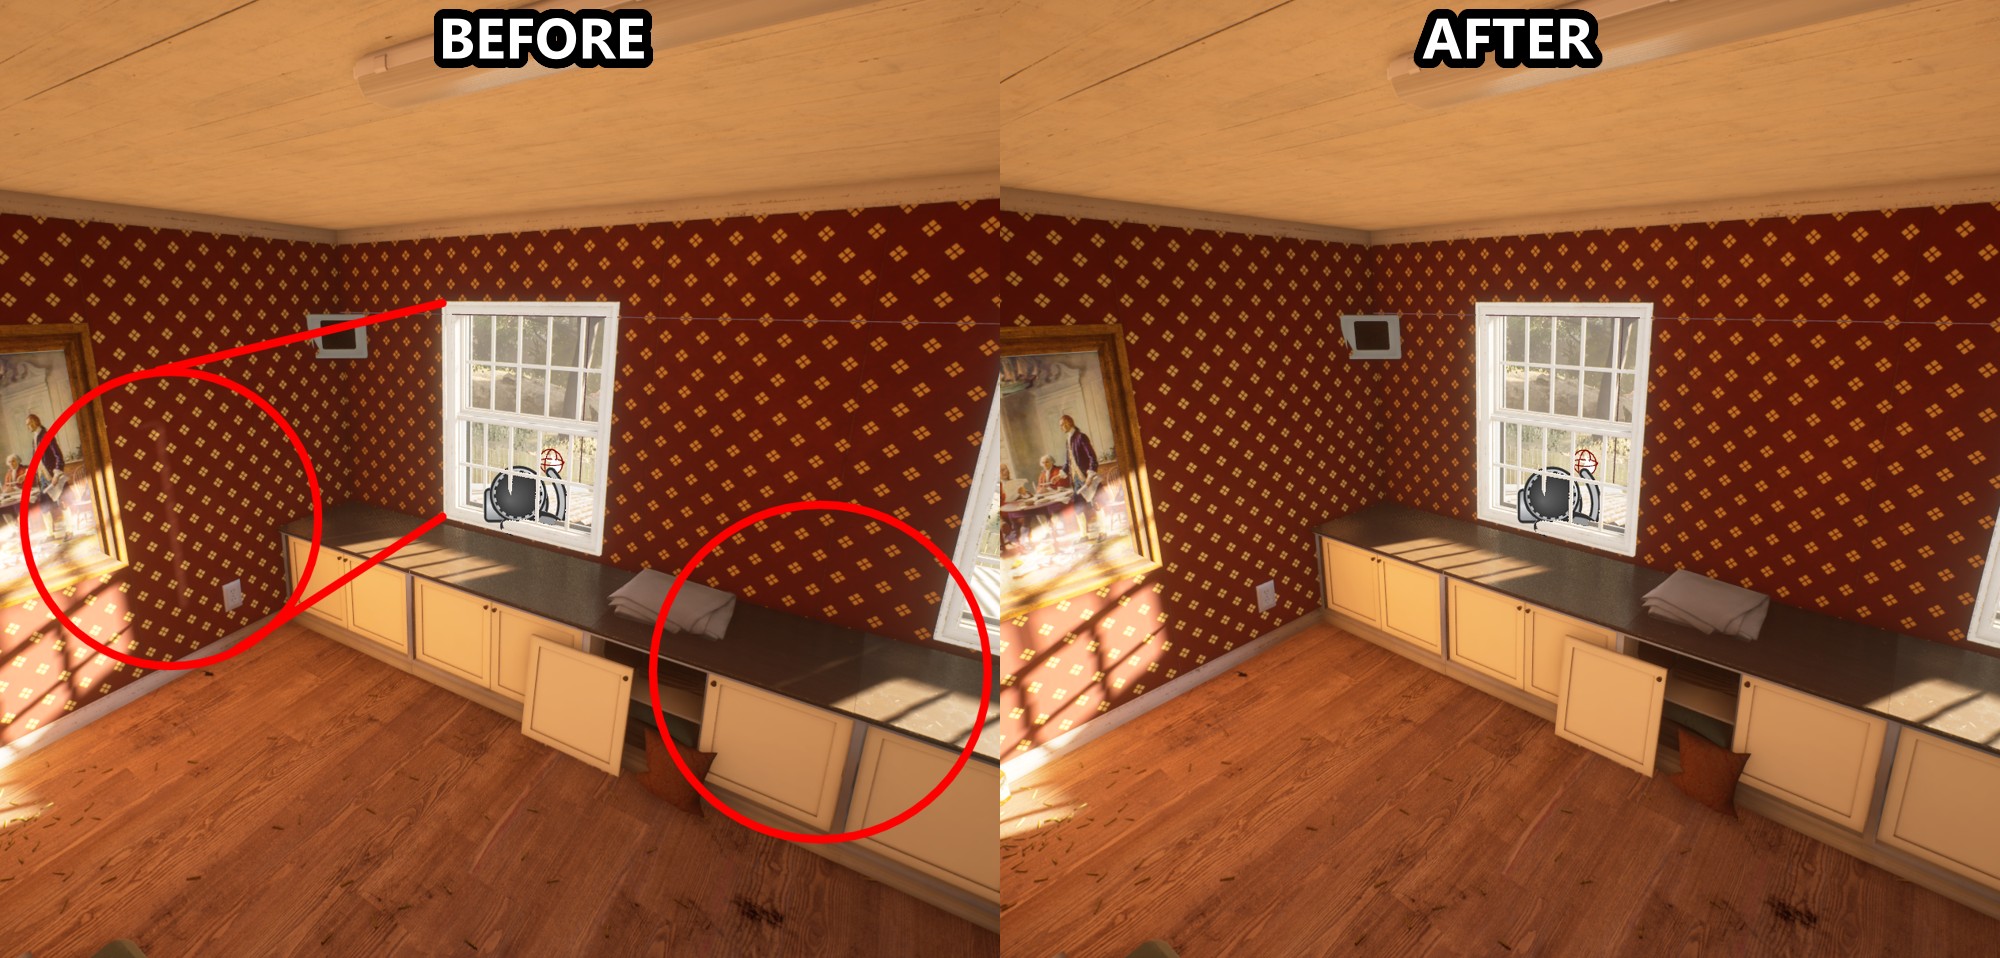
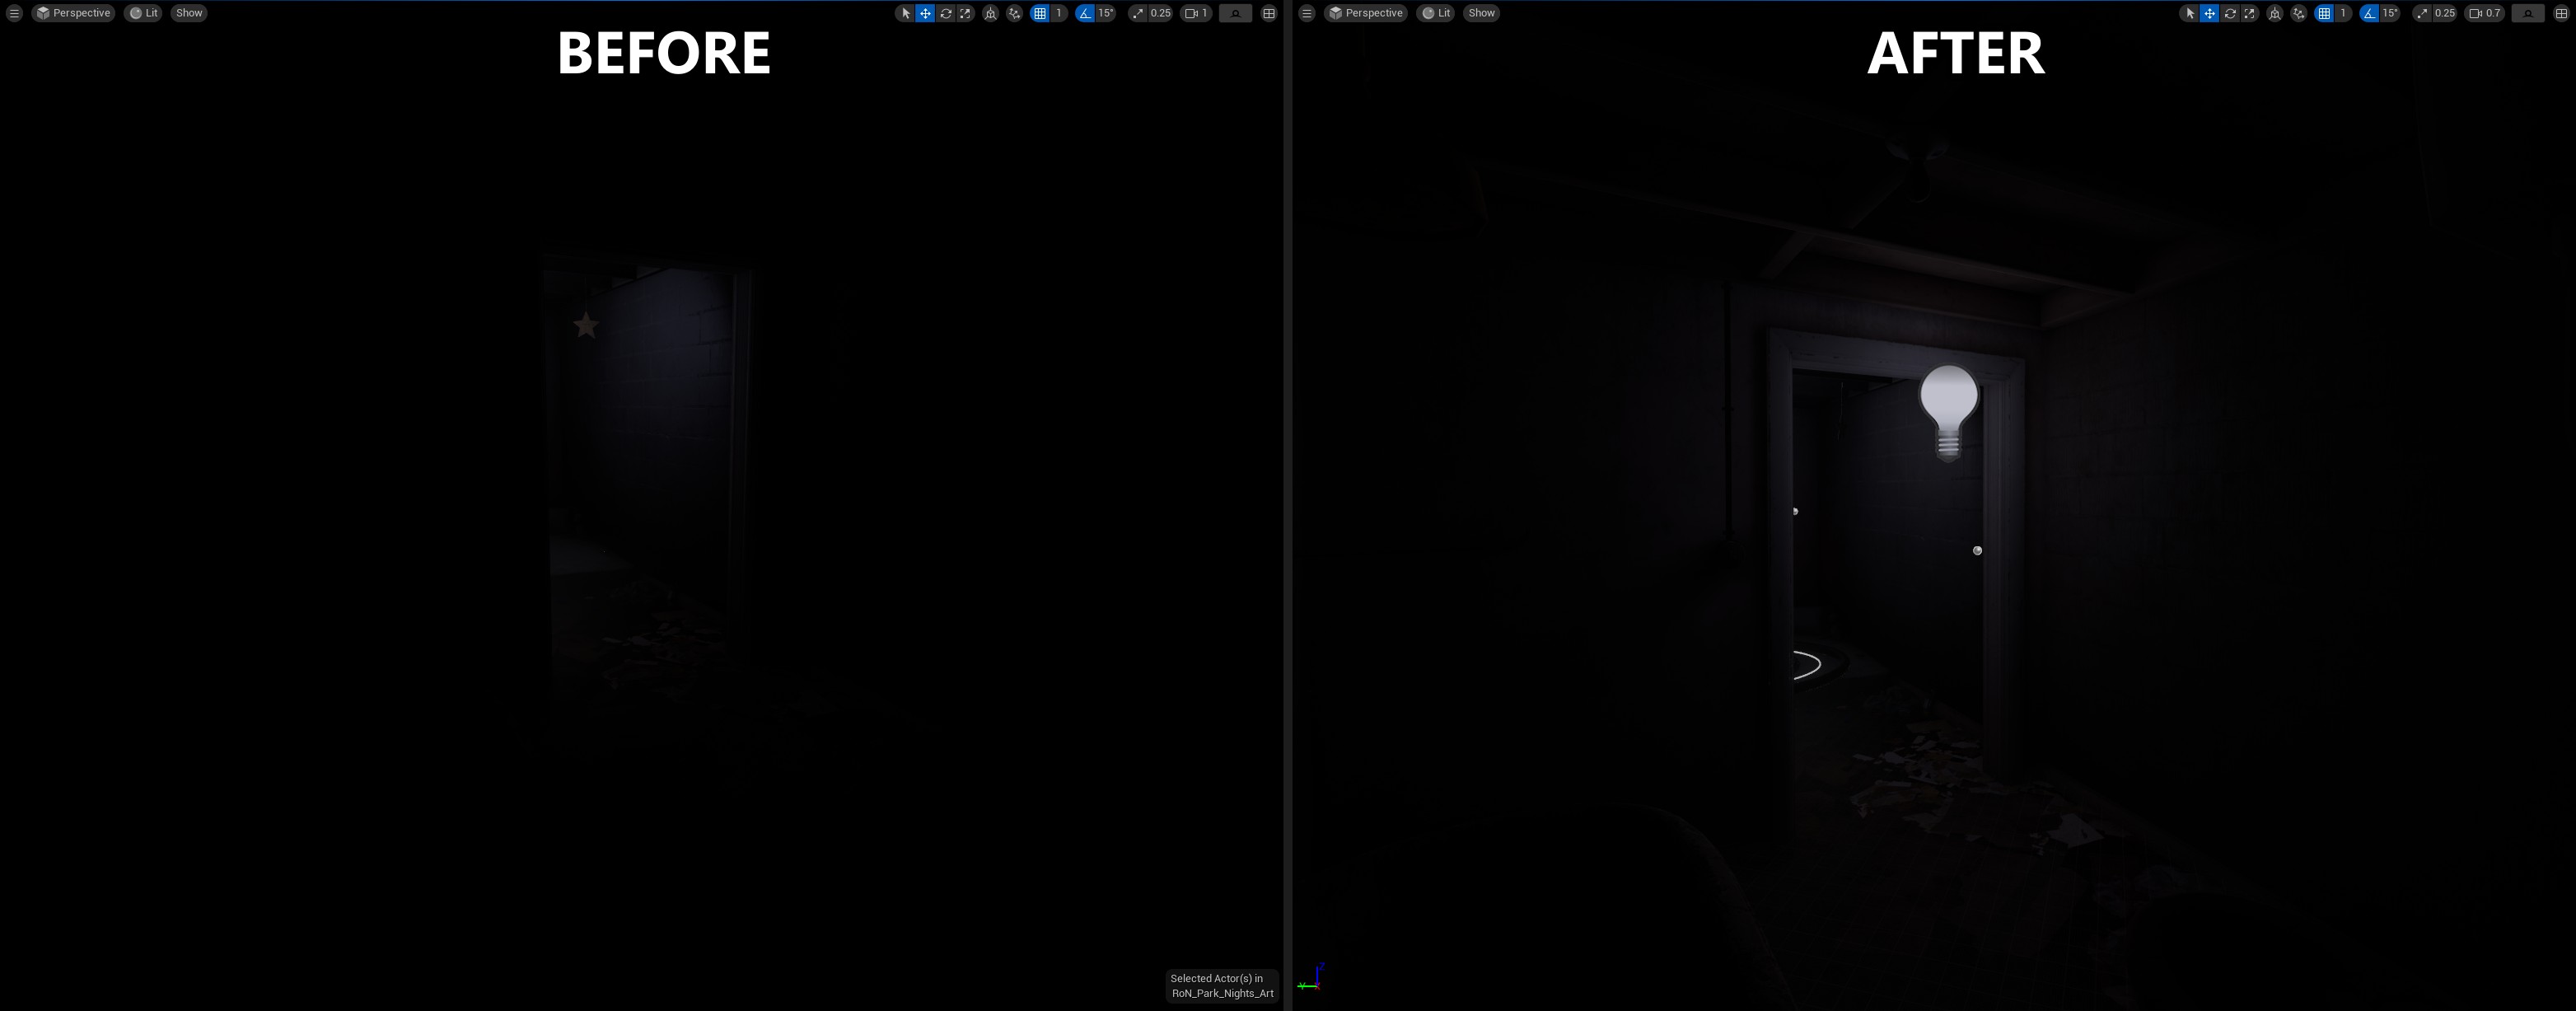
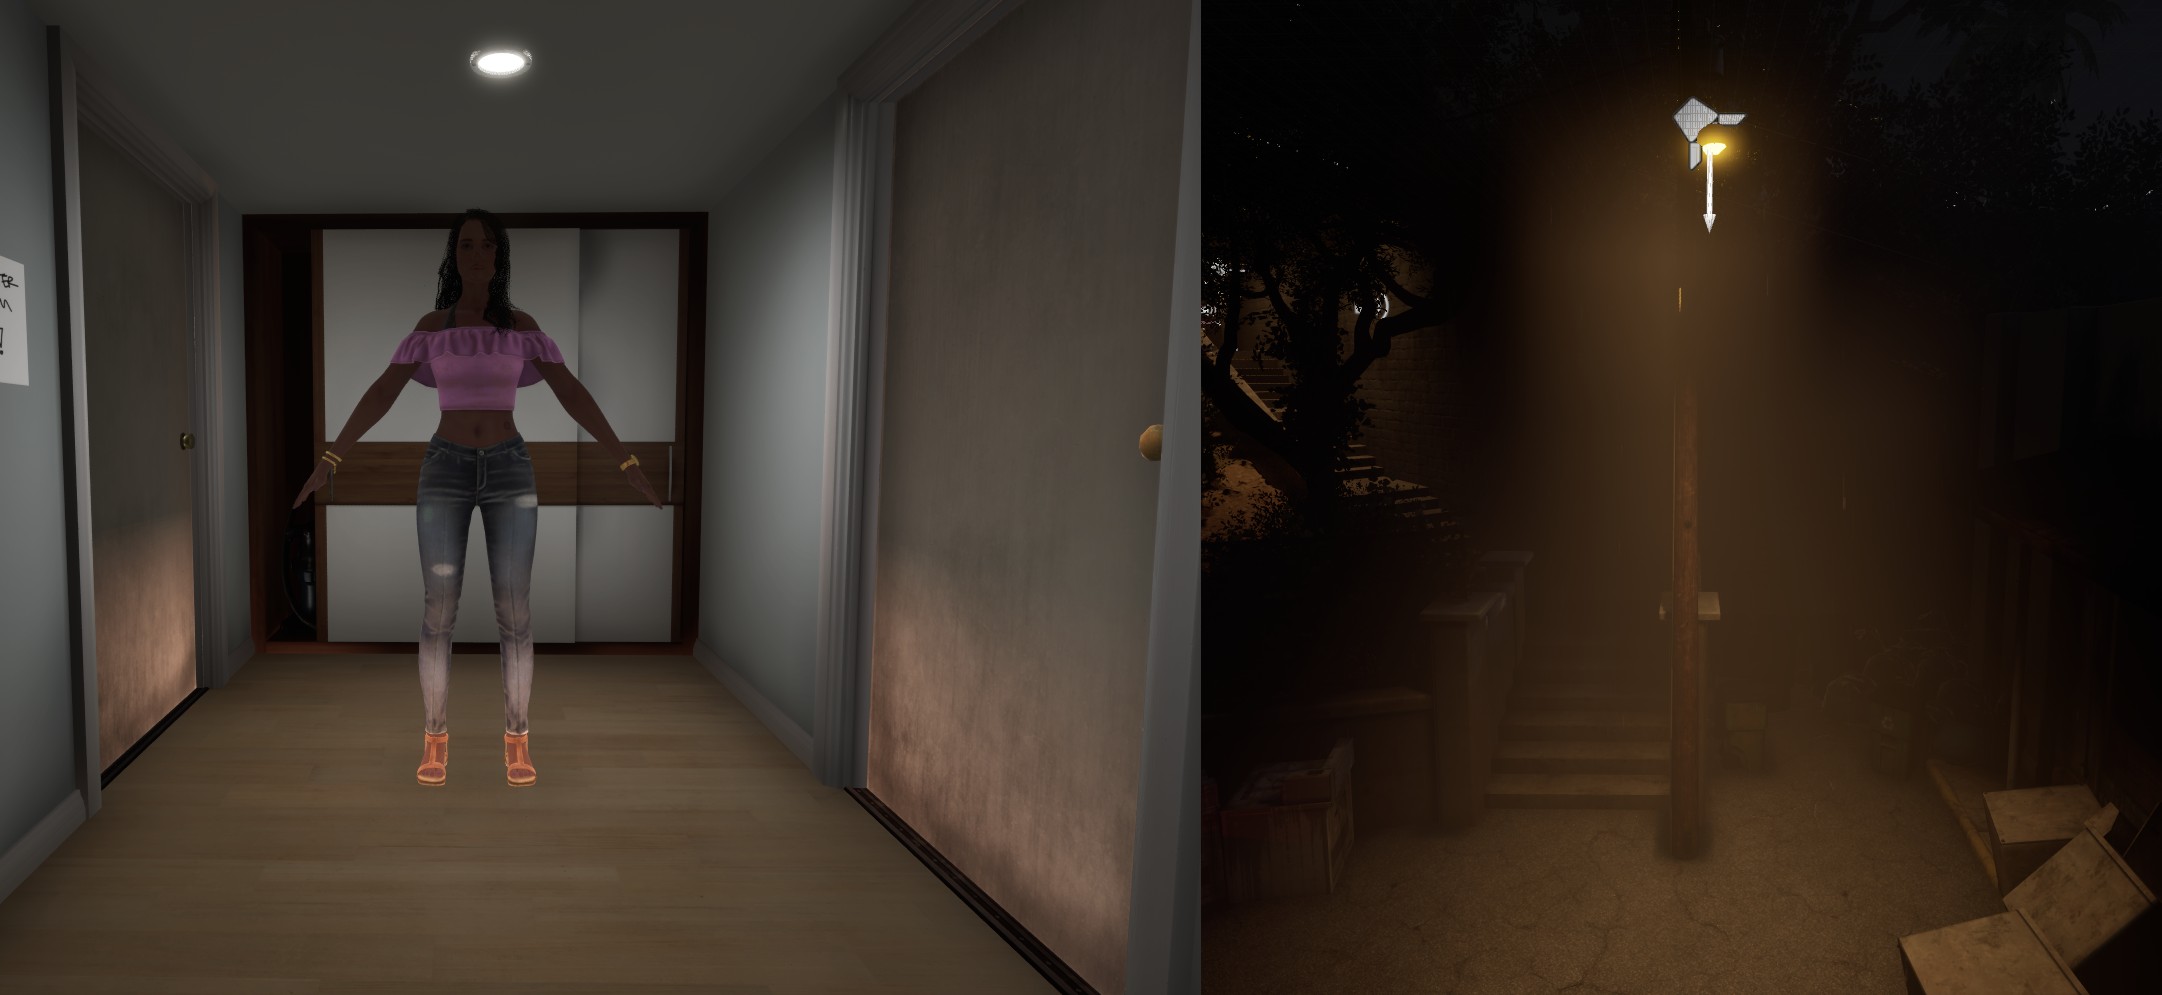
The below demonstrates a use-case for this: The door is a dynamic actor and won’t contribute to the baked lighting. Simply solved by introducing a light blocker that is Editor Only.
 Light bleed from the previous room isn’t blocked by the door since it doesn’t cast static shadows. A light blocker solves the issue.
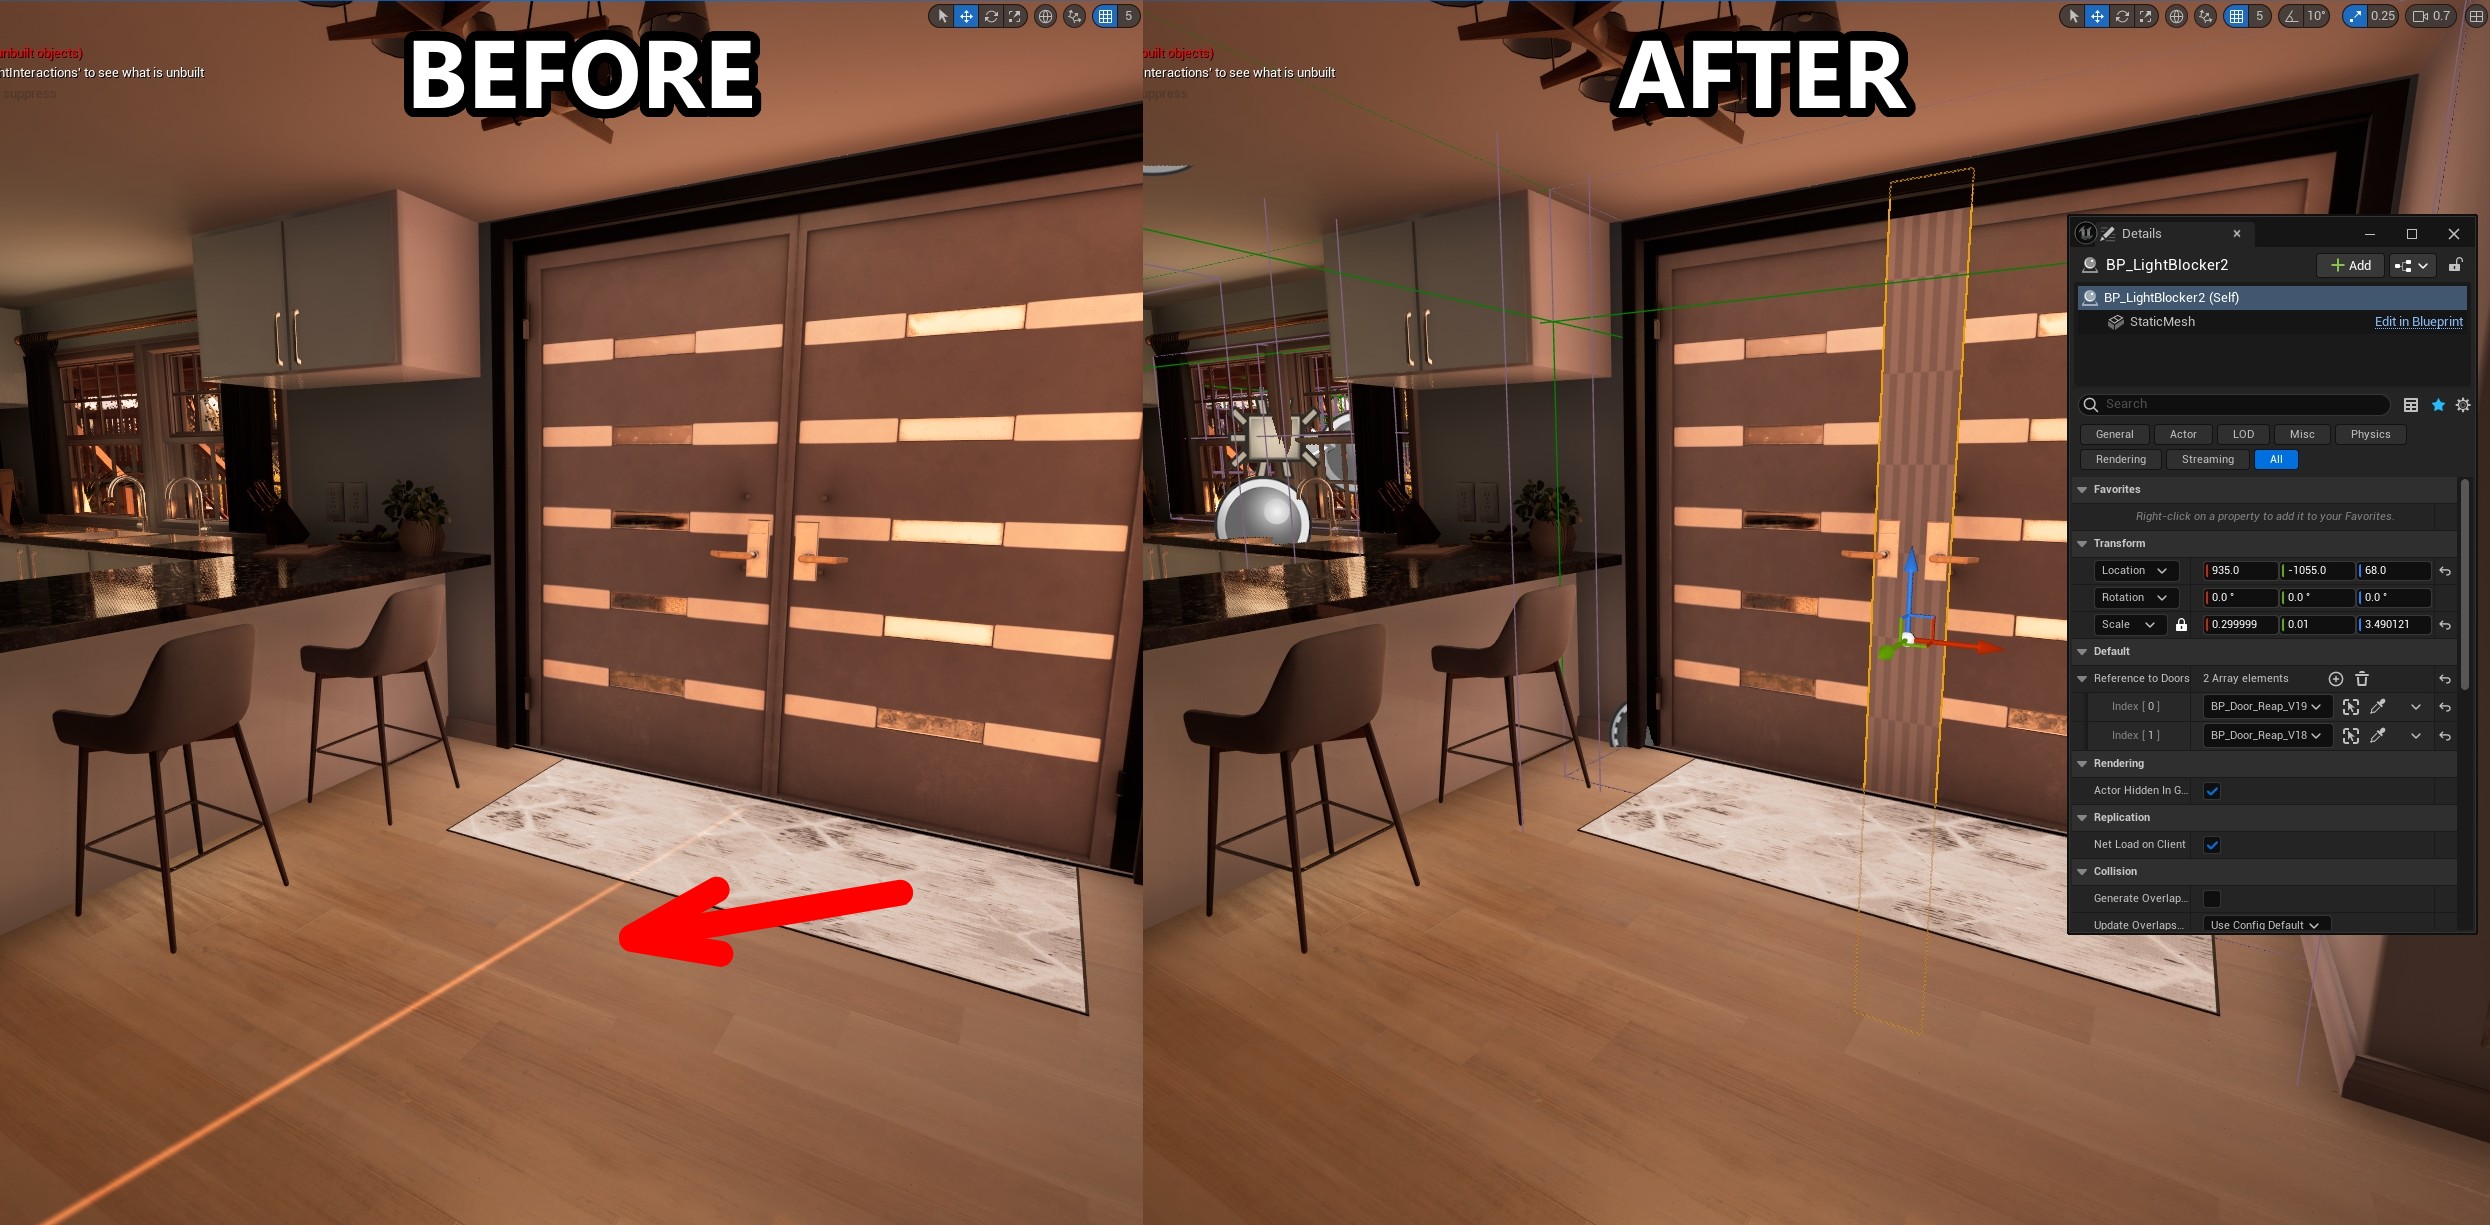
Dynamic Light Blockers
Just like with Static Meshes, game-objects can also create the issue. Here the interactable doors meet but still allow a sliver of light to make it through. Creating specific blueprints to solve these are sometimes needed; in this case a light blocker’s shadow is enabled when doors are closed, and disabled when opened.
The Mapping Framework comes with the exact Blueprint shown and supports the network replication for Doors. It is located at Mods > Template > Blueprints > BP_LightBlocker_Framework
Faking It Until You Make It: Shadows
Sometimes objects that should be shadowed - just aren’t. These are usually fringe cases but can be solved a little easier than you think. Just add to their Ambient Occlusion!
You can add shadows directly into the material by providing a mask to the areas that need to shaded. You can do this through a simple position gradient, vertex painting or even an additional texture. In the latter you can hook into the UVs of the Lightmap index. This allows for you to easily paint the shadows in an external program like Blender/Photoshop.
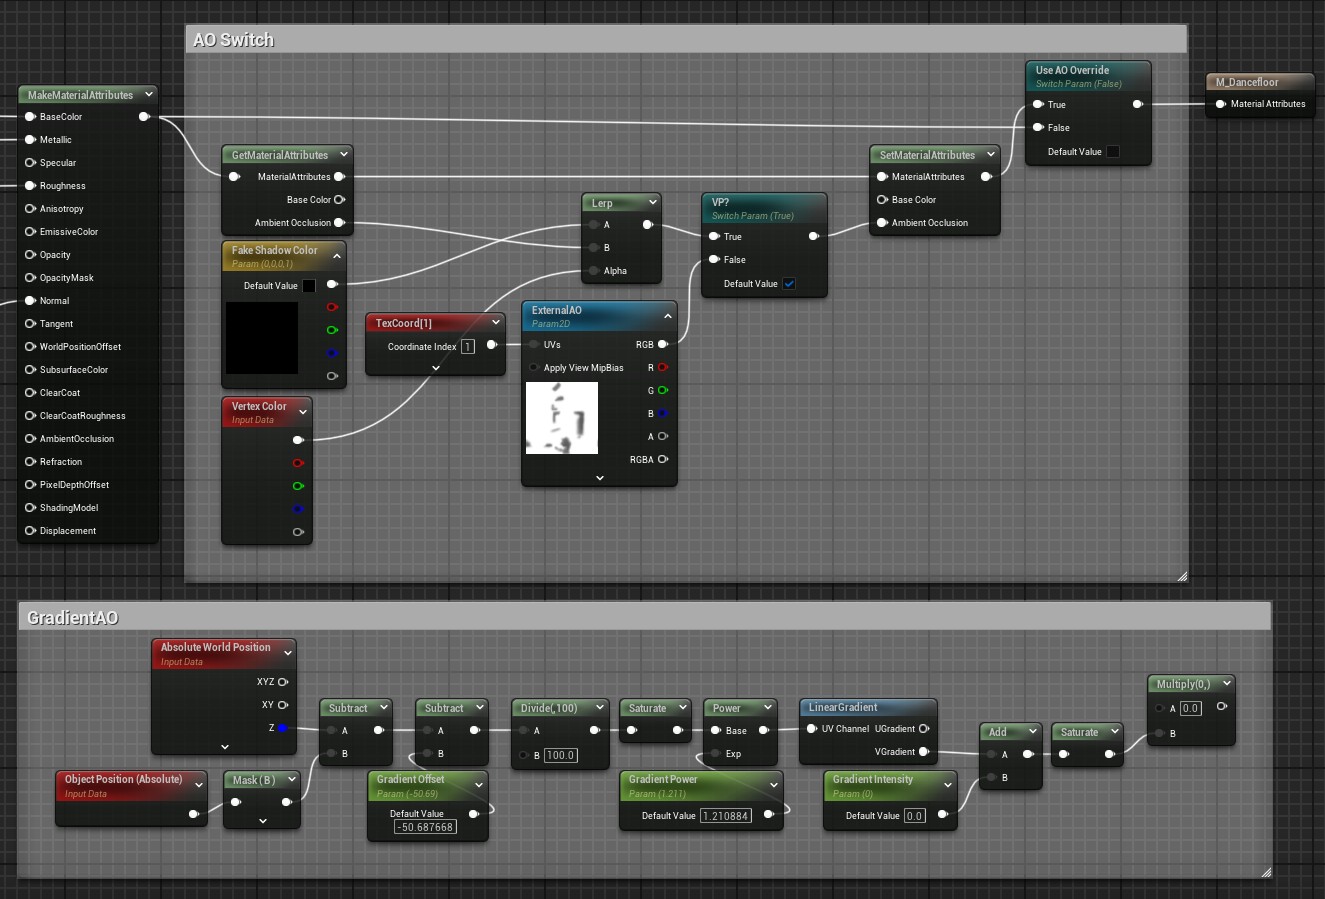 Some material nodes to implement all 3 methods of AO faking.
You can also go “Old School”, using a fake shadow material on a plane is an awesome way to get quick AO without having to rely on more hardcoded methods like the custom AO Lightmap shown above. The go to is a sphere, but squares and gradients have use-cases as well.
Make sure you disable
Static ShadowsandDynamic Shadowsas well as all Collision from the Static Mesh.
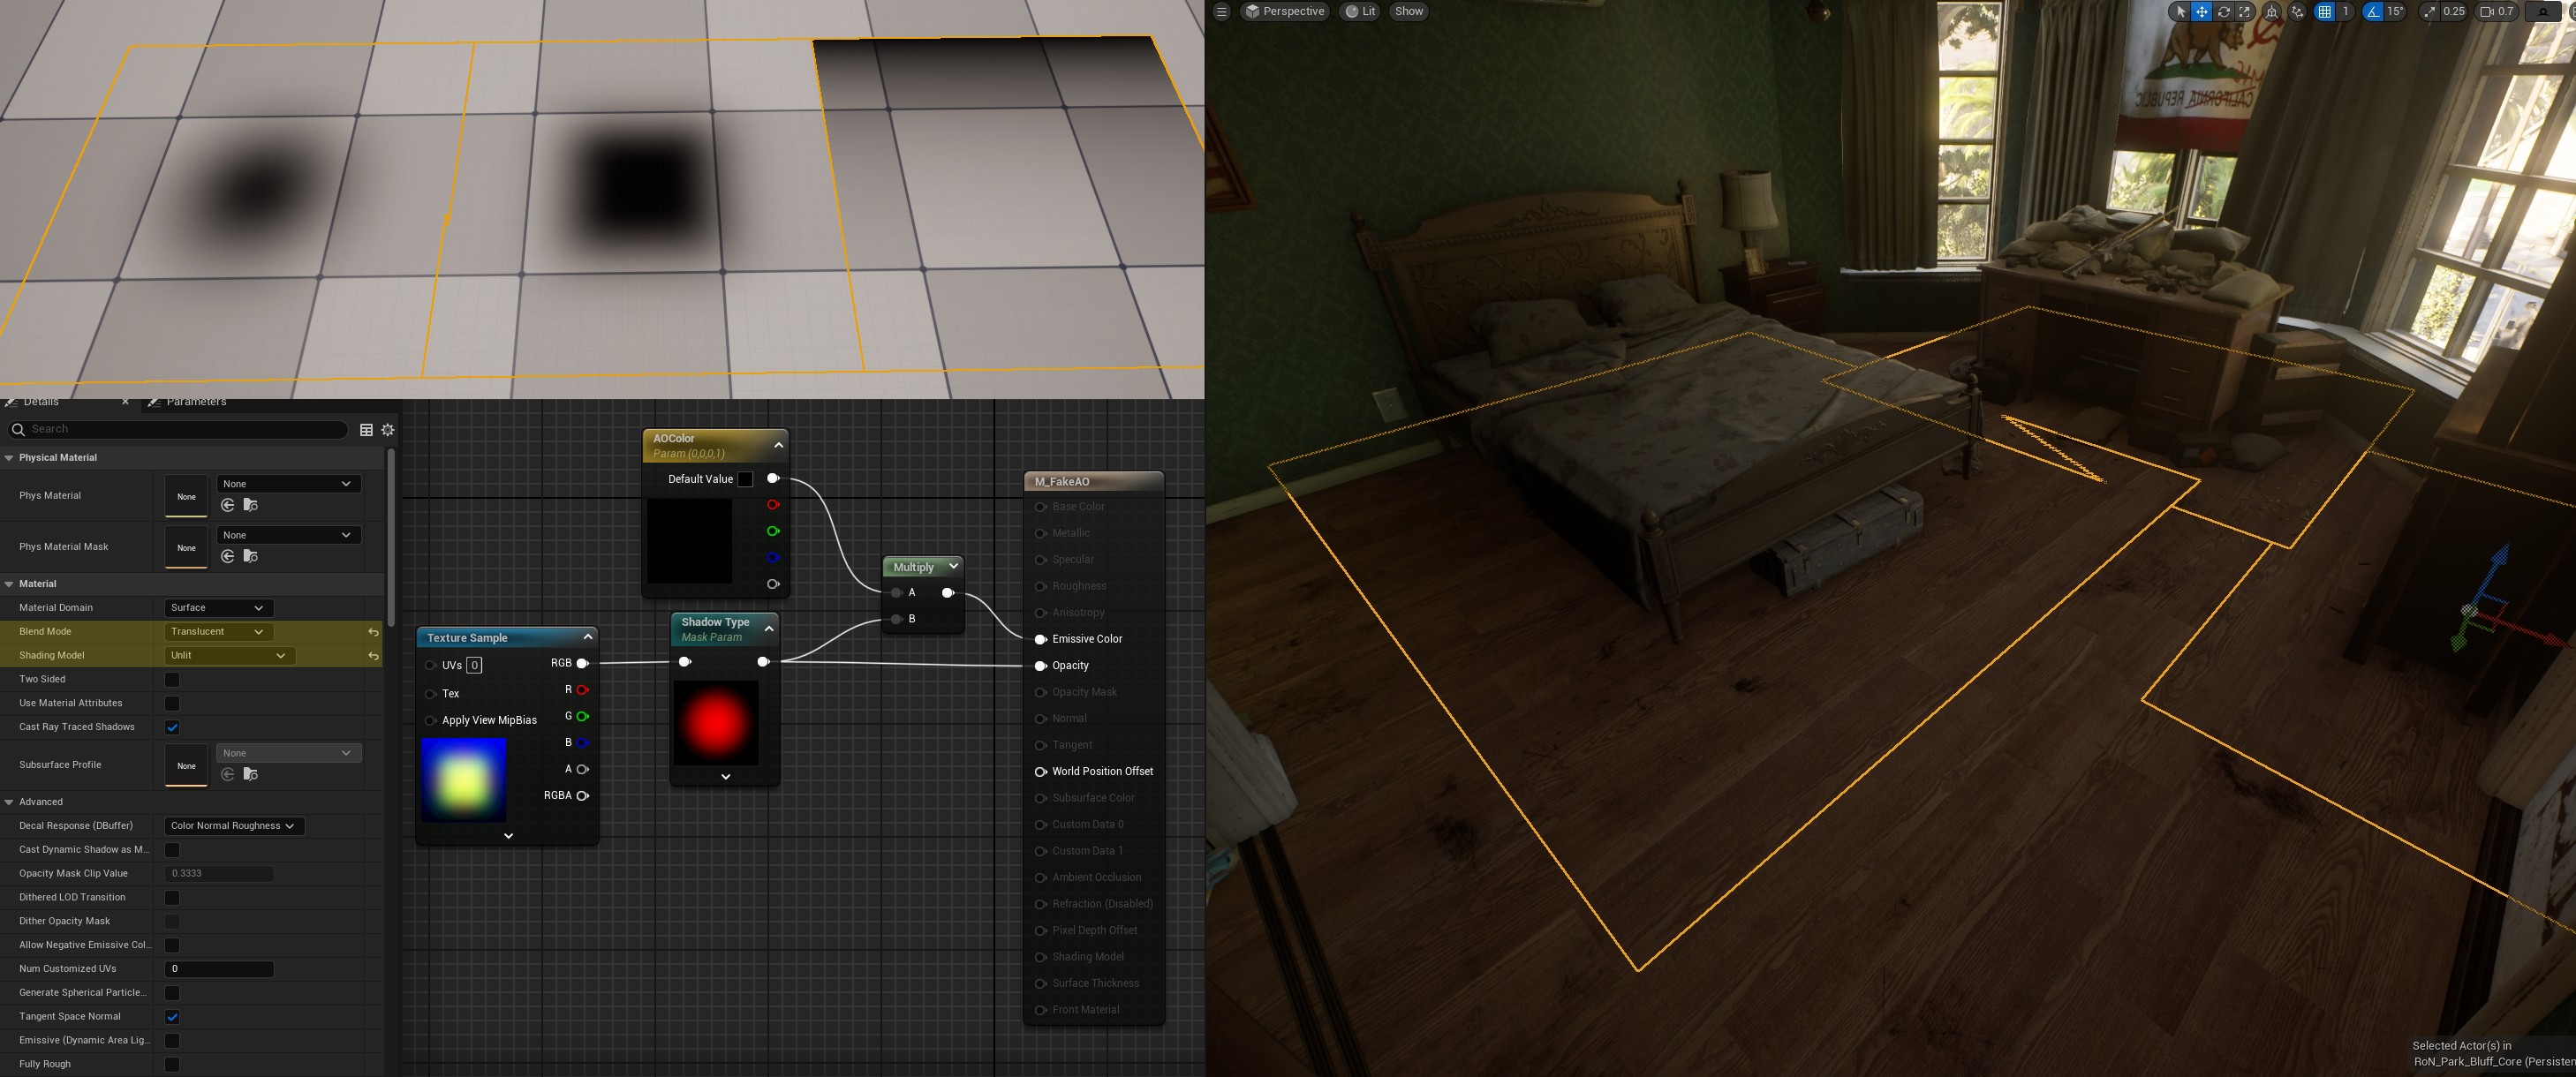 Very Simple Material that allows you to switch between Masks for fake AO planes. Alternative application is shown here using the planes instead of the additional lightmap that was handpainted. The benefit is that it is a lot easier and faster to place down. The tradeoff is that you will likely have transparency overdraw and lack the accuracy of the handpainted option.
Here’s the texture mask used in the above image: link
Faking It Until You Make It: Additional Lighting and GI
Indirect Lighting Intensity
Sometimes the lighting entering our scene doesn’t produce the desired effect we want, a lot of the time it can be just that there isn’t enough of it. Increasing a Light’s radius isn’t great for performance and light overlapping can become an issue. However, we can increase the Indirect Lighting Intensity. This will affect how the light bounces in the scene and increasing this value can help “fill” areas beyond the light’s radius without the need to increase it - with no extra performance cost!
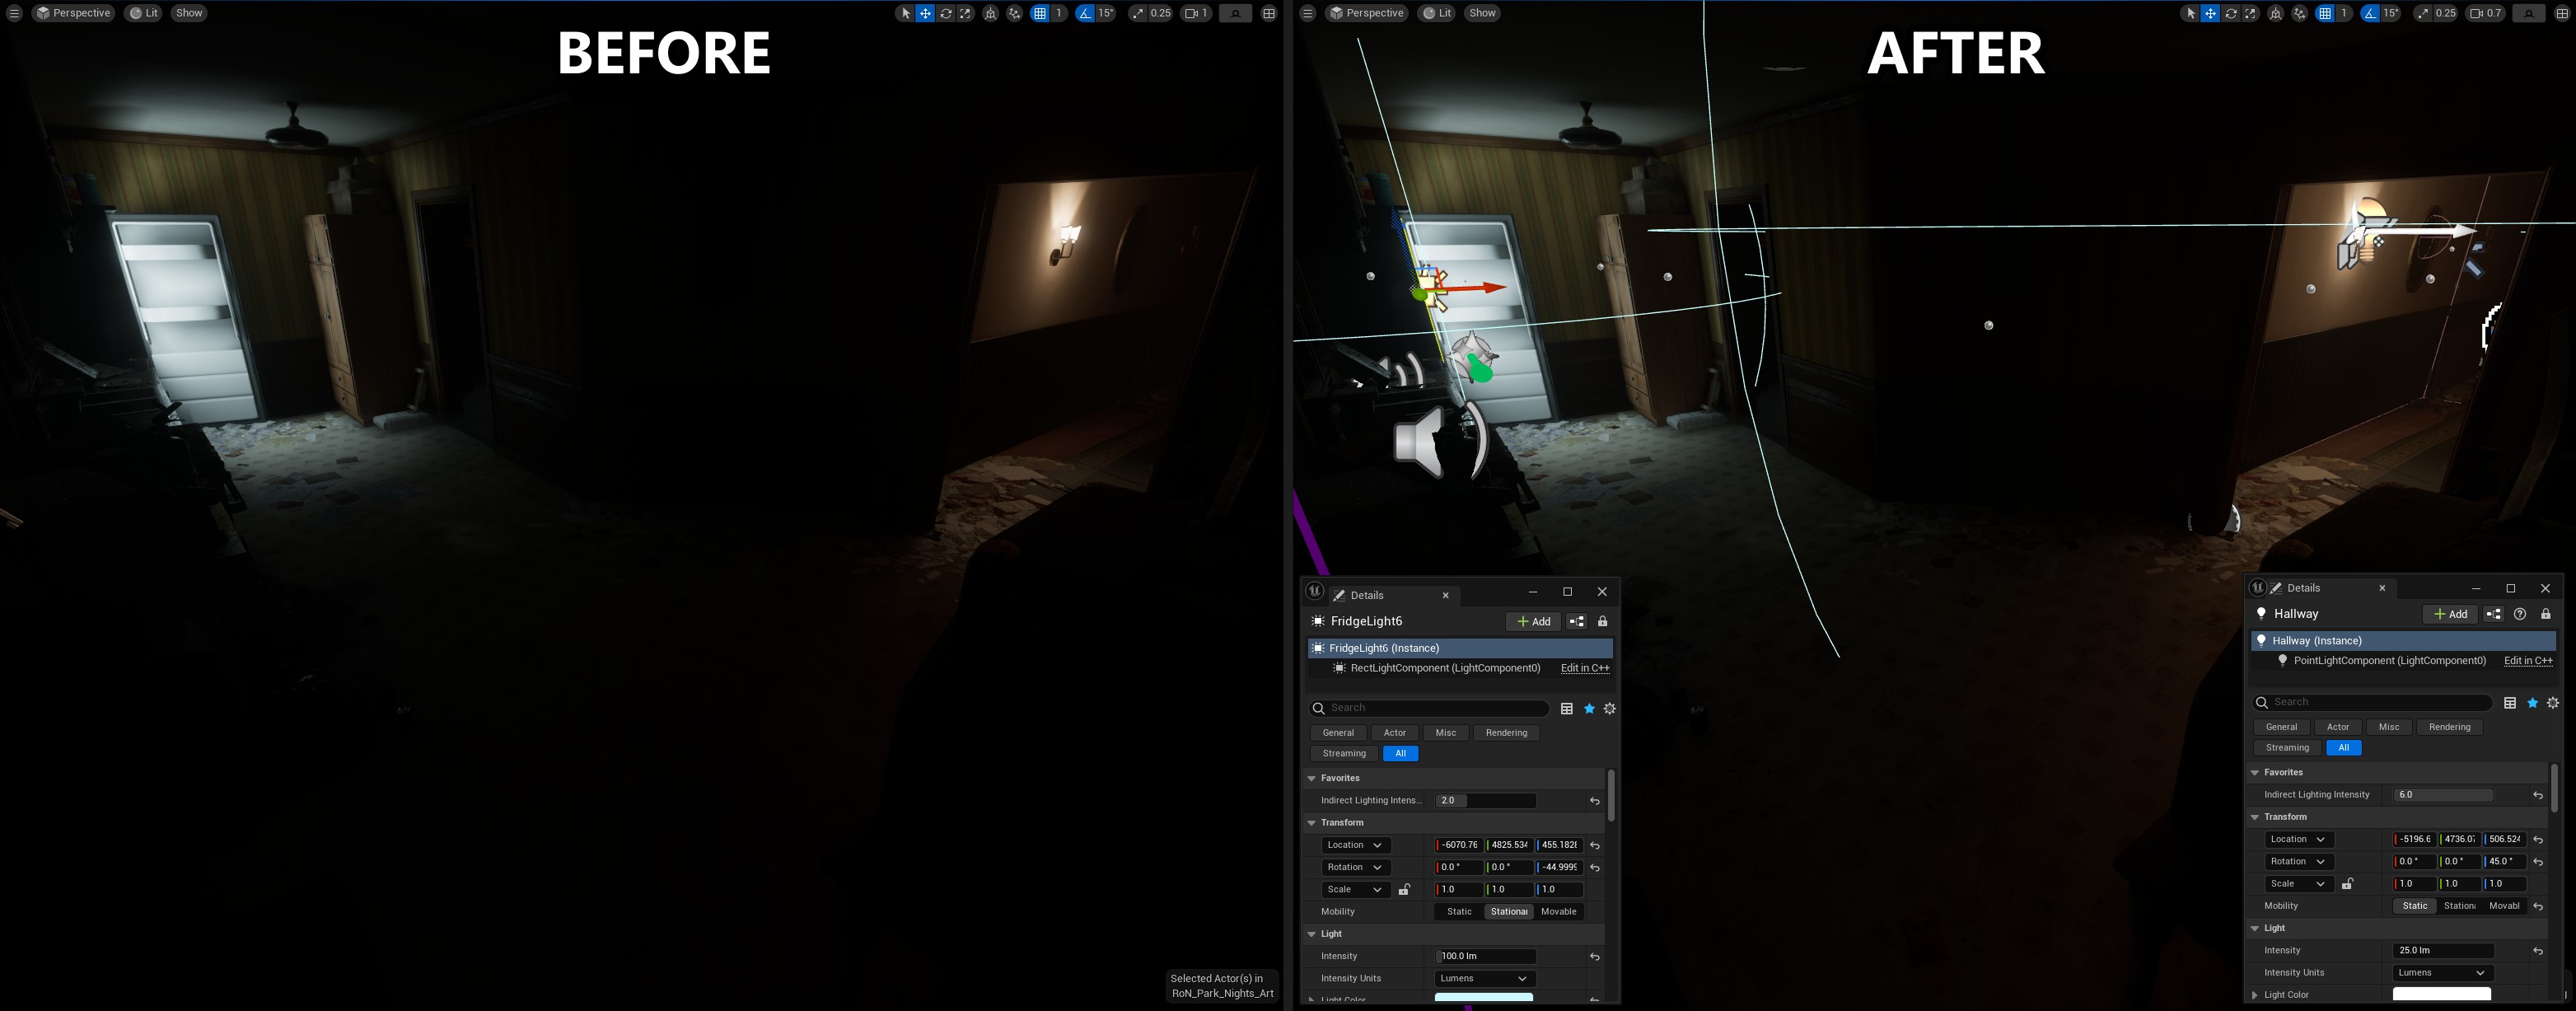
 Showing how dramatically the lighting in the scene can change just by increasing the
 Indirect Lighting Intensity value - don’t be afraid to go beyond even 10 if you need a lot of fill lighting!
The only downside is that you need to build lighting to see the result. 😞
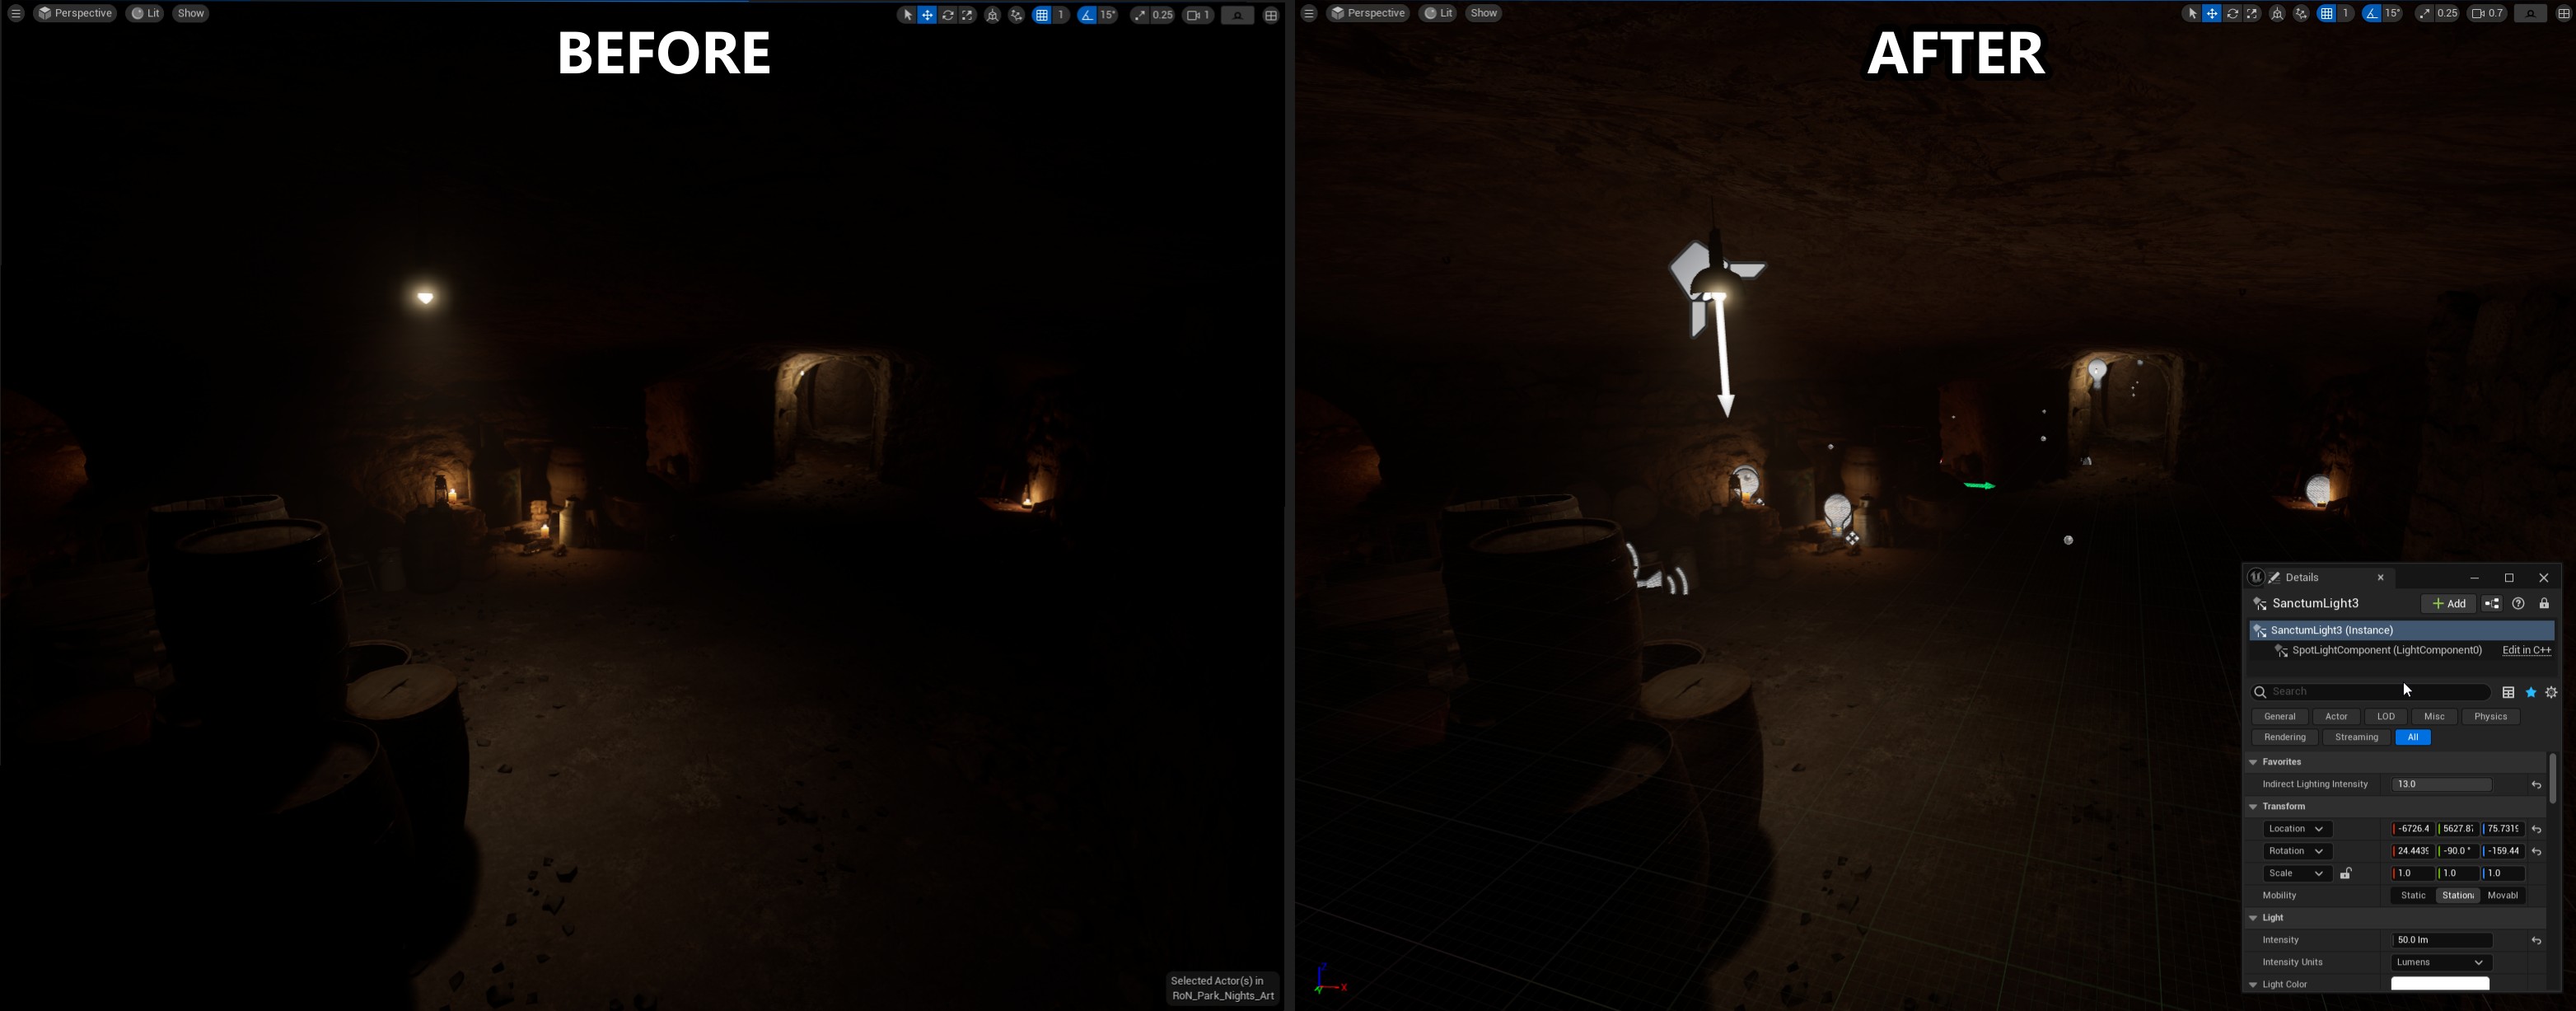
Faking GI with Rect Lights
Although we might want to achieve accurate physically based lighting, we also need to remember that games are also an art form so we can take some “artistic liberties”. Don’t be afraid to wrangle your scene to make it look how you envision it to look in your head!
A common area where we want to fake some extra lights are usually around windows. UE has these things called Lightmass Portal Volumes, they aim to allow GI probes to be concentrated in areas they are placed. In my experience - these offer very little visual benefit and only increase build time.
A better method that gives more confident results involves using Rect Lights. There isn’t much of a science to it, place them at the windows, scale them to match and play with the values. It’s really hard to give guidelines on what values to use, especially when you try to convert the Sun’s lux to lumens (lol). You need to experiment matching the tone of the lighting with the Intensity, Radius and Indirect Lighting Intensity.
Turning the Specular Scale on the lighting to 0 also removes any glints that it might create at the source, giving the illusion that the light is not artificially placed and naturally occurring.
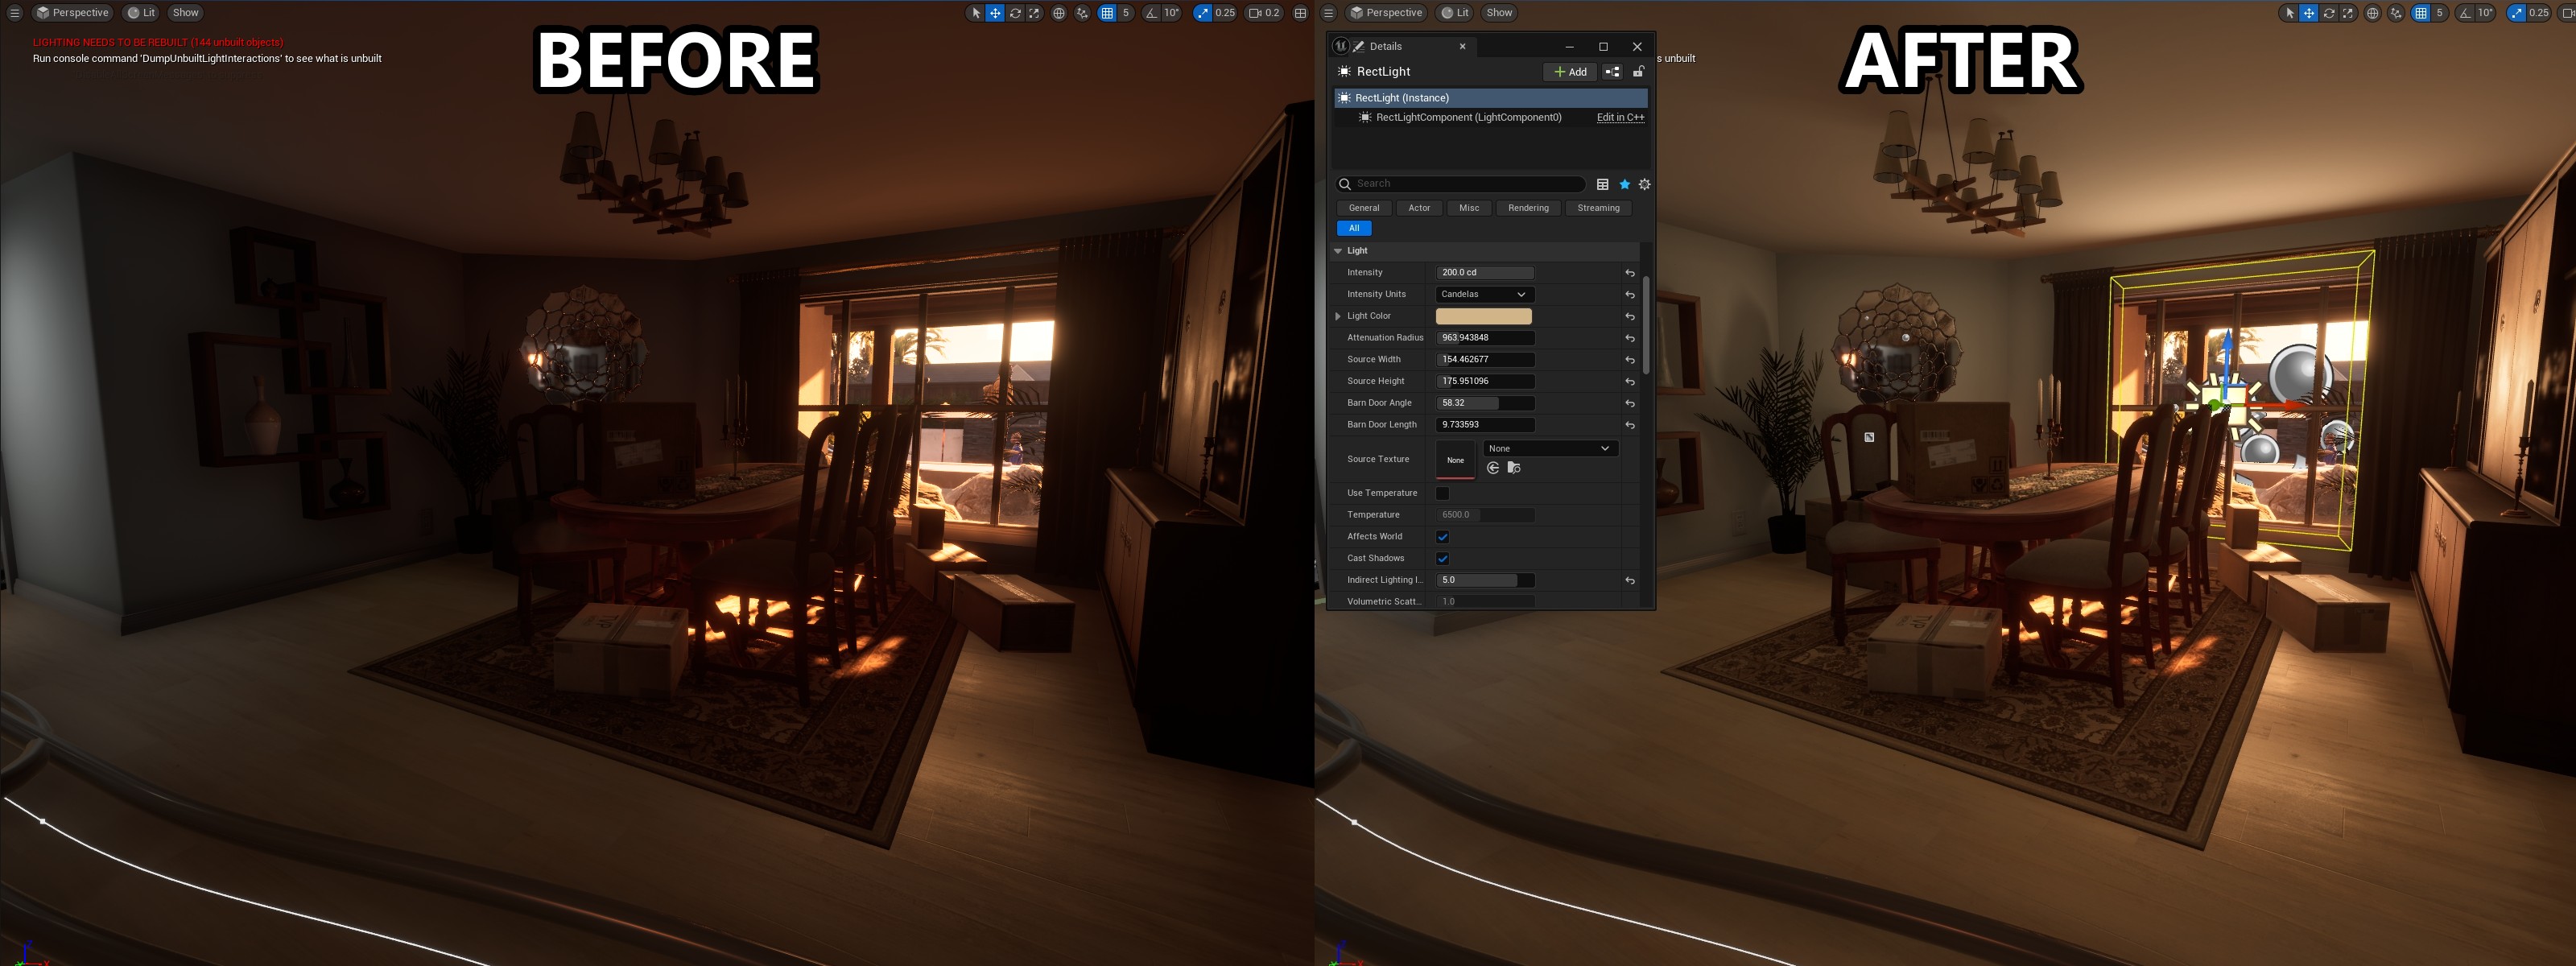
These techniques are used quite a lot in Ready Or Not maps - check out the Valley lighting and you can see that they’re used quite generously around the large glass windows
Similar techniques can be used with Point lights to illuminate areas very subtly and messing with the Use Inverse Squared Falloff bool allows you to tweak things further.
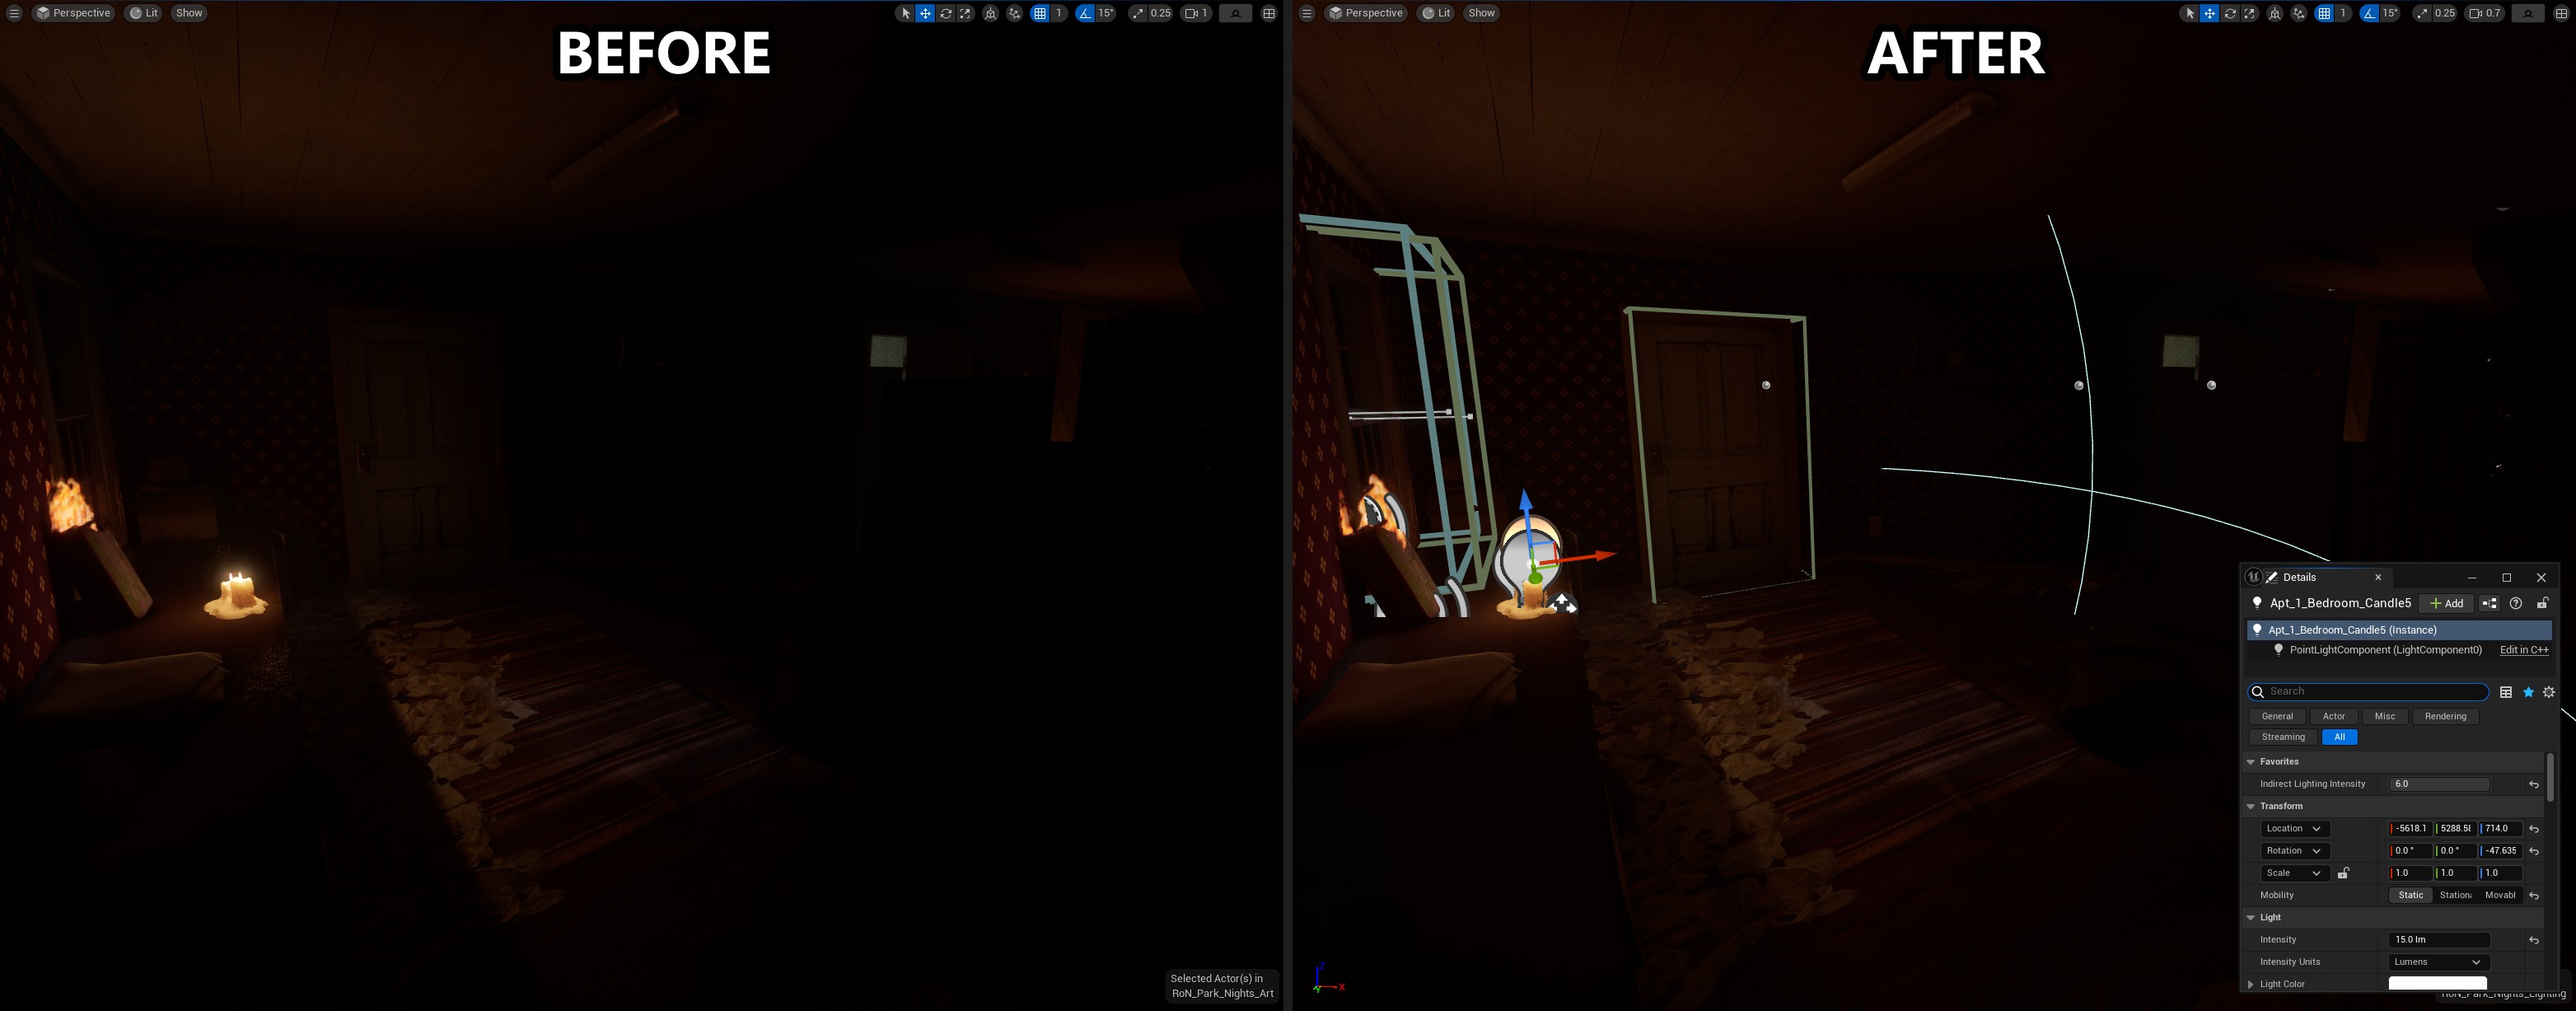
 Here a very low intensity (3) green light is added to give the area an eerie vibe. The green also makes sense as the walls are also green, the light being diffused would be a similar tint.
 A similar thing is done here to imitate the lighting that should be entering through the door from the previous room - Make sure to make the
 Specular Scale to 0 to make sure it doesn’t interact with the reflections!
Part 2 - 💀The Volumetric Lightmap💀
Unreal’s Lighting Hell
Let me introduce you to the most annoying little spheres you will ever encounter as a UE Lighting Artist. Impossibly hard to wrangle, requiring a fair bit of time and luck to get a 90% good enough result, say hello to the Volumetric Lightmap (VLM).
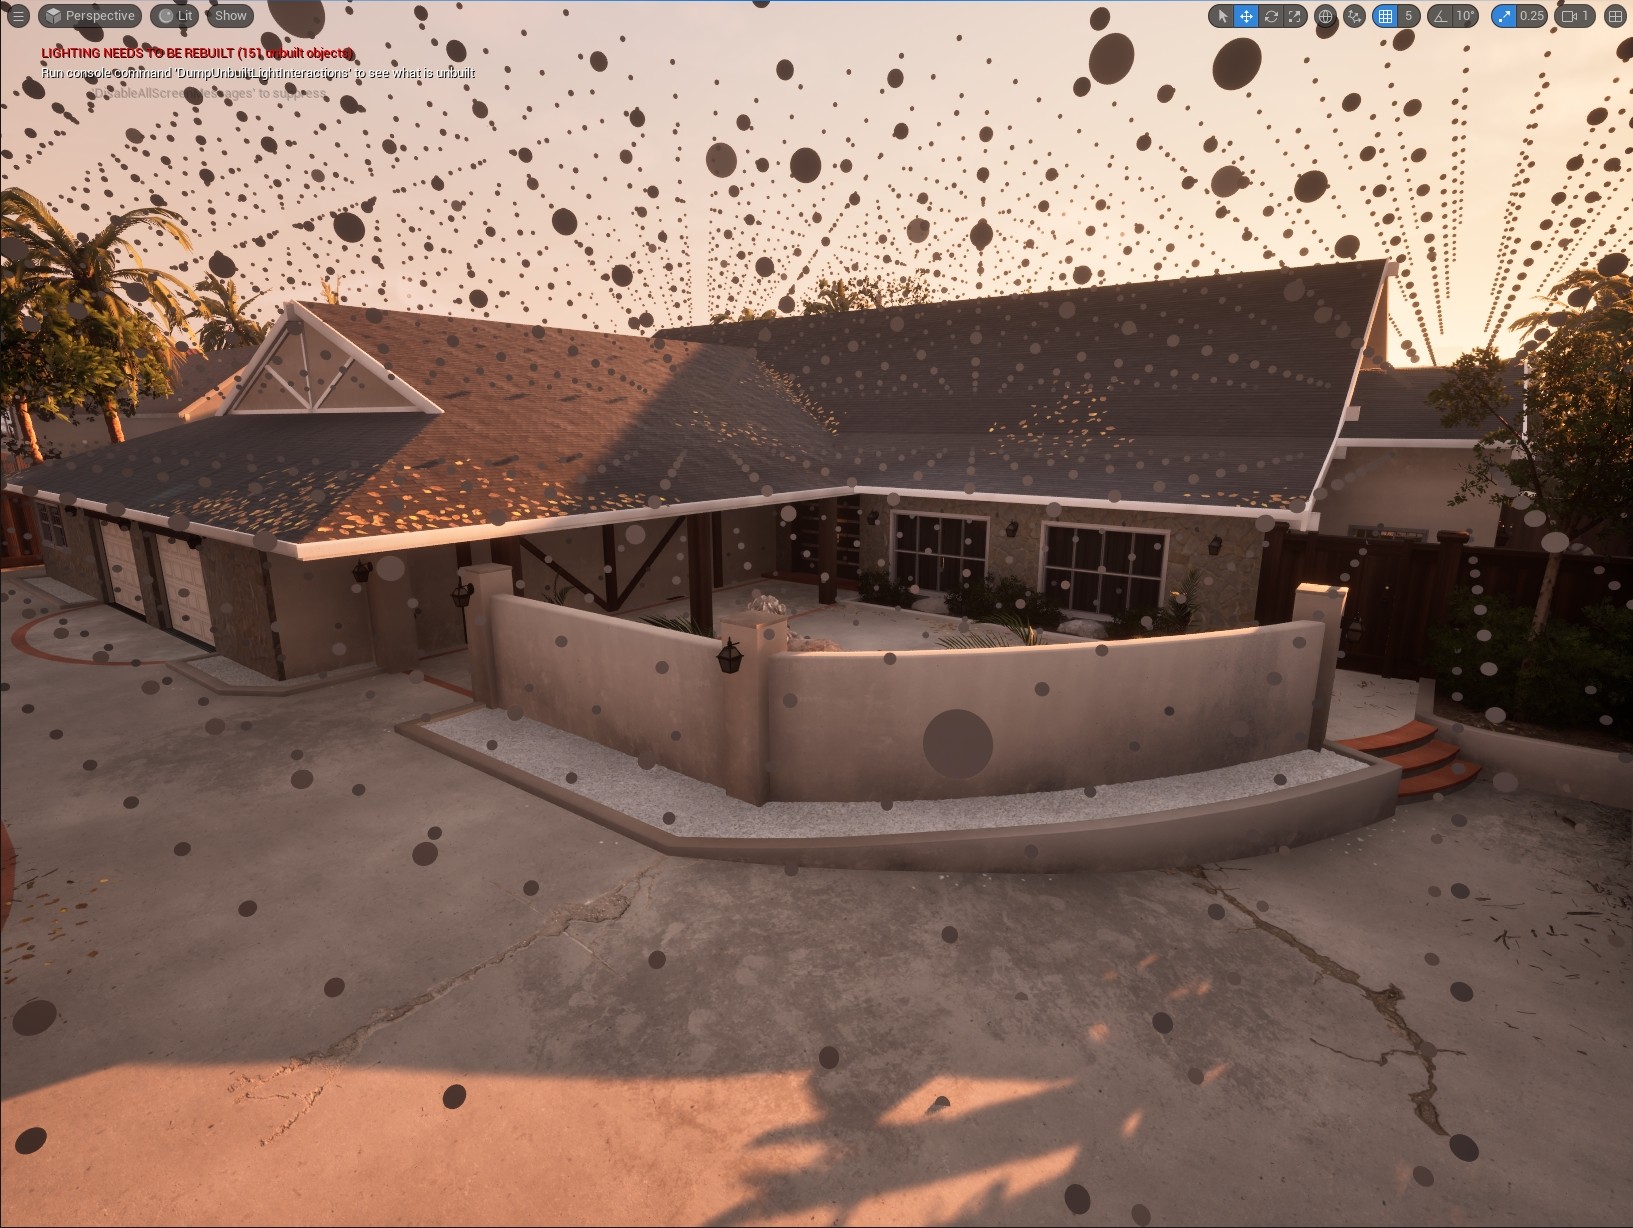
Essentially, the Volumetric Lightmap is a grid of cells/probes (visualized as spheres in the editor) that capture the lighting environment for that particular area. Using a Lightmass Importance Volume allows the VLM to increase cell/probe density in the playable area around objects. However, the grid is very rigid and temperamental.
The VLM is mostly used for lighting dynamic game objects: Your player, interactables, doors, AI/NPCs and Volumetric Fog. In brightly lit scenes it is very common to see game objects completely lit incorrectly due to how the VLM probes interpolate between each other.
You can turn of the Volumetric Lightmap visualization by clicking on Show > Visualize > Volumetric Lightmap within the viewport.
Further Reading
 If you see these weird banding or glowing light issues on your Doors or AI - it is because of the VLM. If your Volumetric Fog also looks a bit blocky and off from the light source, the VLM is also the cause.
Due to how UE deals with interpolation between probes, there just isn’t a smooth transition from one cell/probe to another. The Volumetric Lightmap Spherical Harmonic Smoothing option can be misleading, although the default values produce some more accurate results, they give off more noticeable banding in-between cells. While higher smoothing values bleed the lighting more as the gradient between probes is smoothed out. I usually go for higher values (0.5-1) as the smoother gradient are less obstructive on objects than the harsher transitions that can occur when the probes try to be more accurate.
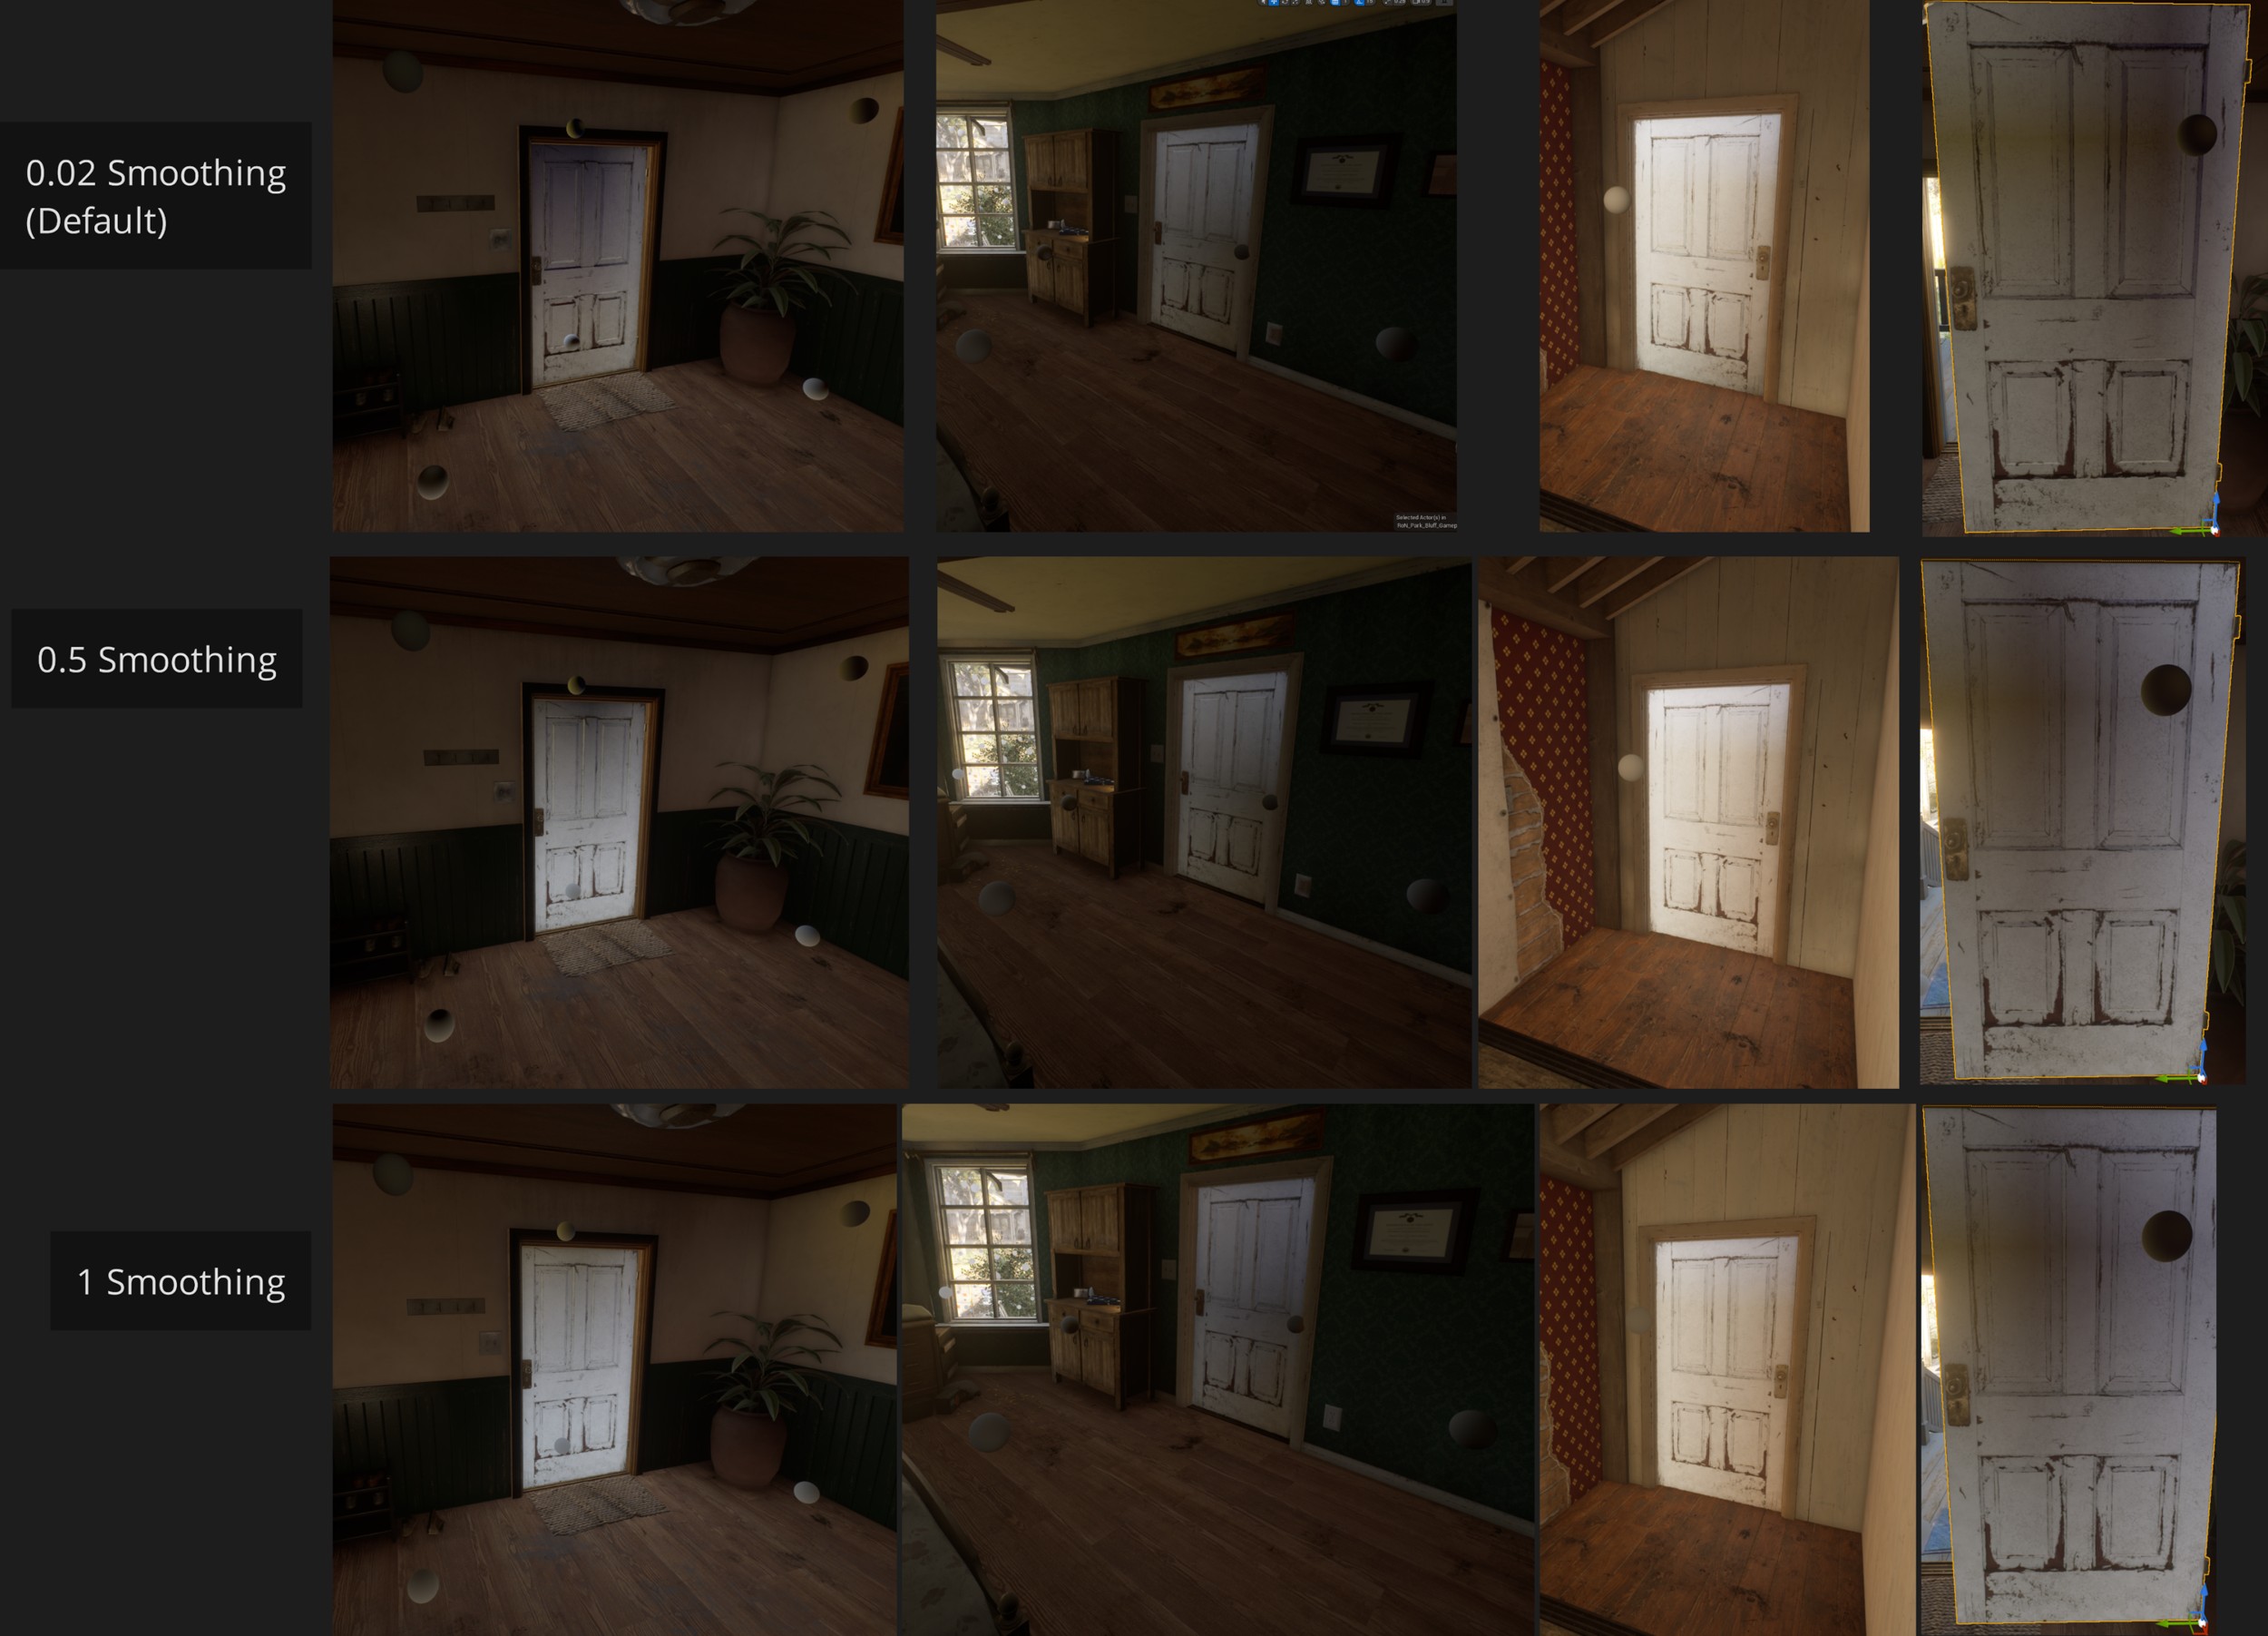 Notice how the gradient on the spheres in the left column changes as smoothing is adjusted. Also pay attention to how the interpolation between probes gets off-center when you increase the smoothing
To my knowledge there are no options to smooth the interpolation and is by far the biggest issue with VLM has. There are no tools to select individual probes and adjust them either, so you are at the mercy of the engine (and luck) to get desirable results. BUT there are things you can do to lower its impact…
For the majority of your lighting development you can ignore it as you focus on getting the core lighting down; Since most of the static lighting you do will not be impacted by it. When you feel confident that you have the lighting set for the scene (and I mean virtually no more changes), you can start looking into adjusting it.
Minor changes to props and lighting around the perimeter of the map and playable spaces start to include these objects into the VLM’s calculation, as it increases probe density to accommodate them.
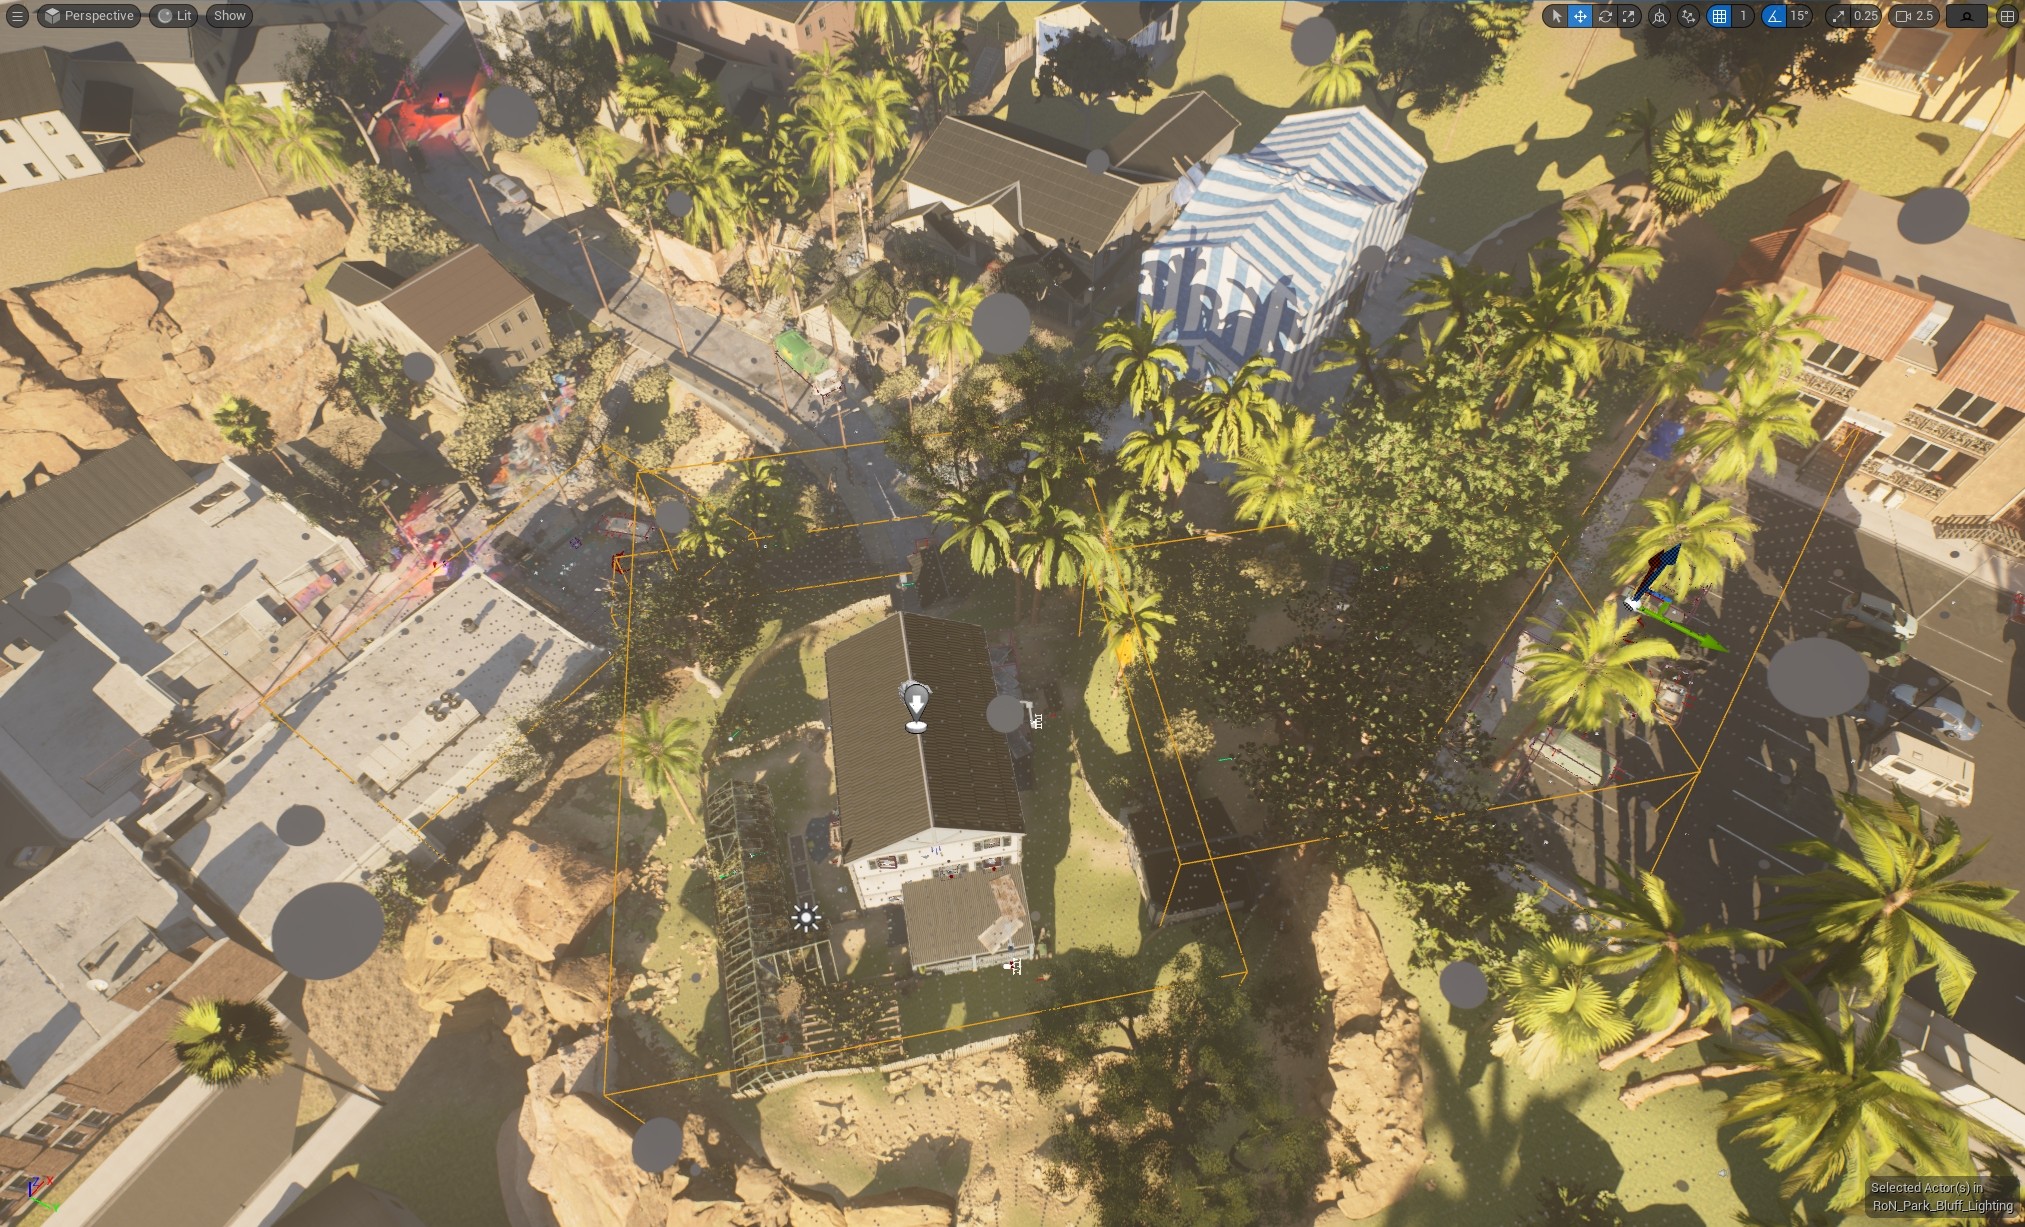
Since the VLM is reliant on Lightmass Importance Volumes (LIV), it is important to ONLY cover the playable area.
- Do not fall into the trap of encompassing the entire map with 1 massive LIV - this will dramatically increase lighting build times, and also produce unnecessary VLM probes which eats up memory in game.
- Also, if the LIV is too large the VLM starts ‘dropping’ probes resulting in inaccurate and missing lighting bakes on important playable areas
- I recommend jumping ahead a little to here, before committing to the next step.
When you have the LIV set up, brew a cuppa and get ready to build your lighting on repeat. Since the VLM is on a grid, we have to find a grid that will work for our specific scenario. Which means lots of iterations on the Volumetric Lightmap Detail Cell Size in World Settings until you find something that works best for you.
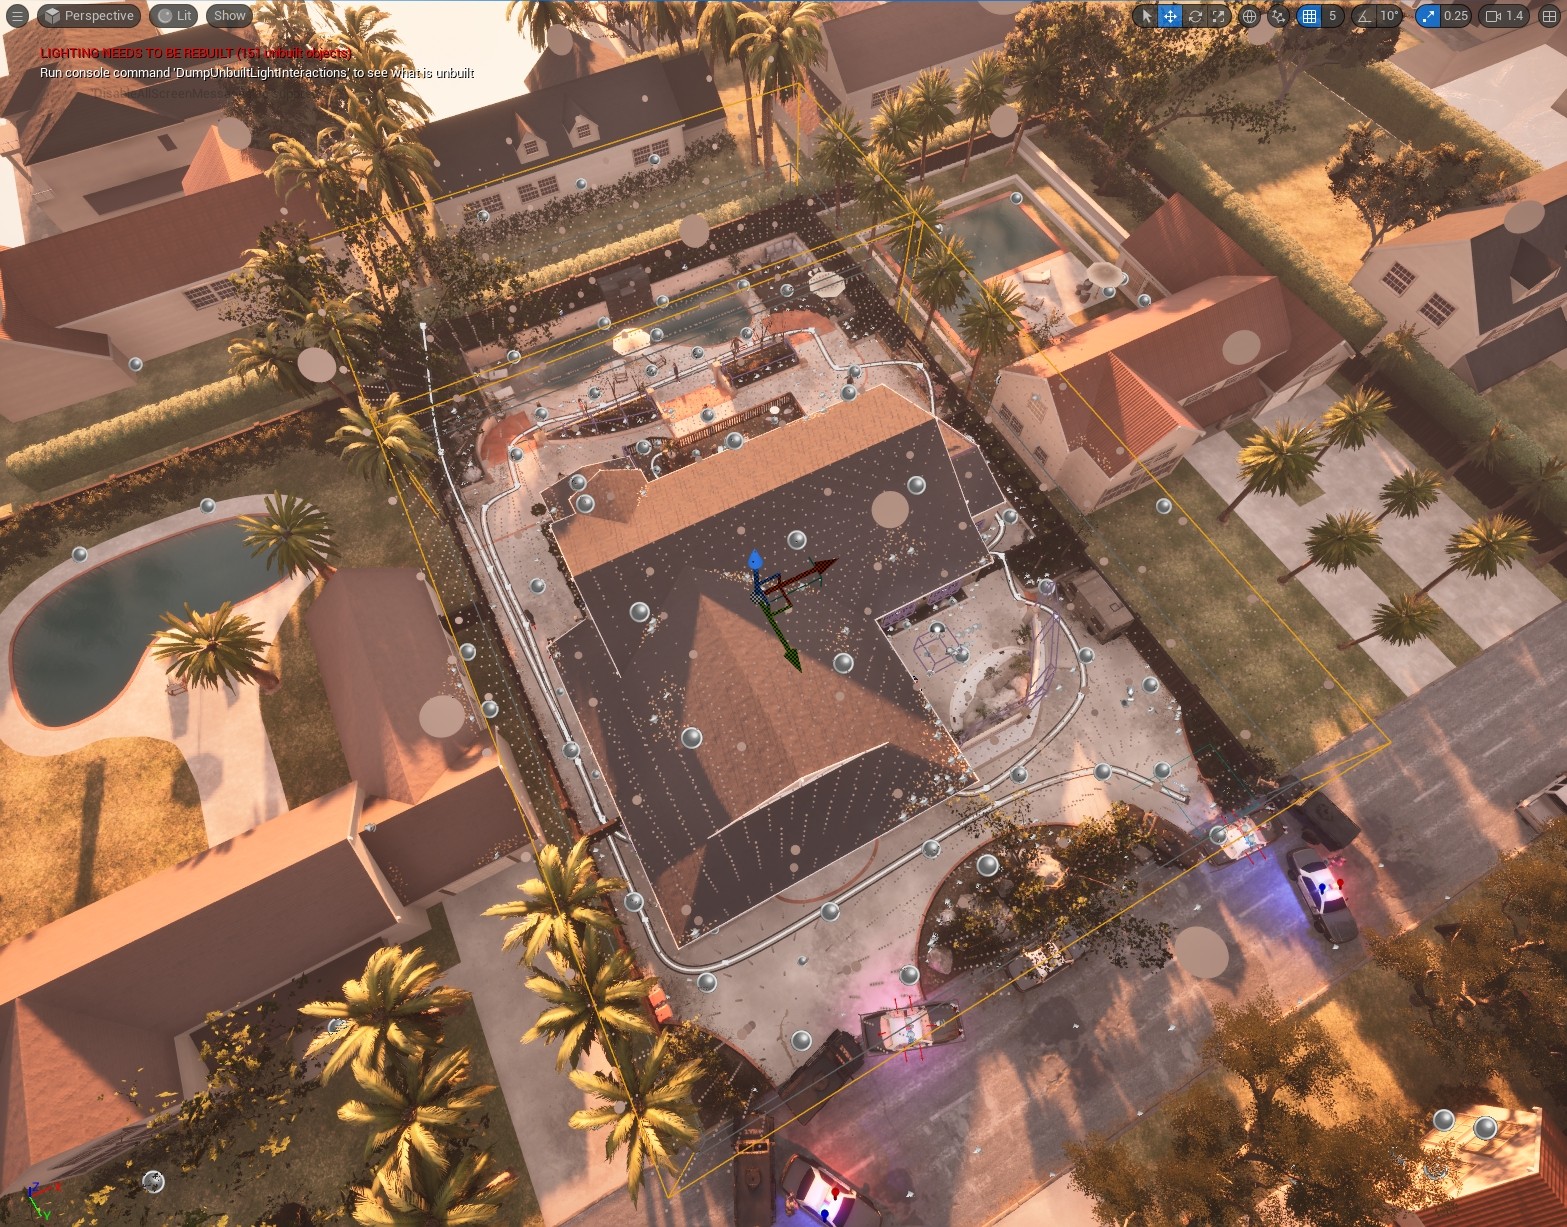 Notice how sphere density is concentrated inside the LIV and only covers the playable area
 You can use more than 1 LIV to make the shape as close to the playable area as possible
Here are some tips to help you on your journey:
- I do recommend doing this towards the end of development - when you’ve got meshes and lights in lockdown.
- As mentioned before, adding objects to the perimeter of the LIV will move and adjust the VLM grid, meaning you could be resetting all your iterations to 0 again.
- Document the results
- I clip the problem areas of my map with each build in PureRef so I can make an informed decision afterwards on the best results to tradeoffs.
![VLM Documentation]() For my maps I document the problem areas (usually doors) where cell banding is particularly bad so I can come back later on and make an informed choice
For my maps I document the problem areas (usually doors) where cell banding is particularly bad so I can come back later on and make an informed choice
- I clip the problem areas of my map with each build in PureRef so I can make an informed decision afterwards on the best results to tradeoffs.
- Stick to Medium Light Quality Builds
- Unfortunately, we cannot use Preview Builds. Why? Preview builds do not handle indirect lighting and shadows correctly. We need these to accurately see how the light bleeds between nodes.
- Avoid going too low on the Cell Size
- It seems intuitive to increase the number of probes by making the cell size smaller and thus more accurate - however this also can result in more light bleed artifacts within the grid.
![VLM Documentation]()
- I tend to stick between 140-200 for cell size. Lower means more memory/artifacts - higher means less visual accuracy.
- Ultimately you will need to test to see what will work.
- It seems intuitive to increase the number of probes by making the cell size smaller and thus more accurate - however this also can result in more light bleed artifacts within the grid.
- Each adjustment will dramatically adjust the VLM grid
- Don’t expect minute adjustments.
- All your adjustments should start at the macro level (ie; increments of 5 or 10 on cell size)
- When you have a ball park of good results (eg: 190-200) try micro increments (eg: 190 > 191 > 192 > etc).
- Be prepared to not get a perfect result
- It is unlikely you will find a Cell Size that will cover all your bases without having to make lighting concessions or workarounds.
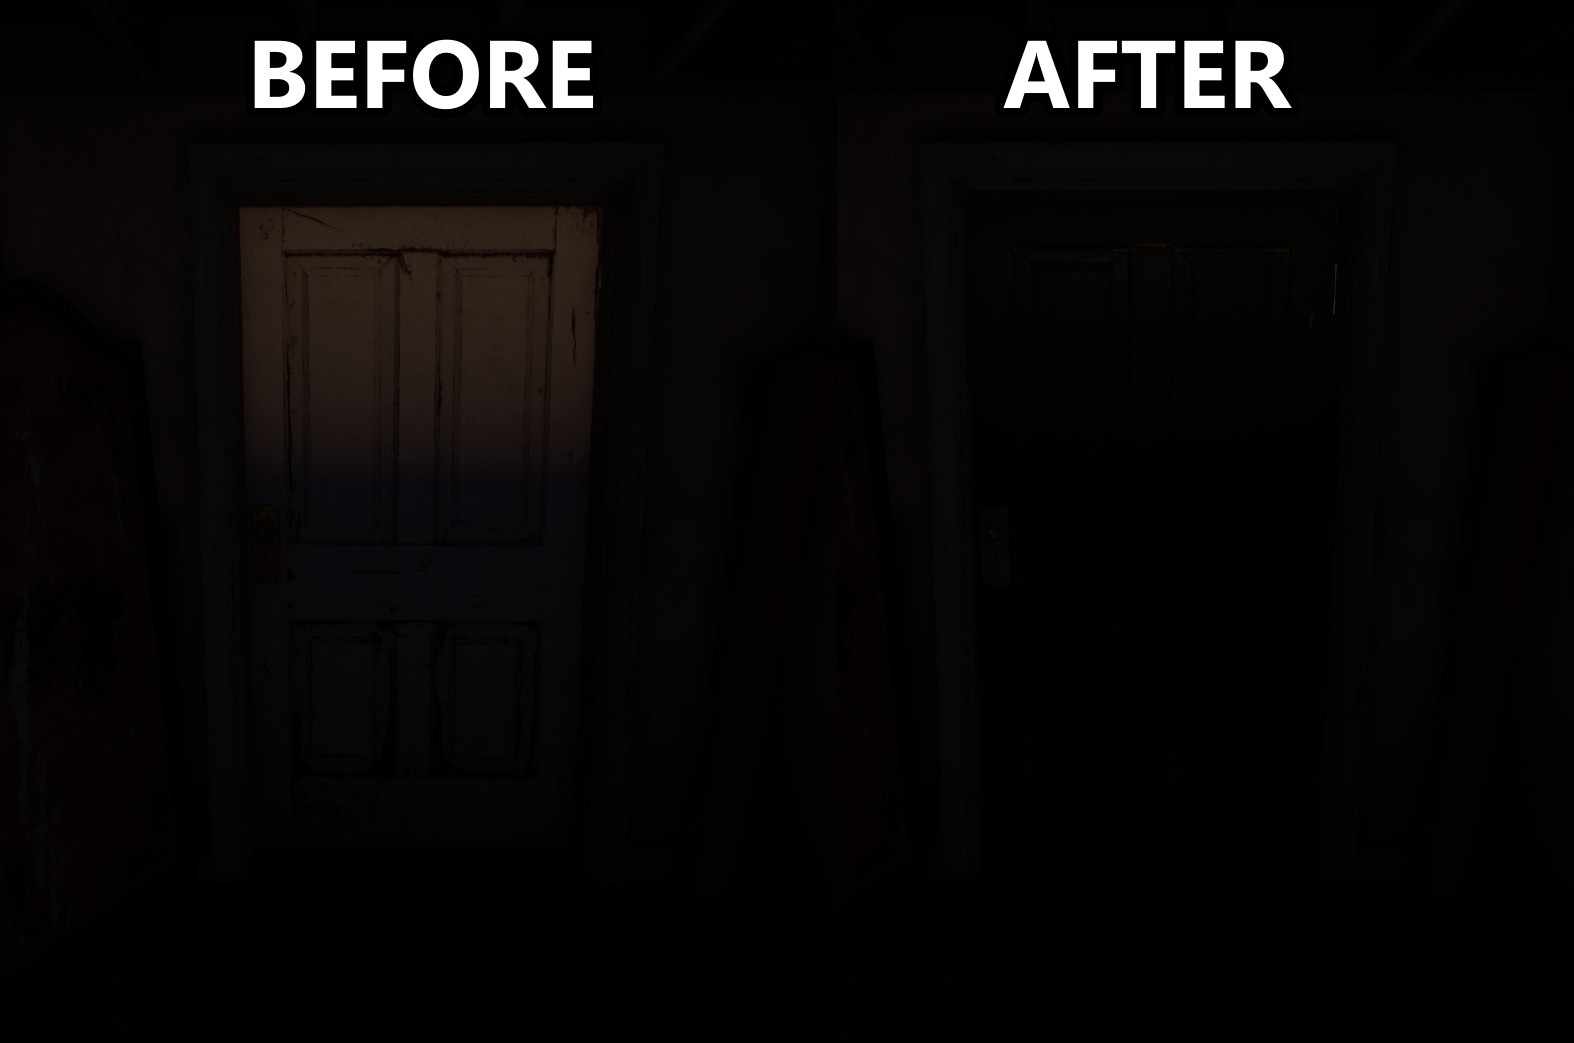
![Masking VLM Issues]() Here I change the material to a darker one to mask the lighting issue. But in severe cases I’ve also just completely scrapped some lighting.
Here I change the material to a darker one to mask the lighting issue. But in severe cases I’ve also just completely scrapped some lighting.
- It is unlikely you will find a Cell Size that will cover all your bases without having to make lighting concessions or workarounds.
 For my maps I document the problem areas (usually doors) where cell banding is particularly bad so I can come back later on and make an informed choice
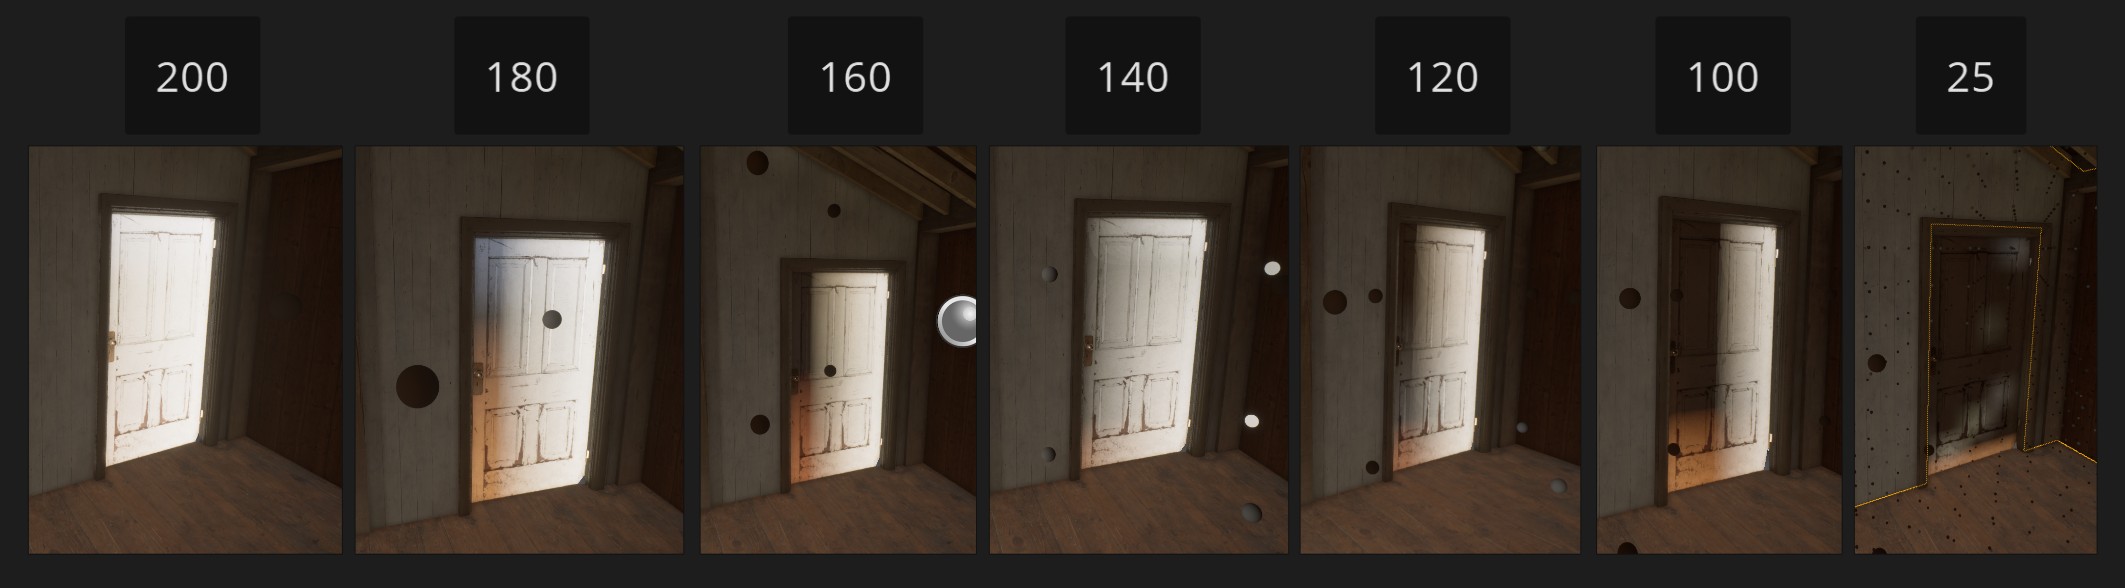
 Here I change the material to a darker one to mask the lighting issue. But in severe cases I’ve also just completely scrapped some lighting.
Help! I’m still getting VLM Bleeding!!!!!!!!
There is one extra scenario where you will need to make a workaround, and that is when the light bleeds through the ground floor providing either dark or over illuminated lighting from beneath the level. The workaround is actually very reminiscent of tricks in the past how old games used to fake reflections with a flipped world beneath the ground, or on the other side of a mirror. This is essentially what we are going to do - create a fake environment to fool the VLM.
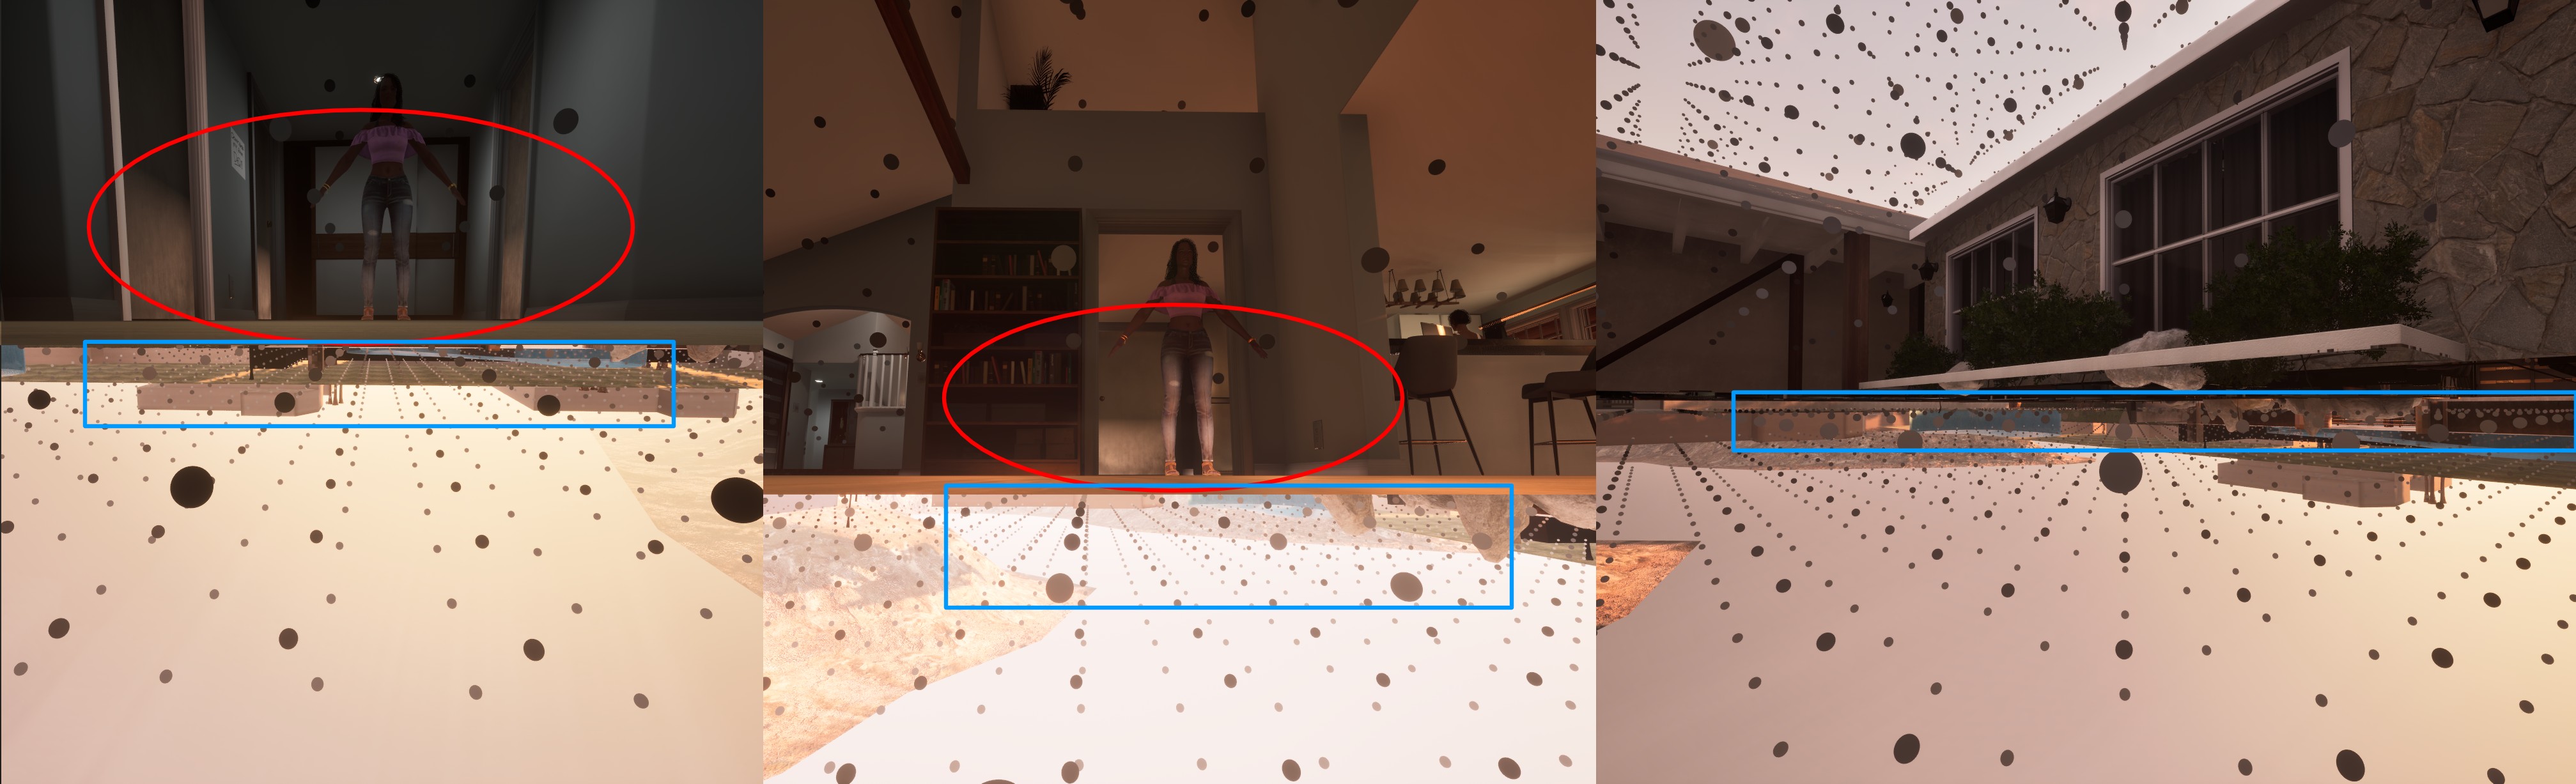 Notice the unnaturally bright light coming through the floor - this is due to the bright VLM probes
To try and wrangle the probes to act more accurately, we are going to flip the walls of the rooms with problems to create a mirror version of it underneath it. Trying to match up the sections where light can enter (windows/doors) as accurately as we can, we can nearly mimic the lighting on those problem probes.
If we change the following properties of the meshes, then they will not show up in game, but their existence will still influence the VLM:
- Override Light Map Res: 4
- Affect Indirect Lighting While Hidden: True
- Hidden Shadow: True
- Is Editor Only: True
- Is Editor Only Actor: True
 With the faked flipped building beneath the floor, the VLM probes are now behaving naturally.
 Here’s another view of the flipped barebones house. In some sections the lighting was TOO dark, and so some replicated Spot lights was added to make the VLM align closer to the floor.
WARNING: *This also means that since we are adding some static meshes under the map - the VLM grid will change and we may need to adjust the LIV. If you are already seeing lot of bleeding occur during your builds you may want to pre-empt this by adding it sooner rather than later - requiring more light builds
You do not have to use the geometry of the house for your fake world beneath the map. An inverted normal cube or some basic shapes can also work in a pinch.
This technique can also be used to try and wrangle straggler probes in voids that affect the playable area but be careful of situations where the meshes clip through existing geometry as they will bake unwanted shadows on those intersections.
 Pay attention to the thin line on the top of the door disappearing when the probes above it get encased, which also get darker
Part 3 - Dynamic Lighting and Shadows
BEFORE WE CONTINUE: TURN OFF DYNAMIC SHADOWS ON POINT LIGHTS
Point lights, for whatever reason, always have Dynamic Shadows enabled by default - this setting should always be disabled regardless of the light’s mobility. Why? A point light is made up of multiple Spot lights (6 pointing in each direction) and if casting dynamic shadows, each light is 2x more costly - it’s easy to do the math from there.
Dynamic Shadows are pretty expensive but they provide the environment with a level of richness and realism to the player that can just feel alien if they weren’t there. We obviously cannot have everything casting dynamic shadows - this would be a performance nightmare.
The go to solution would seem to make all the lights Stationary and manually pick which lights cast dynamic shadows, however we soon run into a hard limitation of UE - we can only have 4 overlapping Stationary Lights at a time. And this becomes very hard to manage on largely vertical environments.
We need to be smart about it.
Being Smart about Dynamic Lights: Light Combos
If you require the full illumination that can really only be gained by a Point or Rect Light, but still require Dynamic shadows - I will introduce you to the Point/Spot Light Combo:
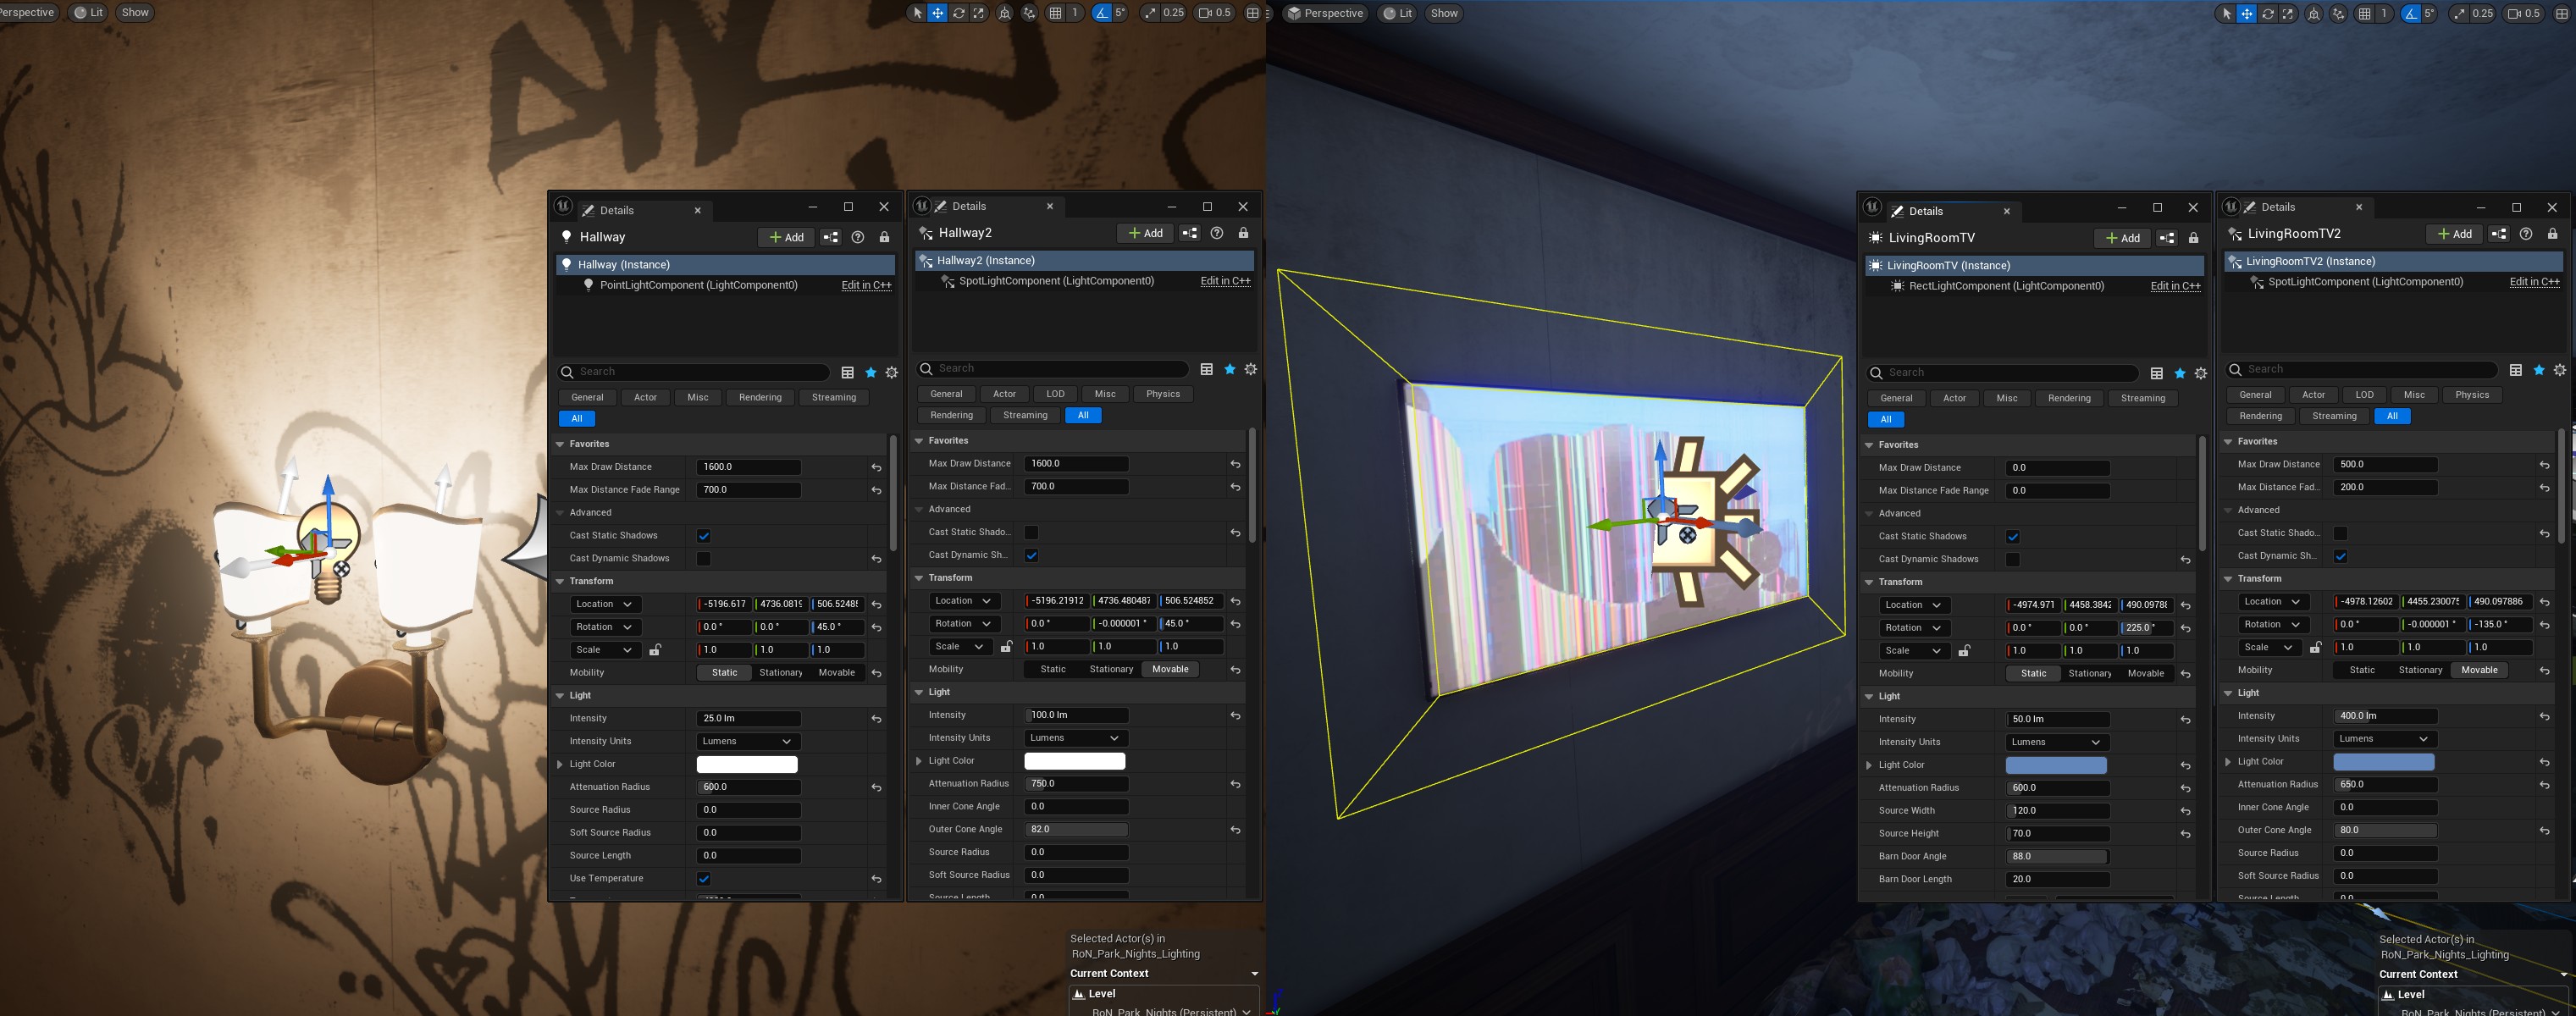
The Point Light is static and only casts static lighting, and in the same spot we have a Spot Light that’s only job is to cast a dynamic shadow. To avoid the stationary light overlap limitation, we also set this to movable. And to make sure everything is extra optimized we also set the Max Draw Distance and Max Distance Fade Range to disable the shadow casting contribution when the light is out of range (and you really should do this for all lights😜).
Set up right, this allows for the correct light radius to achieve your illumination and also allows for tighter control on the radius of the shadow caster to lower it’s impact when not around.
If you can use Spot Lights in place of Point Lights, this is typically preferable. I’ve heard people using 2 spot lights to try and emulate a single point light - but from personal experience, I have never gotten adequate results.
Going Further
Even when we tightly manage the radius of shadow casters and cannot view them in the scene - if we are still in radius of them, they will still cast shadows. Again, this can be a pain if your level has a lot of verticality to it.
One solution is to set up level streaming if you feel your level is large enough to do it, but you may encounter additional overhead if players are consistently moving in and out of that area.
The other solution is to manually control when lights are active based on Trigger Volumes. This works much like level streaming, however if you are limited to one sub-level this becomes the better option. This is exactly what I have done in the map below. On level load, I turn off all large dynamic shadow casting lights that might stack, and when the player enters or exits the trigger volumes, I toggle the lights on and off respectively.
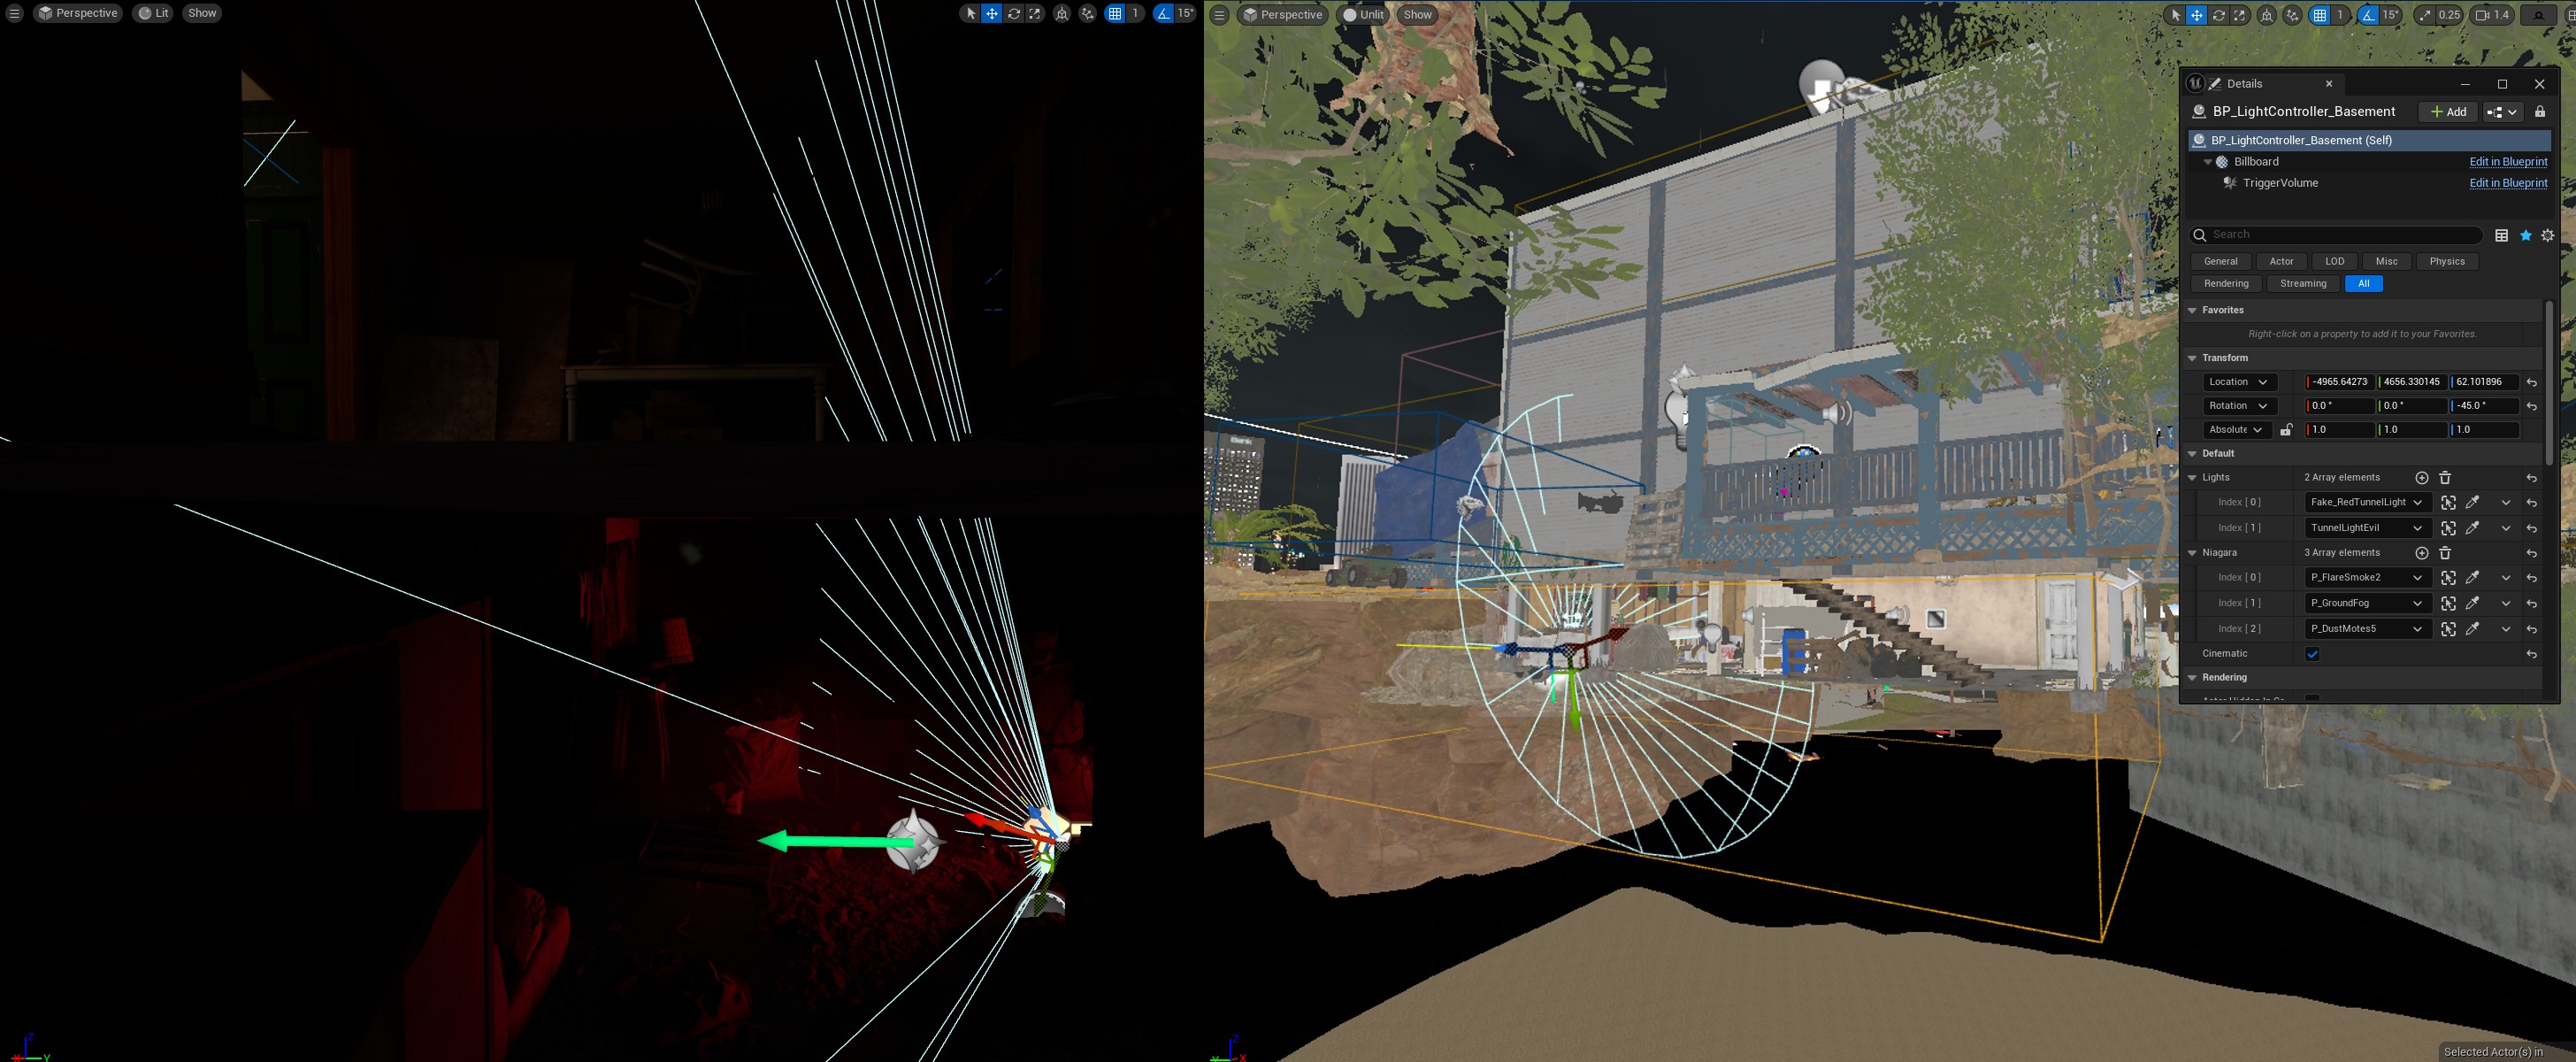 Notice how the Radius of the Spot Light clips through the floor above (and even the floor above that), manual control of these lights are needed
And this…..is to go even Further Beyond!
Ready Or Not uses an amazingly simple technique to control what can cast dynamic shadows through the use of Lighting Channels. It’s so brilliant in its simplicity, I am shocked that it isn’t more widely known.

Default State of the Lighting Channels (0) on all Lights
At a very low level and basic primer for how dynamic shadows work in Unreal, when a light needs to cast a dynamic shadow, any object that it casts onto will need to have it’s primitives/tris rendered again from the perspective of the light. The dynamic shadow system cannot clearly differentiate what should be rendered, so essentially anything that is in the casting radius could have its primitives calculated again, per shadow casting light.
Assigning a light’s Lighting Channels allows for that light to only cast on anything else with matching channels - and Unreal gives us 2 more additional channels to work with.
Essentially, changing the Lighting Channels allows for complete control on what actually needs to cast dynamic shadows.
Not everything in the scene moves or is close enough to the source to warrant a dynamic shadow, especially if a baked shadow already exists. Additionally, much like the example above where the light’s radius can bleed through rooms/floors, those rooms may not have any sources that generate dynamic shadows, yet due to how Unreal handles dynamic shadows, they are still likely rendering them even if you cannot see it.
Ready Or Not does this with EVERY stationary/movable light that casts dynamic shadows (minus the Directional). They use the combo method described above but also make sure the dynamic lights have their Lighting Channel’s set solely to 1 and any surrounding meshes enables channel 1 as well (eg: core walls, floors or props close by). By default, the Player and all AI meshes also cast on channels 0 & 1.
 The highlighted Stationary SpotLight casts dynamic shadows on Channel 1. This breakdown shows meshes within its radius as to what actually accepts it’s Lighting and Shadows. Comments are left on non-highlighted meshes as to why they do not need to receive the SpotLight’s lighting.
It really cannot be overstated how much of a lighting performance boost can be obtained from such a simple tweak. If you have the ability to implement this in your game’s player character and AI, I would highly recommend it as you can save a significant amount of additional primitives from being calculated. You could literally be saving hundred’s of thousands of unneeded tris from ever being rendered!
Dealing with MORE Volumetric Lightmap Limitations 💀
Stationaries provide a lot of benefits due to their flexible properties, but one benefit is that the light they cast onto Volumetric Fog is accurate to their location. If we use Static lights, than the light cast onto volumetric fog is stuck to the grid based on the VLM AND we have control on the amount of contribution it has on the fog as Volumetric Scattering Intensity will be greyed out…
This gives us the issues shown below:
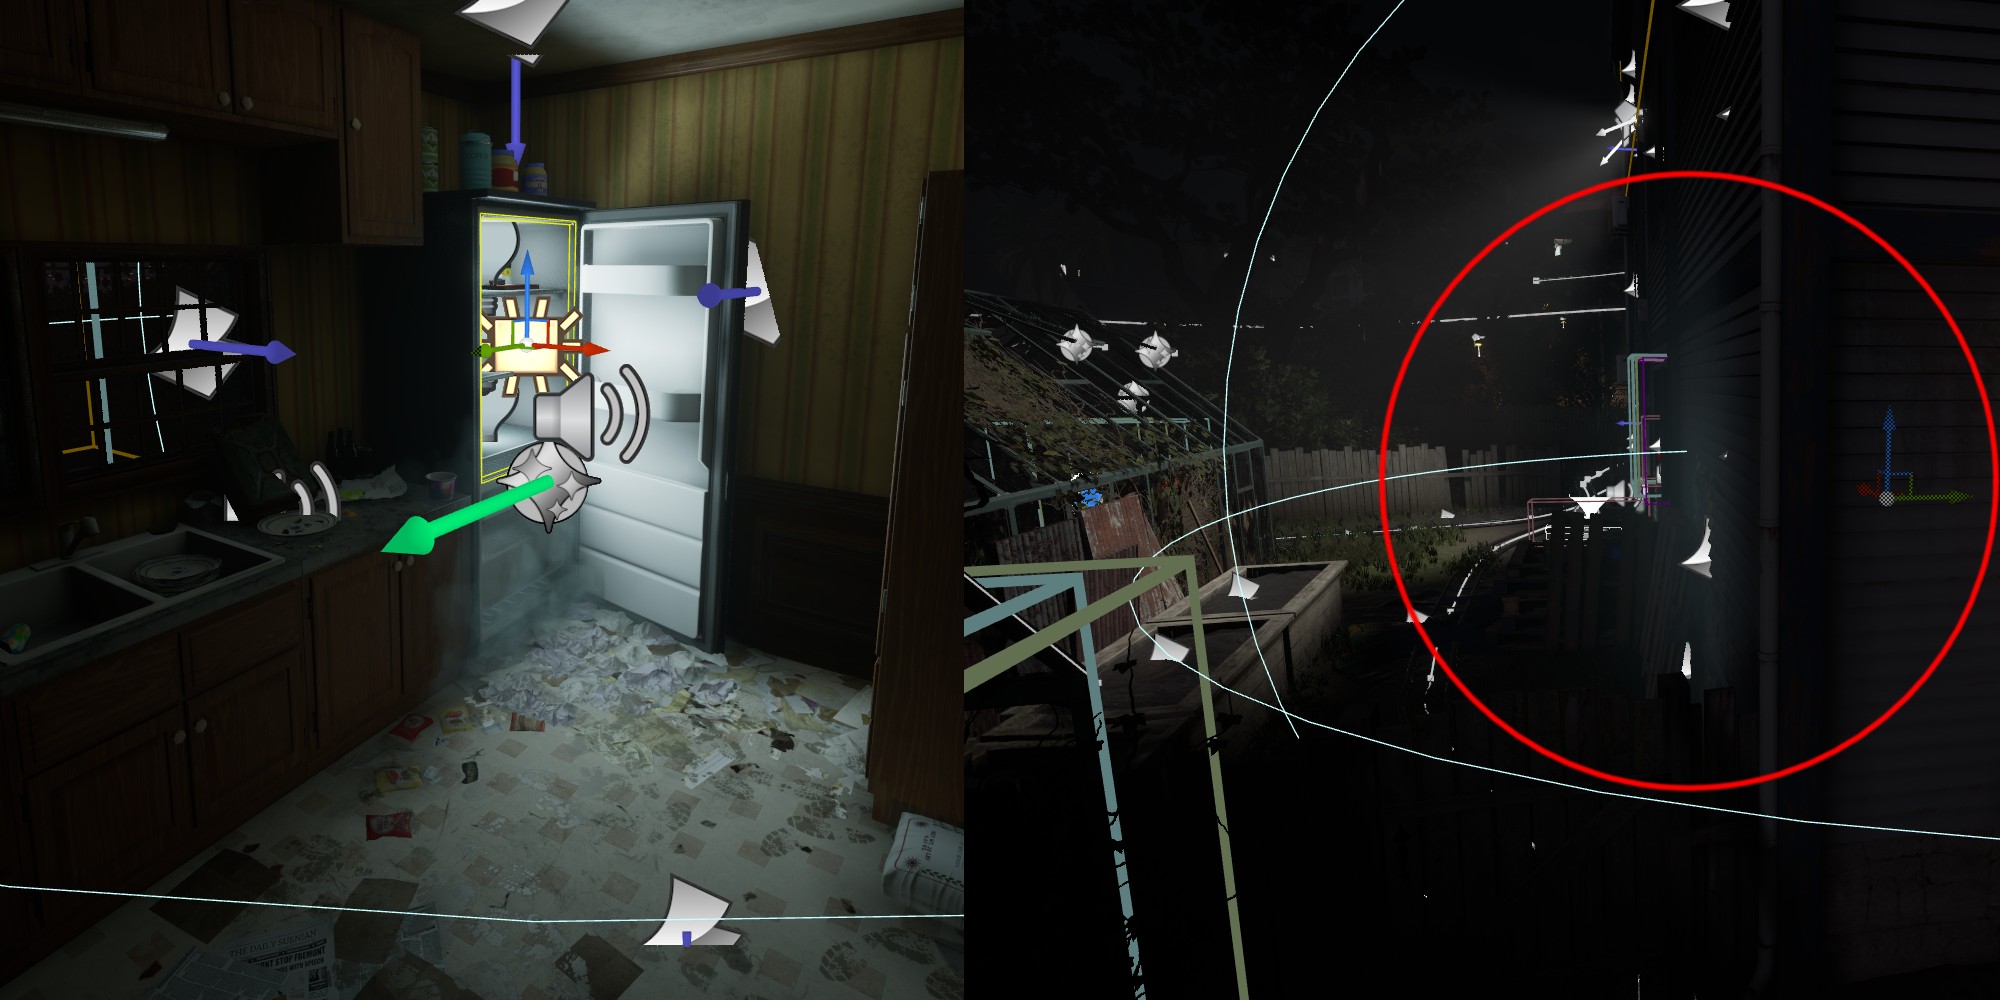 The blue fridge light (Static) is too close to the wall and causes the volumetric fog to receive blue bleeding on the exterior due to the VLM. (Ignore those 3 Point lights in the fridge lol - they are super small Static lights just meant to overcome the limitation of a lightmap of the fridge mesh - they do not contribute to the issue.)
 The fog should be just a cone coming from the light source, but since the light is static than the light is baked into the VLM grid.
These are our options to correct the issues, and none of them are ideal:
- Make the light Moveable and set the
Volumetric Scattering Intensityto 0 and disable dynamic shadows if fog Volumetric Fog isn’t needed.- This is a bad idea as now the light will bleed through all geometry and will be a little more performance heavy.
- It is likely not as much of an issue if you have no playable space on the other side of the geometry however.
- Make it Stationary and risk it overlapping the rest of the larger lights which could be more important.
- Make it Static but reduce the radius/intensity to not bleed through the VLM and possibly adjust the
Indirect Lighting Intensity- This will make the static lighting less accurate and harder to tweak, plus there is no guarantee that the fog bleeding will be fixed.
Ultimately it’s up to you, there’s tough choices to make but sadly these are the limitations of UE.
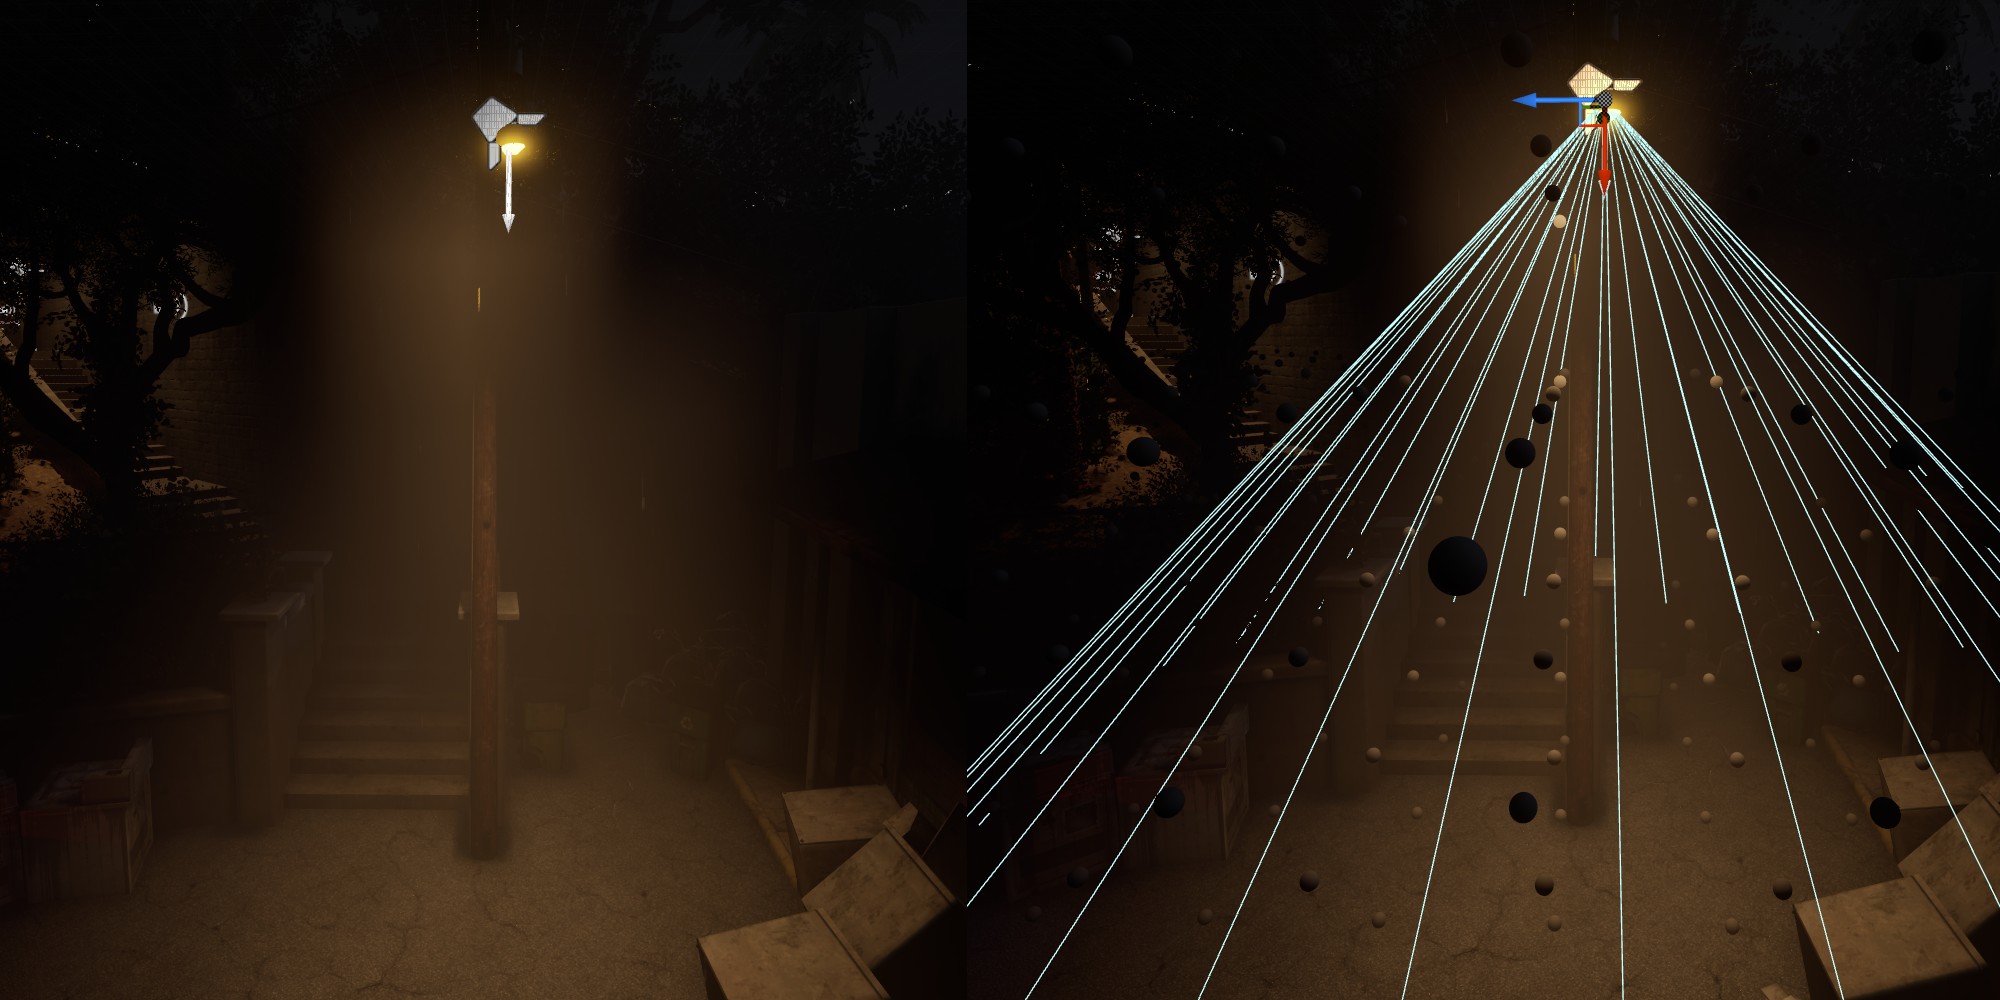
In these scenarios, the street lamp lights were set to Stationary as they were far enough apart to not cause overlapping issues. The fridge light was made Stationary to remove the fog bleeding but other lights inside the house were converted to a Static-Movable combo as they did not create fog bleeding issues.
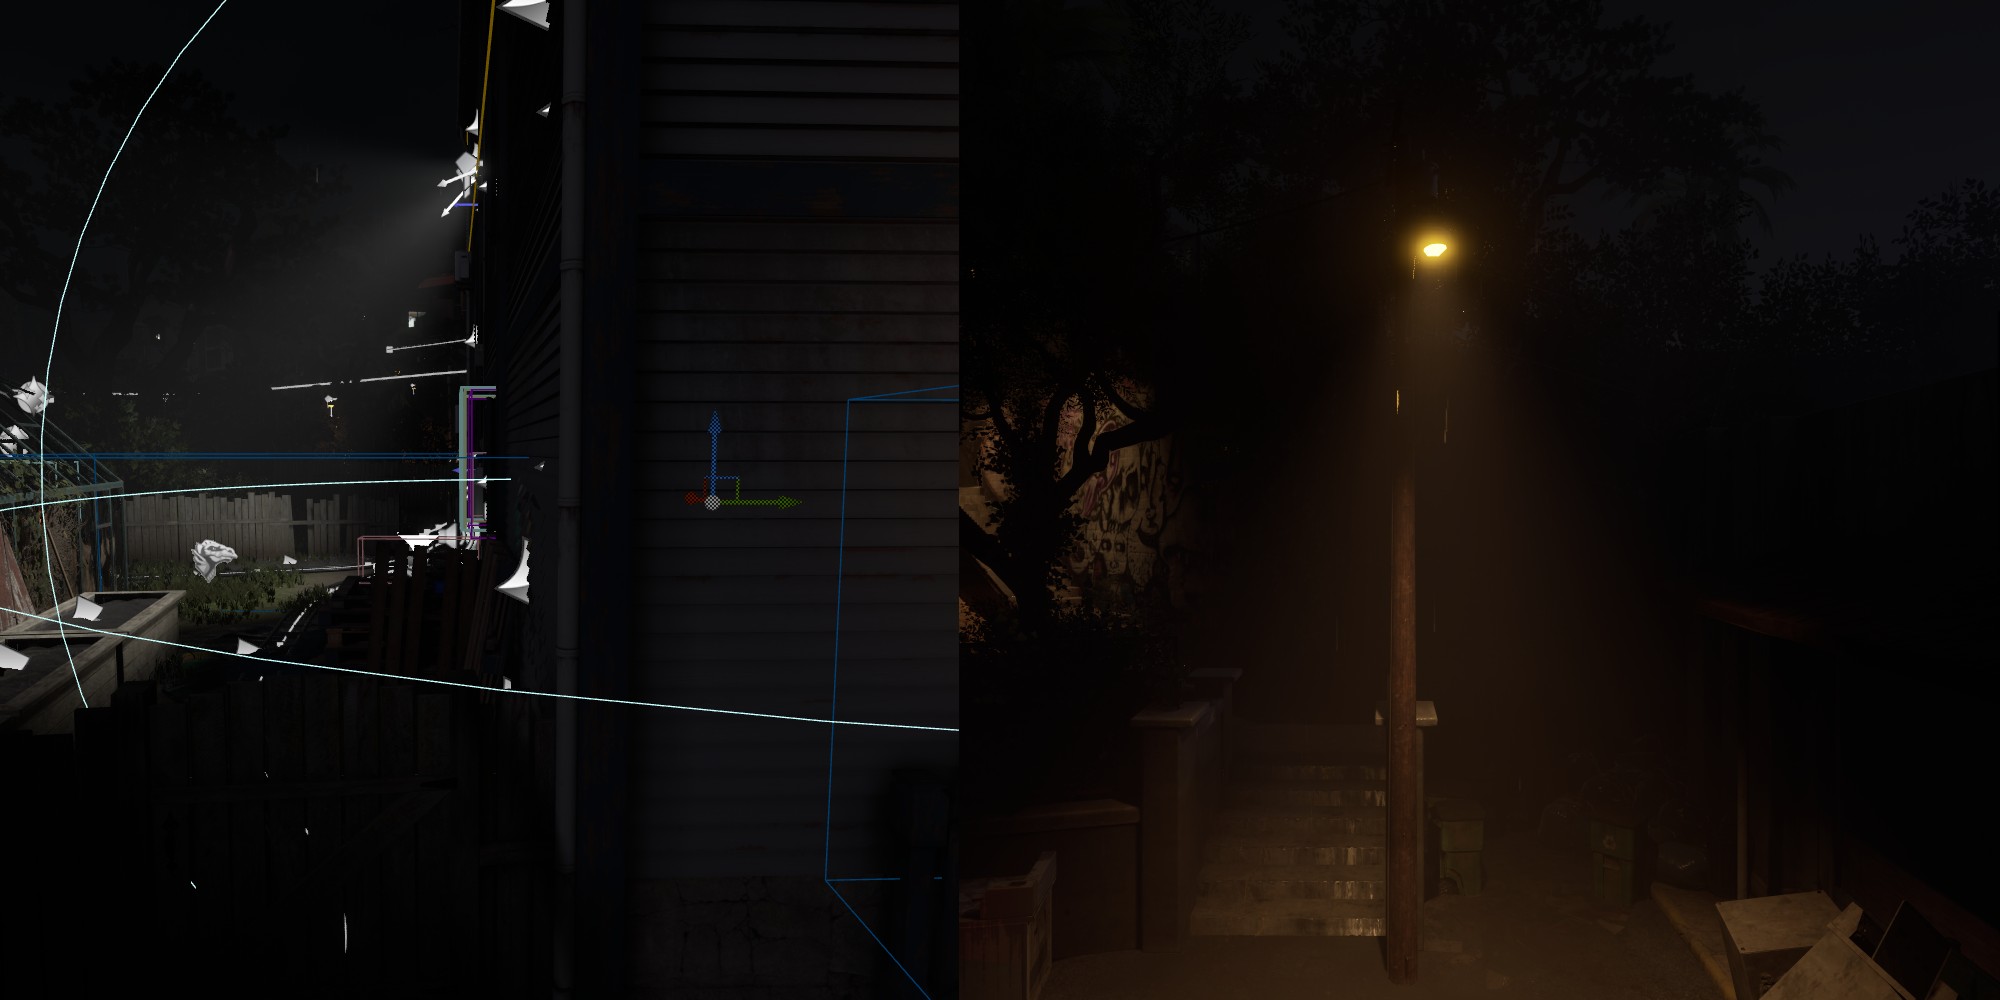 No more fog bleed and accurate cone coming from the street light.
Hidden Features
Another thing to consider is that sometimes other material features can be locked behind the movable/dynamic nature of Stationary Lights - such as subsurface scattering, volumetric translucency and dynamic translucent shadows. This must also be considered for your scenario on what visual features are important to conserve. In this case, a Stationary Light was required to make the tarp seem thin and illuminated from behind utilizing 2-sided foliage techniques, sing a Static light would not give us these effects.
Similar features like subsurface scattering on candle wax may require the same treatment. Without the super small movable light than the material feature just doesn’t work in this case.
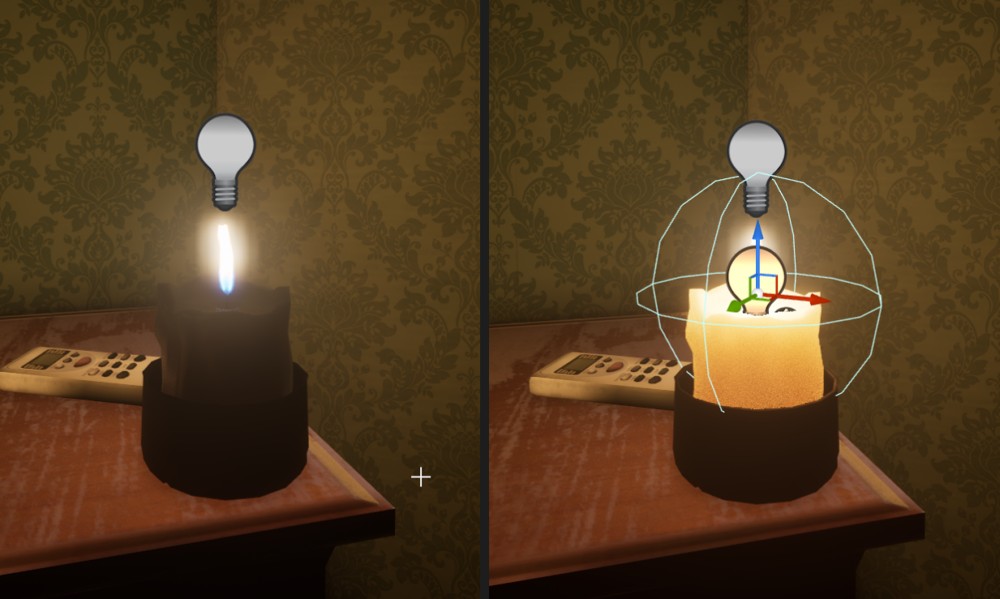
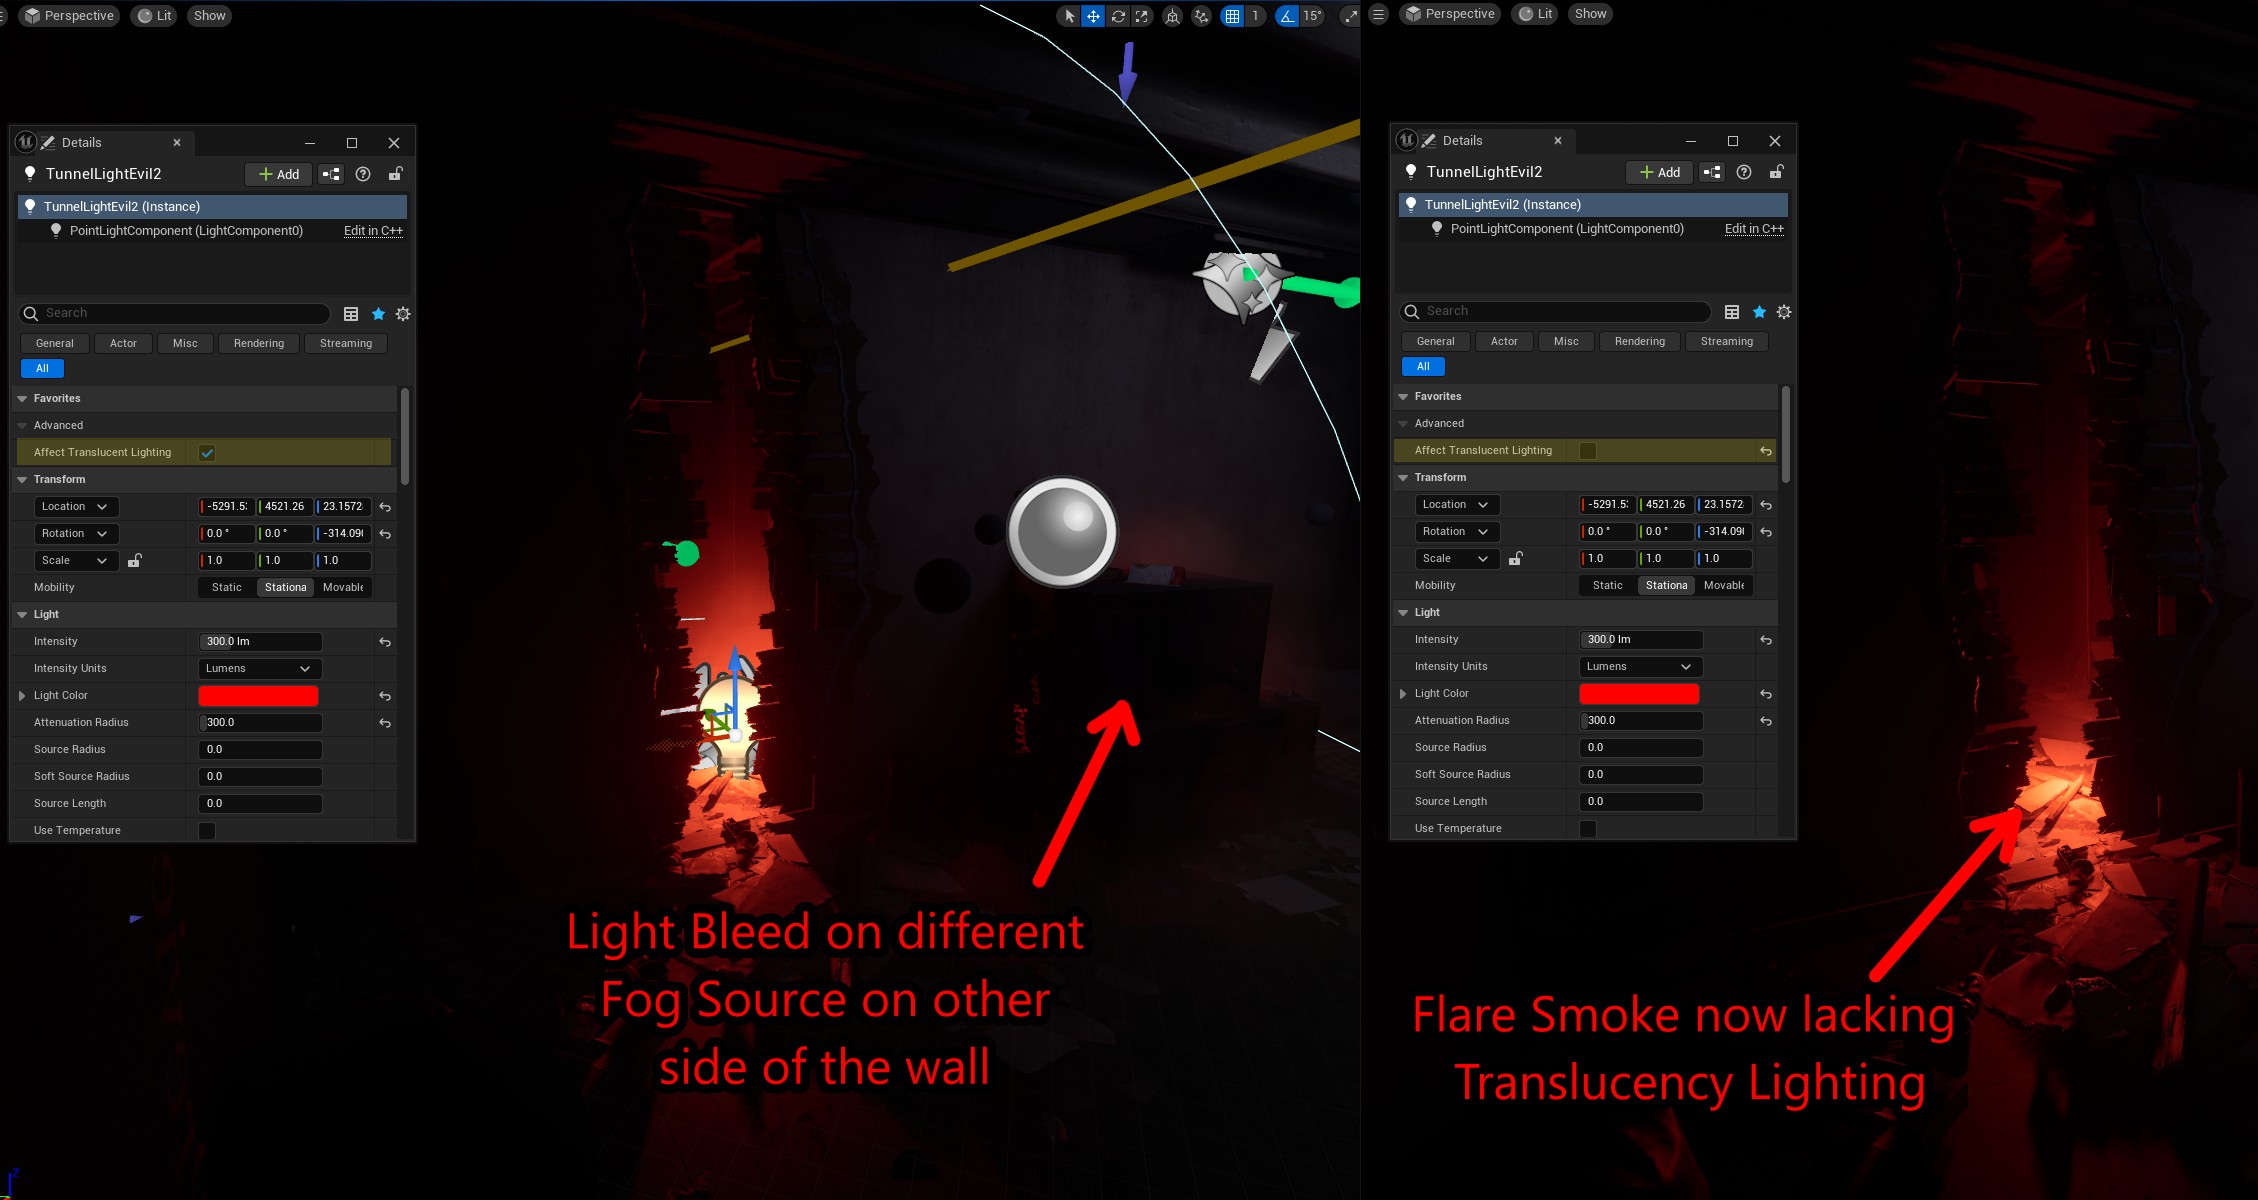
Translucency Lighting can also be a problem and bleed through meshes on materials that receive it if the radius is too large. It also requires a Stationary or Movable Lights to utilize the feature. The in scenario below, I was getting red light bleeding onto a secondary fog VFX in a different room. Disabling Translucency Lighting meant that the VFX for the roadflare smoke would not receive the lighting and thus look very thin and not actually smokey. The solution was to create a secondary Movable Light with a much tighter radius to affect the important areas only.
 Problem
 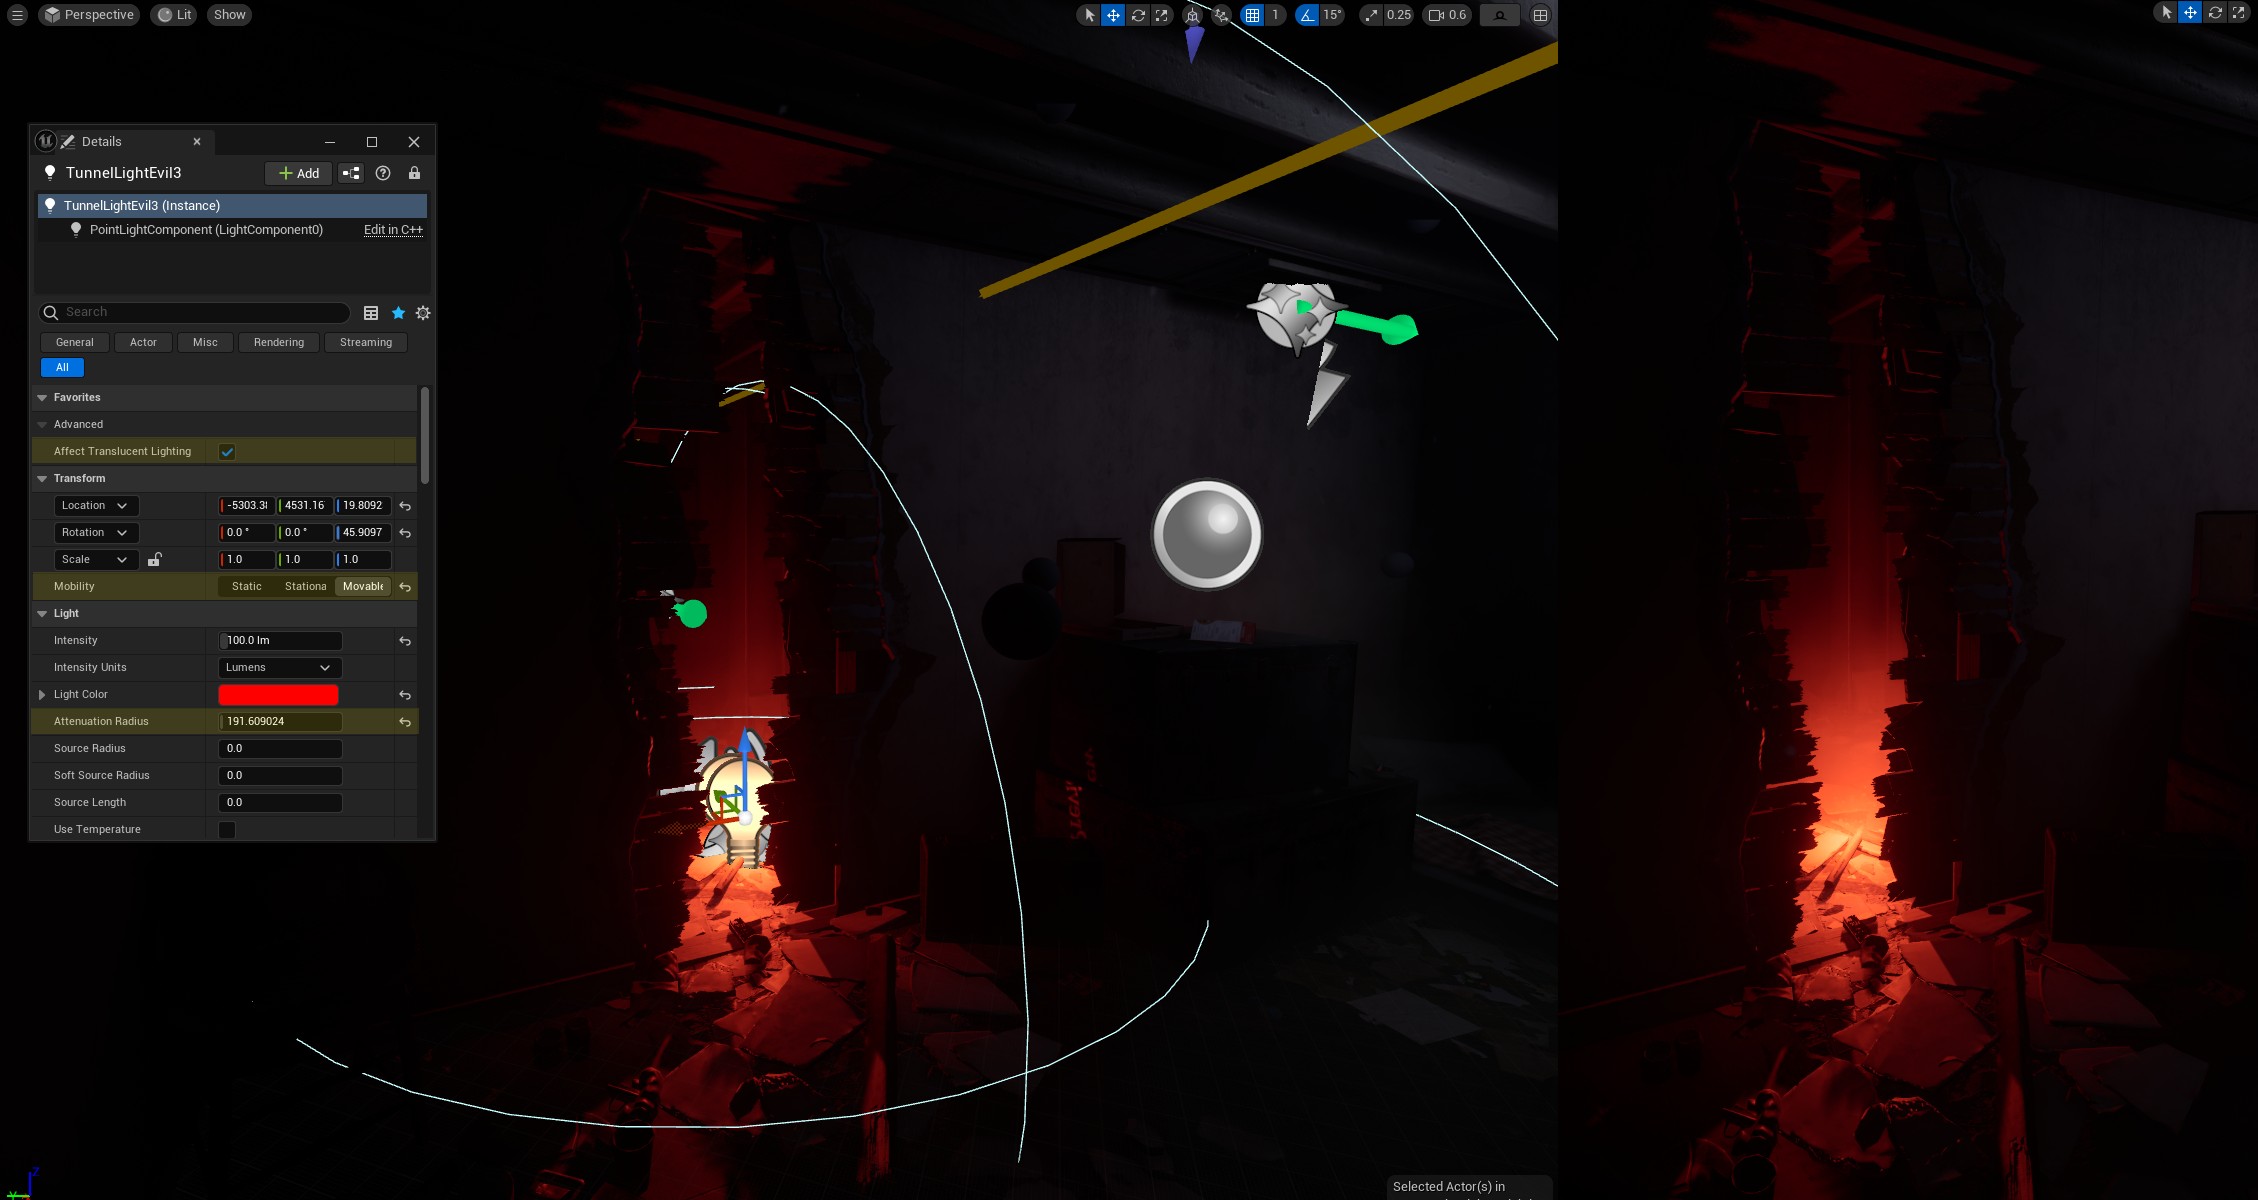 Solution
Static Meshes that need to cast dynamic shadows based on the animated translucent materials also need to be Movable objects as well. This was the case for the glass in the scene below to cast shadows from the rain drops in the material.
Conclusion
I’m constantly learning new things when it comes to lighting and for me it’s an endearing struggle to figure out solutions to these seemingly random problems that emerge.
If you’ve read this far, thanks, and I hope something was useful - if it was please let me know! And if I got something wrong also let me know! I’m also really interested to know if you have encountered any lighting problems that require some non-conventional workarounds or hacks; There’s just something technical yet artistic to the solutions that always entertain me.
With the direction Epic/Unreal is deciding to take lighting and with companies using Unreal deciding to use their own Lighting engines, Static Lighting might end up becoming a lost art form. I would like to share as much knowledge as I can before that happens~
Changelog
1
2
21/11/2025: Original Upload
19/01/2026: Added new info about utilizing Lighting Channels to optimize Dynamic Shadows